Spring Cloud Netflix
概述
Spring Cloud 为开发人员提供了快速构建分布式系统中一些常见模式的工具(例如配置管理,服务发现,断路器,智能路由,微代理,控制总线)。分布式系统的协调导致了样板模式, 使用 Spring Cloud 开发人员可以快速地支持实现这些模式的服务和应用程序。他们将在任何分布式环境中运行良好,包括开发人员自己的笔记本电脑,裸机数据中心,以及 Cloud Foundry 等托管平台。
由于 Spring Cloud Netflix 项目已进入维护期。这意味着继续使用它再也没有新功能福利了;故我们采用 Spring Cloud Alibaba 方案来替代 Spring Cloud Netflix。
项目进入维护期
【官方新闻】Spring Cloud Greenwich.RC1 available now
2018 年 12 月 12 日,Netflix 宣布 Spring Cloud Netflix 系列技术栈进入维护模式(不再添加新特性)
最近,Netflix 宣布 Hystrix 正在进入维护模式。自 2016 年以来,Ribbon 已处于类似状态。虽然 Hystrix 和 Ribbon 现已处于维护模式,但它们仍然在 Netflix 大规模部署。
Hystrix Dashboard 和 Turbine 已被 Atlas 取代。这些项目的最后一次提交分别是 2 年前和 4 年前。Zuul1 和 Archaius1 都被后来不兼容的版本所取代。
以下 Spring Cloud Netflix 模块和相应的 Starter 将进入维护模式:
- spring-cloud-netflix-archaius
- spring-cloud-netflix-hystrix-contract
- spring-cloud-netflix-hystrix-dashboard
- spring-cloud-netflix-hystrix-stream
- spring-cloud-netflix-hystrix
- spring-cloud-netflix-ribbon
- spring-cloud-netflix-turbine-stream
- spring-cloud-netflix-turbine
- spring-cloud-netflix-zuul
什么是维护模式
将模块置于维护模式,意味着 Spring Cloud 团队将不会再向模块添加新功能。我们将修复 block 级别的 bug 以及安全问题,我们也会考虑并审查社区的小型 pull request。
替代品
我们建议对这些模块提供的功能进行以下替换
| CURRENT | REPLACEMENT |
|---|---|
| Hystrix | Resilience4j |
| Hystrix Dashboard / Turbine | Micrometer + Monitoring System |
| Ribbon | Spring Cloud Loadbalancer |
| Zuul 1 | Spring Cloud Gateway |
| Archaius 1 | Spring Boot external config + Spring Cloud Config |
附:扩展阅读
Netflix Concurrency Limits
并发限制模块,它是 Netflix 开源的限流器项目,Spring Cloud 在 Greenwich 版本中引入 spring-cloud-netflix-concurrency-limits
Archaius 1
有些人对它可能比较陌生,也是 Netflix 公司开源项目,基于 Java 的配置管理类库(apache common configuration 类库的扩展),主要用于多配置存储的动态获取。它主要的特性:
- 动态类型化属性
- 高效和线程安全的配置操作
- 配置改变时的回调机制
- 轮询框架
- JMX,通过Jconsole检查和调用操作属性
- 组合配置
Resilience4j
目前还中孵化中,Spring 可能是要抽象一个断路器的统一规范,让不同的断路器(Hystrix、Resilience4j、Sentinel(阿里开源))选择使用
Micrometer
Spring Boot 2 中的 Spring Boot Actuator 底层用的就是 Micrometer,它是 Pivotal 公司(也就是 Spring 所在的公司)开源的监控门面,类似于监控世界的 Slf4j。Resilience4j 自带整合了 Micrometer;目前还无法判断是否比 Hystrix Dashboard /Turbine 的更强大,更好用。
Spring Cloud Loadbalancer
目前还中孵化中,使用上和 Ribbon 区别不大
Spring Cloud Gateway
Zuul 持续跳票 1 年多,1.x 是一个基于阻塞 IO 的 API Gateway 以及 Servlet;直到 2018 年 5 月,Zuul 2.x(基于 Netty,也是非阻塞的,支持长连接)才发布,但 Spring Cloud 暂时还没有整合计划。Spring Cloud Gateway 比 Zuul 1.x 系列的性能和功能整体要好。
Spring Boot external config + Spring Cloud Config
Netflix 开源的组件(Archaius 1/Ribbon/Hystrix)都没有使用 Spring Boot 的规范(spring-boot-configuration-processor),根本没有 metadata.json 文件,于是这部分配置 IDE 无法给你提示
Spring Cloud Alibaba
概述
2018 年 10 月 31 日的凌晨,这个伟大的日子里,Spring Cloud Alibaba 正式入驻了 Spring Cloud 官方孵化器,并在 Maven 中央库发布了第一个版本。
Spring Cloud for Alibaba 0.2.0 released
The Spring Cloud Alibaba project, consisting of Alibaba’s open-source components and several Alibaba Cloud products, aims to implement and expose well known Spring Framework patterns and abstractions to bring the benefits of Spring Boot and Spring Cloud to Java developers using Alibaba products.
Spring Cloud for Alibaba,它是由一些阿里巴巴的开源组件和云产品组成的。这个项目的目的是为了让大家所熟知的 Spring 框架,其优秀的设计模式和抽象理念,以给使用阿里巴巴产品的 Java 开发者带来使用 Spring Boot 和 Spring Cloud 的更多便利。
Spring Cloud Alibaba 致力于提供微服务开发的一站式解决方案。此项目包含开发分布式应用微服务的必需组件,方便开发者通过 Spring Cloud 编程模型轻松使用这些组件来开发分布式应用服务。
依托 Spring Cloud Alibaba,您只需要添加一些注解和少量配置,就可以将 Spring Cloud 应用接入阿里微服务解决方案,通过阿里中间件来迅速搭建分布式应用系统。
主要功能
- 服务限流降级: 默认支持 Servlet、Feign、RestTemplate、Dubbo 和 RocketMQ 限流降级功能的接入,可以在运行时通过控制台实时修改限流降级规则,还支持查看限流降级 Metrics 监控。
- 服务注册与发现: 适配 Spring Cloud 服务注册与发现标准,默认集成了 Ribbon 的支持。
- 分布式配置管理: 支持分布式系统中的外部化配置,配置更改时自动刷新。
- 消息驱动能力: 基于 Spring Cloud Stream 为微服务应用构建消息驱动能力。
- 阿里云对象存储: 阿里云提供的海量、安全、低成本、高可靠的云存储服务。支持在任何应用、任何时间、任何地点存储和访问任意类型的数据。
- 分布式任务调度: 提供秒级、精准、高可靠、高可用的定时(基于 Cron 表达式)任务调度服务。同时提供分布式的任务执行模型,如网格任务。网格任务支持海量子任务均匀分配到所有 Worker(schedulerx-client)上执行。
组件
- Sentinel: 把流量作为切入点,从流量控制、熔断降级、系统负载保护等多个维度保护服务的稳定性。
- Nacos: 一个更易于构建云原生应用的动态服务发现、配置管理和服务管理平台。
- RocketMQ: 一款开源的分布式消息系统,基于高可用分布式集群技术,提供低延时的、高可靠的消息发布与订阅服务。
- Dubbo: Apache Dubbo™ 是一款高性能 Java RPC 框架。
- Seata: 阿里巴巴开源产品,一个易于使用的高性能微服务分布式事务解决方案。
- Alibaba Cloud ACM: 一款在分布式架构环境中对应用配置进行集中管理和推送的应用配置中心产品。
- Alibaba Cloud OSS: 阿里云对象存储服务(Object Storage Service,简称 OSS),是阿里云提供的海量、安全、低成本、高可靠的云存储服务。您可以在任何应用、任何时间、任何地点存储和访问任意类型的数据。
- Alibaba Cloud SchedulerX: 阿里中间件团队开发的一款分布式任务调度产品,提供秒级、精准、高可靠、高可用的定时(基于 Cron 表达式)任务调度服务。
- Alibaba Cloud SMS: 覆盖全球的短信服务,友好、高效、智能的互联化通讯能力,帮助企业迅速搭建客户触达通道。
更新包名和 Maven 坐标
接到阿里官方通知在 2019 年 7 月 4 日修改相关包名和 Maven 坐标,请参考 Update package name & maven coordinates ,由于视频录制于 2019 年 6 月 28 日,故所使用的包名和坐标依然沿用原先的 org.springframework.cloud,后面的视频会改用最新的标准,看到这里的小伙伴可以尝试使用新坐标。
包名修改
包名前缀由 org.springframework.cloud.alibaba 变更为 com.alibaba.cloud
Maven 坐标修改
bom 由 spring-cloud-alibaba-dependencies 变更为 alibaba-spring-cloud-dependencies
maven groupid 由 org.springframework.cloud 变更为 com.alibaba.cloud
Spring Cloud Alibaba
| 修改前 | 修改后 | |
|---|---|---|
| sentinel starter | spring-cloud-starter-alibaba-sentinel | alibaba-sentinel-spring-cloud-starter |
| nacos config starter | spring-cloud-starter-alibaba-nacos-config | alibaba-nacos-config-spring-cloud-starter |
| nacos discovery starter | spring-cloud-starter-alibaba-nacos-discovery | alibaba-nacos-discovery-spring-cloud-starter |
| seata starter | spring-cloud-starter-alibaba-seata | alibaba-seata-spring-cloud-starter |
| dubbo starter | spring-cloud-starter-dubbo | dubbo-spring-cloud-starter |
| rocketmq binder starter | spring-cloud-starter-stream-rocketmq | rocketmq-stream-spring-cloud-starter |
| rocketmq bus module name | spring-cloud-starter-bus-rocketmq | rocketmq-bus-spring-cloud-starter |
| sentinel module name | spring-cloud-alibaba-sentinel | alibaba-sentinel-spring-cloud |
| sentinel datasource module name | spring-cloud-alibaba-sentinel-datasource | alibaba-sentinel-datasource-spring-cloud |
| sentinel gateway module name | spring-cloud-alibaba-sentinel-gateway | alibaba-sentinel-gateway-spring-cloud |
| nacos config module name | spring-cloud-alibaba-nacos-config | alibaba-nacos-config-spring-cloud |
| nacos discovery module name | spring-cloud-alibaba-nacos-discovery | alibaba-nacos-discovery-spring-cloud |
| dubbo module name | spring-cloud-alibaba-dubbo | alibaba-dubbo-spring-cloud |
| seata module name | spring-cloud-alibaba-seata | alibaba-seata-spring-cloud |
| rocketmq binder module name | spring-cloud-stream-binder-rocketmq | rocketmq-spring-cloud-stream-binder |
Spring Cloud Alicloud(商业化组件)
| 修改前 | 修改后 | |
|---|---|---|
| oss starter | spring-cloud-alicloud-oss | alicloud-oss-spring-cloud |
| sms starter | spring-cloud-alicloud-sms | alicloud-sms-spring-cloud |
| schedulerx starter | spring-cloud-alicloud-schedulerx | alicloud-schedulerx-spring-cloud |
| ans starter | spring-cloud-alicloud-ans | alicloud-ans-spring-cloud |
| acm starter | spring-cloud-alicloud-acm | alicloud-acm-spring-cloud |
| oss module name | spring-cloud-alicloud-oss | alicloud-oss-spring-cloud |
| sms module name | spring-cloud-alicloud-sms | alicloud-sms-spring-cloud |
| schedulerx module name | spring-cloud-alicloud-schedulerx | alicloud-schedulerx-spring-cloud |
| ans module name | spring-cloud-alicloud-ans | alicloud-ans-spring-cloud |
| acm module name | spring-cloud-alicloud-acm | alicloud-acm-spring-cloud |
创建项目工程
POM
<?xml version="1.0" encoding="UTF-8"?>
<project xmlns="http://maven.apache.org/POM/4.0.0" xmlns:xsi="http://www.w3.org/2001/XMLSchema-instance"
         xsi:schemaLocation="http://maven.apache.org/POM/4.0.0 http://maven.apache.org/xsd/maven-4.0.0.xsd">
    <modelVersion>4.0.0</modelVersion>

    <parent>
        <groupId>org.springframework.boot</groupId>
        <artifactId>spring-boot-starter-parent</artifactId>
        <version>2.1.6.RELEASE</version>
        <relativePath/> <!-- lookup parent from repository -->
    </parent>

    <groupId>com.funtl</groupId>
    <artifactId>hello-spring-cloud-alibaba</artifactId>
    <version>0.0.1-SNAPSHOT</version>
    <packaging>pom</packaging>
    <url>http://www.funtl.com</url>

    <modules>
        <module>hello-spring-cloud-alibaba-dependencies</module>
    </modules>

    <properties>
        <java.version>1.8</java.version>
        <maven.compiler.source>${java.version}</maven.compiler.source>
        <maven.compiler.target>${java.version}</maven.compiler.target>
        <project.build.sourceEncoding>UTF-8</project.build.sourceEncoding>
        <project.reporting.outputEncoding>UTF-8</project.reporting.outputEncoding>
    </properties>

    <licenses>
        <license>
            <name>Apache 2.0</name>
            <url>https://www.apache.org/licenses/LICENSE-2.0.txt</url>
        </license>
    </licenses>

    <developers>
        <developer>
            <id>liwemin</id>
            <name>Lusifer Lee</name>
            <email>lee.lusifer@gmail.com</email>
        </developer>
    </developers>

    <dependencyManagement>
        <dependencies>
            <dependency>
                <groupId>com.funtl</groupId>
                <artifactId>hello-spring-cloud-alibaba-dependencies</artifactId>
                <version>${project.version}</version>
                <type>pom</type>
                <scope>import</scope>
            </dependency>
        </dependencies>
    </dependencyManagement>

    <profiles>
        <profile>
            <id>default</id>
            <activation>
                <activeByDefault>true</activeByDefault>
            </activation>
            <properties>
                <spring-javaformat.version>0.0.12</spring-javaformat.version>
            </properties>
            <build>
                <plugins>
                    <plugin>
                        <groupId>io.spring.javaformat</groupId>
                        <artifactId>spring-javaformat-maven-plugin</artifactId>
                        <version>${spring-javaformat.version}</version>
                    </plugin>
                    <plugin>
                        <groupId>org.apache.maven.plugins</groupId>
                        <artifactId>maven-surefire-plugin</artifactId>
                        <configuration>
                            <includes>
                                <include>**/*Tests.java</include>
                            </includes>
                            <excludes>
                                <exclude>**/Abstract*.java</exclude>
                            </excludes>
                            <systemPropertyVariables>
                                <java.security.egd>file:/dev/./urandom</java.security.egd>
                                <java.awt.headless>true</java.awt.headless>
                            </systemPropertyVariables>
                        </configuration>
                    </plugin>
                    <plugin>
                        <groupId>org.apache.maven.plugins</groupId>
                        <artifactId>maven-enforcer-plugin</artifactId>
                        <executions>
                            <execution>
                                <id>enforce-rules</id>
                                <goals>
                                    <goal>enforce</goal>
                                </goals>
                                <configuration>
                                    <rules>
                                        <bannedDependencies>
                                            <excludes>
                                                <exclude>commons-logging:*:*</exclude>
                                            </excludes>
                                            <searchTransitive>true</searchTransitive>
                                        </bannedDependencies>
                                    </rules>
                                    <fail>true</fail>
                                </configuration>
                            </execution>
                        </executions>
                    </plugin>
                    <plugin>
                        <groupId>org.apache.maven.plugins</groupId>
                        <artifactId>maven-install-plugin</artifactId>
                        <configuration>
                            <skip>true</skip>
                        </configuration>
                    </plugin>
                    <plugin>
                        <groupId>org.apache.maven.plugins</groupId>
                        <artifactId>maven-javadoc-plugin</artifactId>
                        <configuration>
                            <skip>true</skip>
                        </configuration>
                        <inherited>true</inherited>
                    </plugin>
                </plugins>
            </build>
        </profile>
    </profiles>

    <repositories>
        <repository>
            <id>spring-milestone</id>
            <name>Spring Milestone</name>
            <url>https://repo.spring.io/milestone</url>
            <snapshots>
                <enabled>false</enabled>
            </snapshots>
        </repository>
        <repository>
            <id>spring-snapshot</id>
            <name>Spring Snapshot</name>
            <url>https://repo.spring.io/snapshot</url>
            <snapshots>
                <enabled>true</enabled>
            </snapshots>
        </repository>
    </repositories>

    <pluginRepositories>
        <pluginRepository>
            <id>spring-milestone</id>
            <name>Spring Milestone</name>
            <url>https://repo.spring.io/milestone</url>
            <snapshots>
                <enabled>false</enabled>
            </snapshots>
        </pluginRepository>
        <pluginRepository>
            <id>spring-snapshot</id>
            <name>Spring Snapshot</name>
            <url>https://repo.spring.io/snapshot</url>
            <snapshots>
                <enabled>true</enabled>
            </snapshots>
        </pluginRepository>
    </pluginRepositories>
</project>
创建统一的依赖管理
POM
<?xml version="1.0" encoding="UTF-8"?>
<project xmlns="http://maven.apache.org/POM/4.0.0" xmlns:xsi="http://www.w3.org/2001/XMLSchema-instance"
         xsi:schemaLocation="http://maven.apache.org/POM/4.0.0 http://maven.apache.org/xsd/maven-4.0.0.xsd">
    <modelVersion>4.0.0</modelVersion>

    <groupId>com.funtl</groupId>
    <artifactId>hello-spring-cloud-alibaba-dependencies</artifactId>
    <version>0.0.1-SNAPSHOT</version>
    <packaging>pom</packaging>
    <url>http://www.funtl.com</url>

    <properties>
        <spring-cloud.version>Greenwich.RELEASE</spring-cloud.version>
        <spring-cloud-alibaba.verion>0.9.0.RELEASE</spring-cloud-alibaba.verion>
    </properties>

    <licenses>
        <license>
            <name>Apache 2.0</name>
            <url>https://www.apache.org/licenses/LICENSE-2.0.txt</url>
        </license>
    </licenses>

    <developers>
        <developer>
            <id>liwemin</id>
            <name>Lusifer Lee</name>
            <email>lee.lusifer@gmail.com</email>
        </developer>
    </developers>

    <dependencyManagement>
        <dependencies>
            <dependency>
                <groupId>org.springframework.cloud</groupId>
                <artifactId>spring-cloud-dependencies</artifactId>
                <version>${spring-cloud.version}</version>
                <type>pom</type>
                <scope>import</scope>
            </dependency>
            <dependency>
                <groupId>org.springframework.cloud</groupId>
                <artifactId>spring-cloud-alibaba-dependencies</artifactId>
                <version>${spring-cloud-alibaba.verion}</version>
                <type>pom</type>
                <scope>import</scope>
            </dependency>
        </dependencies>
    </dependencyManagement>

    <repositories>
        <repository>
            <id>spring-milestone</id>
            <name>Spring Milestone</name>
            <url>https://repo.spring.io/milestone</url>
            <snapshots>
                <enabled>false</enabled>
            </snapshots>
        </repository>
        <repository>
            <id>spring-snapshot</id>
            <name>Spring Snapshot</name>
            <url>https://repo.spring.io/snapshot</url>
            <snapshots>
                <enabled>true</enabled>
            </snapshots>
        </repository>
    </repositories>

    <pluginRepositories>
        <pluginRepository>
            <id>spring-milestone</id>
            <name>Spring Milestone</name>
            <url>https://repo.spring.io/milestone</url>
            <snapshots>
                <enabled>false</enabled>
            </snapshots>
        </pluginRepository>
        <pluginRepository>
            <id>spring-snapshot</id>
            <name>Spring Snapshot</name>
            <url>https://repo.spring.io/snapshot</url>
            <snapshots>
                <enabled>true</enabled>
            </snapshots>
        </pluginRepository>
    </pluginRepositories>

</project>
Nacos 注册中心
概述
Nacos 致力于帮助您发现、配置和管理微服务。Nacos 提供了一组简单易用的特性集,帮助您快速实现动态服务发现、服务配置、服务元数据及流量管理。
Nacos 帮助您更敏捷和容易地构建、交付和管理微服务平台。 Nacos 是构建以 “服务” 为中心的现代应用架构 (例如微服务范式、云原生范式) 的服务基础设施。
关键特性
服务发现和服务健康监测
Nacos 支持基于 DNS 和基于 RPC 的服务发现。服务提供者使用 原生 SDK、OpenAPI、或一个 独立的 Agent TODO 注册 Service 后,服务消费者可以使用 DNS TODO 或 HTTP&API 查找和发现服务。
Nacos 提供对服务的实时的健康检查,阻止向不健康的主机或服务实例发送请求。Nacos 支持传输层 (PING 或 TCP) 和应用层 (如 HTTP、MySQL、用户自定义)的健康检查。 对于复杂的云环境和网络拓扑环境中(如 VPC、边缘网络等)服务的健康检查,Nacos 提供了 agent 上报模式和服务端主动检测 2 种健康检查模式。Nacos 还提供了统一的健康检查仪表盘,帮助您根据健康状态管理服务的可用性及流量。
动态配置服务
动态配置服务可以让您以中心化、外部化和动态化的方式管理所有环境的应用配置和服务配置。动态配置消除了配置变更时重新部署应用和服务的需要,让配置管理变得更加高效和敏捷。配置中心化管理让实现无状态服务变得更简单,让服务按需弹性扩展变得更容易。
Nacos 提供了一个简洁易用的 UI 帮助您管理所有的服务和应用的配置。Nacos 还提供包括配置版本跟踪、金丝雀发布、一键回滚配置以及客户端配置更新状态跟踪在内的一系列开箱即用的配置管理特性,帮助您更安全地在生产环境中管理配置变更和降低配置变更带来的风险。
动态 DNS 服务
动态 DNS 服务支持权重路由,让您更容易地实现中间层负载均衡、更灵活的路由策略、流量控制以及数据中心内网的简单 DNS 解析服务。动态 DNS 服务还能让您更容易地实现以 DNS 协议为基础的服务发现,以帮助您消除耦合到厂商私有服务发现 API 上的风险。
Nacos 提供了一些简单的 DNS APIs TODO 帮助您管理服务的关联域名和可用的 IP:PORT 列表.
服务及其元数据管理
Nacos 能让您从微服务平台建设的视角管理数据中心的所有服务及元数据,包括管理服务的描述、生命周期、服务的静态依赖分析、服务的健康状态、服务的流量管理、路由及安全策略、服务的 SLA 以及最首要的 metrics 统计数据。
Nacos 地图

- 特性大图:要从功能特性,非功能特性,全面介绍我们要解的问题域的特性诉求
- 架构大图:通过清晰架构,让您快速进入 Nacos 世界
- 业务大图:利用当前特性可以支持的业务场景,及其最佳实践
- 生态大图:系统梳理 Nacos 和主流技术生态的关系
- 优势大图:展示 Nacos 核心竞争力
- 战略大图:要从战略到战术层面讲 Nacos 的宏观优势
Nacos 架构
基本架构及概念

服务 (Service)
| 服务是指一个或一组软件功能(例如特定信息的检索或一组操作的执行),其目的是不同的客户端可以为不同的目的重用(例如通过跨进程的网络调用)。Nacos 支持主流的服务生态,如 Kubernetes Service、gRPC | Dubbo RPC Service 或者 Spring Cloud RESTful Service. |
服务注册中心 (Service Registry)
服务注册中心,它是服务,其实例及元数据的数据库。服务实例在启动时注册到服务注册表,并在关闭时注销。服务和路由器的客户端查询服务注册表以查找服务的可用实例。服务注册中心可能会调用服务实例的健康检查 API 来验证它是否能够处理请求。
服务元数据 (Service Metadata)
服务元数据是指包括服务端点 (endpoints)、服务标签、服务版本号、服务实例权重、路由规则、安全策略等描述服务的数据
服务提供方 (Service Provider)
是指提供可复用和可调用服务的应用方
服务消费方 (Service Consumer)
是指会发起对某个服务调用的应用方
配置 (Configuration)
在系统开发过程中通常会将一些需要变更的参数、变量等从代码中分离出来独立管理,以独立的配置文件的形式存在。目的是让静态的系统工件或者交付物(如 WAR,JAR 包等)更好地和实际的物理运行环境进行适配。配置管理一般包含在系统部署的过程中,由系统管理员或者运维人员完成这个步骤。配置变更是调整系统运行时的行为的有效手段之一。
配置管理 (Configuration Management)
在数据中心中,系统中所有配置的编辑、存储、分发、变更管理、历史版本管理、变更审计等所有与配置相关的活动统称为配置管理。
名字服务 (Naming Service)
提供分布式系统中所有对象 (Object)、实体 (Entity) 的 “名字” 到关联的元数据之间的映射管理服务,例如 ServiceName -> Endpoints Info, Distributed Lock Name -> Lock Owner/Status Info, DNS Domain Name -> IP List, 服务发现和 DNS 就是名字服务的 2 大场景。
配置服务 (Configuration Service)
在服务或者应用运行过程中,提供动态配置或者元数据以及配置管理的服务提供者。
逻辑架构及其组件介绍
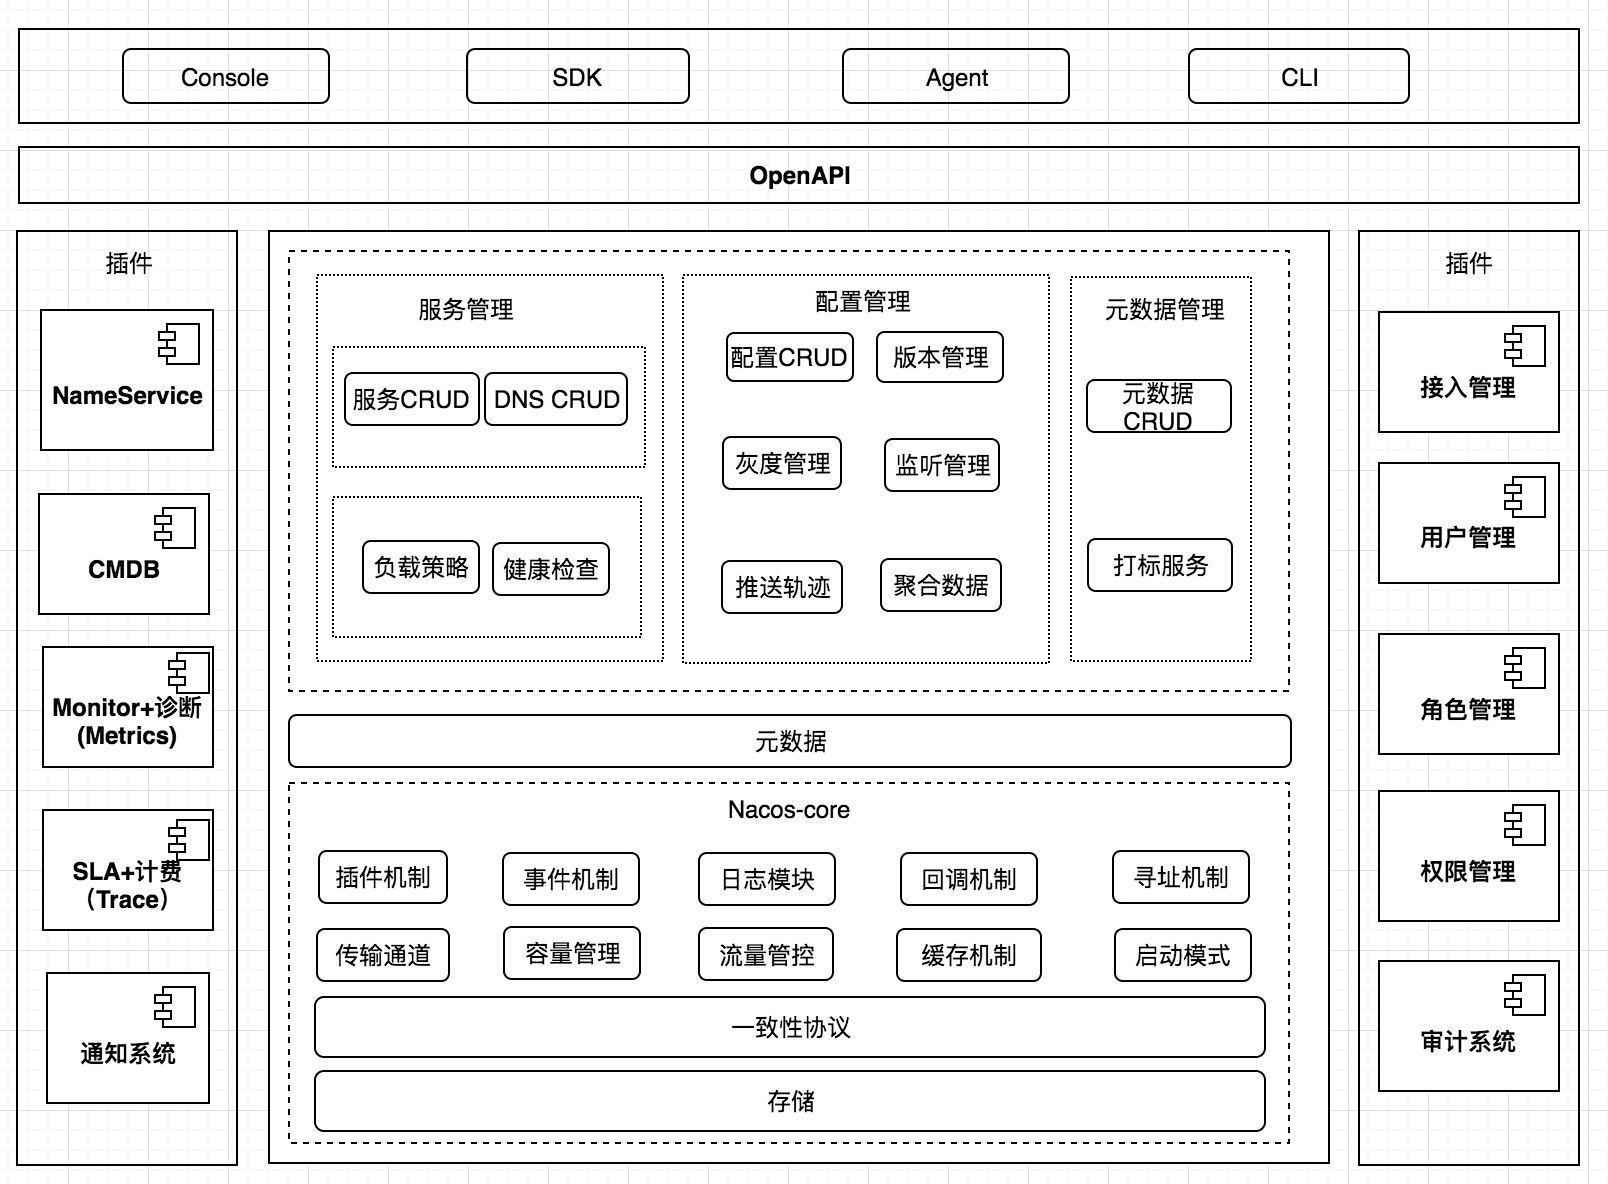
- 服务管理: 实现服务 CRUD,域名 CRUD,服务健康状态检查,服务权重管理等功能
- 配置管理: 实现配置管 CRUD,版本管理,灰度管理,监听管理,推送轨迹,聚合数据等功能
- 元数据管理: 提供元数据 CURD 和打标能力
- 插件机制: 实现三个模块可分可合能力,实现扩展点 SPI 机制
- 事件机制: 实现异步化事件通知,sdk 数据变化异步通知等逻辑
- 日志模块: 管理日志分类,日志级别,日志可移植性(尤其避免冲突),日志格式,异常码 + 帮助文档
- 回调机制: sdk 通知数据,通过统一的模式回调用户处理。接口和数据结构需要具备可扩展性
- 寻址模式: 解决 ip,域名,nameserver、广播等多种寻址模式,需要可扩展
- 推送通道: 解决 server 与存储、server 间、server 与 sdk 间推送性能问题
- 容量管理: 管理每个租户,分组下的容量,防止存储被写爆,影响服务可用性
- 流量管理: 按照租户,分组等多个维度对请求频率,长链接个数,报文大小,请求流控进行控制
- 缓存机制: 容灾目录,本地缓存,server 缓存机制。容灾目录使用需要工具
- 启动模式: 按照单机模式,配置模式,服务模式,dns 模式,或者 all 模式,启动不同的程序 + UI
- 一致性协议: 解决不同数据,不同一致性要求情况下,不同一致性机制
- 存储模块: 解决数据持久化、非持久化存储,解决数据分片问题
- Nameserver: 解决 namespace 到 clusterid 的路由问题,解决用户环境与 nacos 物理环境映射问题
- CMDB: 解决元数据存储,与三方 cmdb 系统对接问题,解决应用,人,资源关系
- Metrics: 暴露标准 metrics 数据,方便与三方监控系统打通
- Trace: 暴露标准 trace,方便与 SLA 系统打通,日志白平化,推送轨迹等能力,并且可以和计量计费系统打通
- 接入管理: 相当于阿里云开通服务,分配身份、容量、权限过程
- 用户管理: 解决用户管理,登录,sso 等问题
- 权限管理: 解决身份识别,访问控制,角色管理等问题
- 审计系统: 扩展接口方便与不同公司审计系统打通
- 通知系统: 核心数据变更,或者操作,方便通过 SMS 系统打通,通知到对应人数据变更
- OpenAPI: 暴露标准 Rest 风格 HTTP 接口,简单易用,方便多语言集成
- Console: 易用控制台,做服务管理、配置管理等操作
- SDK: 多语言 sdk
- Agent: dns-f 类似模式,或者与 mesh 等方案集成
- CLI: 命令行对产品进行轻量化管理,像 git 一样好用
Nacos 安装
概述
Nacos 官方提供了 Docker 版本,方便我们快速部署,操作步骤如下
操作步骤
Clone 项目
git clone https://github.com/nacos-group/nacos-docker.git
cd nacos-docker
单机模式
docker-compose -f example/standalone-mysql.yaml up -d
查看日志
docker-compose -f example/standalone-mysql.yaml logs -f
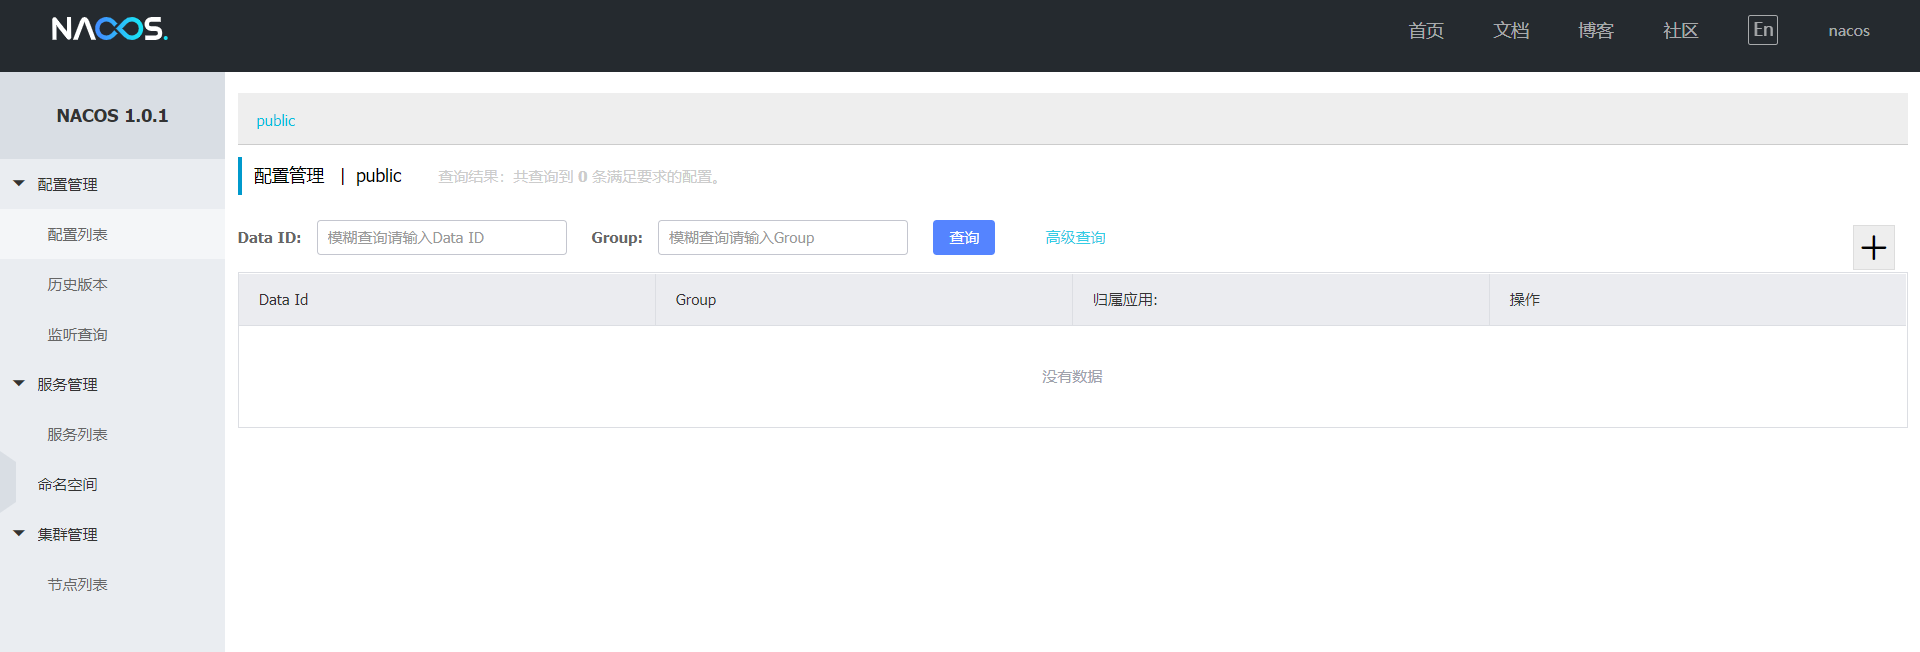
Nacos 控制台
http://192.168.141.132:8848/nacos
登录
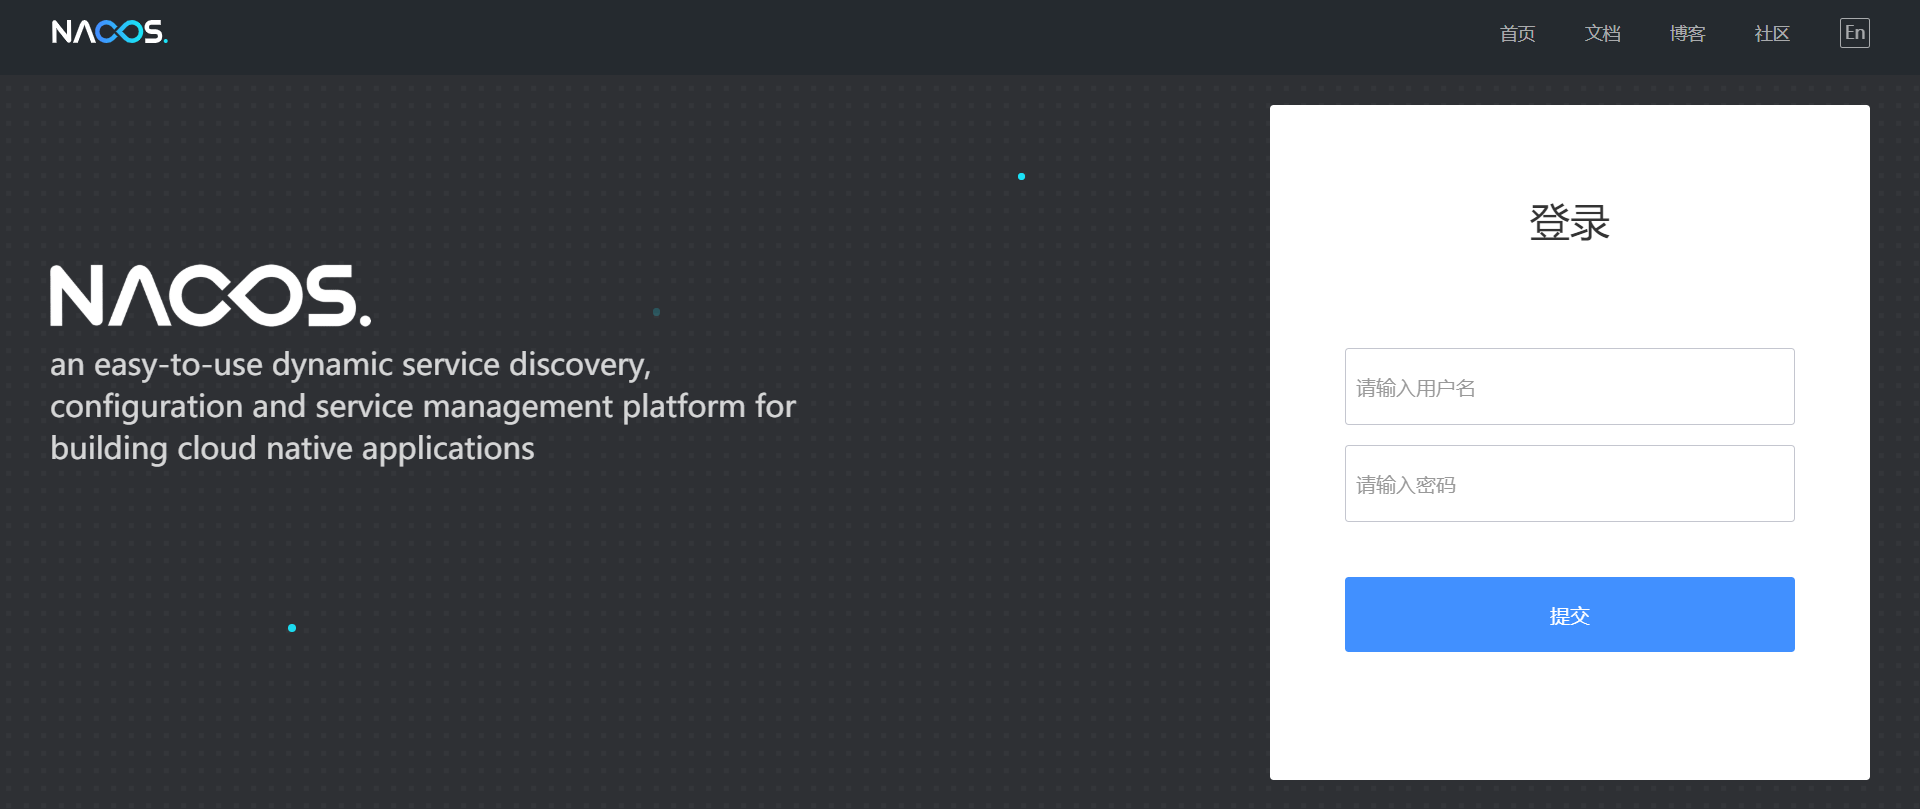
- 账号: nacos
- 密码: nacos
访问
Nacos 服务注册与发现
概述
服务注册中心: 存储服务实例和服务负载均衡策略的数据库
本节通过实现一个简单的 echo service 演示如何在您的 Spring Cloud 项目中启用 Nacos 的服务发现功能,如下图示:

服务提供者
服务提供方: 是指提供可复用和可调用服务的应用方
POM
创建一个名为 hello-spring-cloud-alibaba-provider 的服务提供者项目,pom.xml 配置如下:
<?xml version="1.0" encoding="UTF-8"?>
<project xmlns="http://maven.apache.org/POM/4.0.0" xmlns:xsi="http://www.w3.org/2001/XMLSchema-instance"
         xsi:schemaLocation="http://maven.apache.org/POM/4.0.0 http://maven.apache.org/xsd/maven-4.0.0.xsd">
    <modelVersion>4.0.0</modelVersion>

    <parent>
        <groupId>com.funtl</groupId>
        <artifactId>hello-spring-cloud-alibaba</artifactId>
        <version>0.0.1-SNAPSHOT</version>
        <relativePath>../pom.xml</relativePath>
    </parent>

    <artifactId>hello-spring-cloud-alibaba-provider</artifactId>
    <packaging>jar</packaging>
    <url>http://www.funtl.com</url>
    <inceptionYear>2018-Now</inceptionYear>

    <licenses>
        <license>
            <name>Apache 2.0</name>
            <url>https://www.apache.org/licenses/LICENSE-2.0.txt</url>
        </license>
    </licenses>

    <developers>
        <developer>
            <id>liwemin</id>
            <name>Lusifer Lee</name>
            <email>lee.lusifer@gmail.com</email>
        </developer>
    </developers>

    <dependencies>
        <!-- Spring Boot Begin -->
        <dependency>
            <groupId>org.springframework.boot</groupId>
            <artifactId>spring-boot-starter-web</artifactId>
        </dependency>
        <dependency>
            <groupId>org.springframework.boot</groupId>
            <artifactId>spring-boot-starter-actuator</artifactId>
        </dependency>
        <dependency>
            <groupId>org.springframework.boot</groupId>
            <artifactId>spring-boot-starter-test</artifactId>
            <scope>test</scope>
        </dependency>
        <!-- Spring Boot End -->

        <!-- Spring Cloud Begin -->
        <dependency>
            <groupId>org.springframework.cloud</groupId>
            <artifactId>spring-cloud-starter-alibaba-nacos-discovery</artifactId>
        </dependency>
        <!-- Spring Cloud End -->
    </dependencies>

    <build>
        <plugins>
            <plugin>
                <groupId>org.springframework.boot</groupId>
                <artifactId>spring-boot-maven-plugin</artifactId>
                <configuration>
                    <mainClass>com.funtl.spring.cloud.alibaba.provider.ProviderApplication</mainClass>
                </configuration>
            </plugin>
        </plugins>
    </build>
</project>
application.yml
在 application.yml 中配置 Nacos Server 的地址
spring:
  application:
    # 服务名
    name: service-provider
  cloud:
    nacos:
      discovery:
        # 服务注册中心
        server-addr: 192.168.141.132:8848

server:
  # 服务端口
  port: 8070

management:
  # 端点检查(健康检查)
  endpoints:
    web:
      exposure:
        include: "*"
Application
通过 Spring Cloud 原生注解 @EnableDiscoveryClient 开启服务注册发现功能
package com.funtl.spring.cloud.alibaba.provider;

import org.springframework.boot.SpringApplication;
import org.springframework.boot.autoconfigure.SpringBootApplication;
import org.springframework.cloud.client.discovery.EnableDiscoveryClient;

@SpringBootApplication
@EnableDiscoveryClient
public class ProviderApplication {
    public static void main(String[] args) {
        SpringApplication.run(ProviderApplication.class, args);
    }
}
Controller
编写一个 RestController 提供 RESTFul API 用于测试提供者
package com.funtl.spring.cloud.alibaba.provider.controller;

import org.springframework.web.bind.annotation.GetMapping;
import org.springframework.web.bind.annotation.PathVariable;
import org.springframework.web.bind.annotation.RestController;

@RestController
public class EchoController {

    @GetMapping(value = "/echo/{string}")
    public String echo(@PathVariable String string) {
        return "Hello Nacos Provider " + string;
    }
}
验证是否成功
通过浏览器访问 http://192.168.141.132:8848/nacos Nacos Server 网址

你会发现一个服务已经注册在服务中了,服务名为 service-provider,通过浏览器访问 http://localhost:8070/echo/hi
Hello Nacos Provider hi
服务端点检查
健康检查: 以指定方式检查服务下挂载的实例 (Instance) 的健康度,从而确认该实例 (Instance) 是否能提供服务。根据检查结果,实例 (Instance) 会被判断为健康或不健康。对服务发起解析请求时,不健康的实例 (Instance) 不会返回给客户端。
通过浏览器访问 http://localhost:8070/actuator/nacos-discovery
{
    "subscribe": [
        {
            "jsonFromServer": "",
            "name": "service-provider",
            "groupName": "DEFAULT_GROUP",
            "clusters": null,
            "cacheMillis": 1000,
            "hosts": [],
            "lastRefTime": 0,
            "checksum": "",
            "allIPs": false,
            "key": "service-provider",
            "valid": true,
            "keyEncoded": "service-provider"
        },
        {
            "jsonFromServer": "",
            "name": "service-consumer",
            "groupName": "DEFAULT_GROUP",
            "clusters": null,
            "cacheMillis": 1000,
            "hosts": [],
            "lastRefTime": 0,
            "checksum": "",
            "allIPs": false,
            "key": "service-consumer",
            "valid": true,
            "keyEncoded": "service-consumer"
        }
    ],
    "NacosDiscoveryProperties": {
        "serverAddr": "192.168.141.132:8848",
        "endpoint": "",
        "namespace": "",
        "watchDelay": 30000,
        "logName": "",
        "service": "service-provider",
        "weight": 1,
        "clusterName": "DEFAULT",
        "namingLoadCacheAtStart": "false",
        "metadata": {
            "preserved.register.source": "SPRING_CLOUD"
        },
        "registerEnabled": true,
        "ip": "192.168.141.1",
        "networkInterface": "",
        "port": 8070,
        "secure": false,
        "accessKey": "",
        "secretKey": ""
    }
}
服务消费者
服务消费方: 是指会发起对某个服务调用的应用方
服务消费者的创建与服务提供者大同小异,这里采用最原始的一种方式,即显示的使用 LoadBalanceClient 和 RestTemplate 结合的方式来访问
POM
创建一个名为 hello-spring-cloud-alibaba-consumer 的服务消费者项目,pom.xml 配置如下:
<?xml version="1.0" encoding="UTF-8"?>
<project xmlns="http://maven.apache.org/POM/4.0.0" xmlns:xsi="http://www.w3.org/2001/XMLSchema-instance"
         xsi:schemaLocation="http://maven.apache.org/POM/4.0.0 http://maven.apache.org/xsd/maven-4.0.0.xsd">
    <modelVersion>4.0.0</modelVersion>

    <parent>
        <groupId>com.funtl</groupId>
        <artifactId>hello-spring-cloud-alibaba</artifactId>
        <version>0.0.1-SNAPSHOT</version>
        <relativePath>../pom.xml</relativePath>
    </parent>

    <artifactId>hello-spring-cloud-alibaba-consumer</artifactId>
    <packaging>jar</packaging>
    <url>http://www.funtl.com</url>
    <inceptionYear>2018-Now</inceptionYear>

    <licenses>
        <license>
            <name>Apache 2.0</name>
            <url>https://www.apache.org/licenses/LICENSE-2.0.txt</url>
        </license>
    </licenses>

    <developers>
        <developer>
            <id>liwemin</id>
            <name>Lusifer Lee</name>
            <email>lee.lusifer@gmail.com</email>
        </developer>
    </developers>

    <dependencies>
        <!-- Spring Boot Begin -->
        <dependency>
            <groupId>org.springframework.boot</groupId>
            <artifactId>spring-boot-starter-web</artifactId>
        </dependency>
        <dependency>
            <groupId>org.springframework.boot</groupId>
            <artifactId>spring-boot-starter-actuator</artifactId>
        </dependency>
        <dependency>
            <groupId>org.springframework.boot</groupId>
            <artifactId>spring-boot-starter-test</artifactId>
            <scope>test</scope>
        </dependency>
        <!-- Spring Boot End -->

        <!-- Spring Cloud Begin -->
        <dependency>
            <groupId>org.springframework.cloud</groupId>
            <artifactId>spring-cloud-starter-alibaba-nacos-discovery</artifactId>
        </dependency>
        <!-- Spring Cloud End -->
    </dependencies>

    <build>
        <plugins>
            <plugin>
                <groupId>org.springframework.boot</groupId>
                <artifactId>spring-boot-maven-plugin</artifactId>
                <configuration>
                    <mainClass>com.funtl.spring.cloud.alibaba.consumer.ConsumerApplication</mainClass>
                </configuration>
            </plugin>
        </plugins>
    </build>
</project>
application.yml
在 application.yml 中配置 Nacos Server 的地址
spring:
  application:
    # 服务名
    name: service-consumer
  cloud:
    nacos:
      discovery:
        # 服务注册中心
        server-addr: 192.168.141.132:8848

server:
  # 服务端口
  port: 8080

management:
  # 端点检查(健康检查)
  endpoints:
    web:
      exposure:
        include: "*"
Application
通过 Spring Cloud 原生注解 @EnableDiscoveryClient 开启服务注册发现功能
package com.funtl.spring.cloud.alibaba.consumer;

import org.springframework.boot.SpringApplication;
import org.springframework.boot.autoconfigure.SpringBootApplication;
import org.springframework.cloud.client.discovery.EnableDiscoveryClient;

@SpringBootApplication
@EnableDiscoveryClient
public class ConsumerApplication {
    public static void main(String[] args) {
        SpringApplication.run(ConsumerApplication.class, args);
    }
}
Configuration
创建一个 Java 配置类,主要作用是为了注入 RestTemplate
package com.funtl.spring.cloud.alibaba.consumer.configure;

import org.springframework.cloud.client.loadbalancer.LoadBalanced;
import org.springframework.context.annotation.Bean;
import org.springframework.context.annotation.Configuration;
import org.springframework.web.client.RestTemplate;

@Configuration
public class ConsumerConfiguration {

    @Bean
    @LoadBalanced
    public RestTemplate restTemplate() {
        return new RestTemplate();
    }
}
Controller
package com.funtl.spring.cloud.alibaba.consumer.controller;

import org.springframework.beans.factory.annotation.Autowired;
import org.springframework.web.bind.annotation.GetMapping;
import org.springframework.web.bind.annotation.PathVariable;
import org.springframework.web.bind.annotation.RestController;
import org.springframework.web.client.RestTemplate;

@RestController
public class TestController {

    private final RestTemplate restTemplate;

    @Autowired
    public TestController(RestTemplate restTemplate) {
        this.restTemplate = restTemplate;
    }

    @GetMapping(value = "/echo/{str}")
    public String echo(@PathVariable String str) {
    	// 使用服务名请求服务提供者
        return restTemplate.getForObject("http://service-provider/echo/" + str, String.class);
    }
}
验证是否成功
通过浏览器访问 http://192.168.141.132:8848/nacos Nacos Server 网址
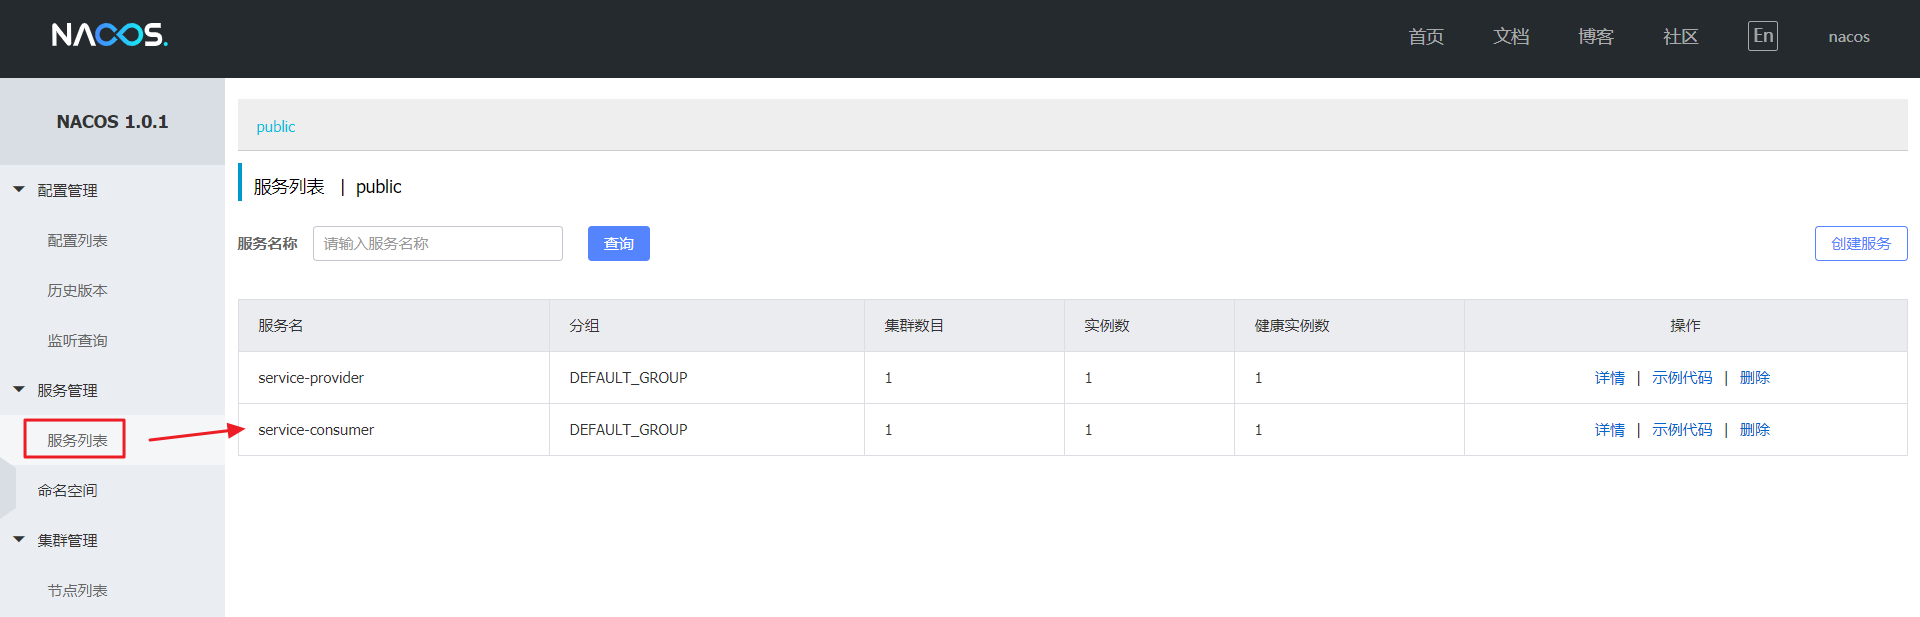
你会发现一个服务已经注册在服务中了,服务名为 service-consumer,通过浏览器访问 http://localhost:8080/echo/hi
Hello Nacos Provider hi
服务端点检查
通过浏览器访问 http://localhost:8080/actuator/nacos-discovery
{
    "subscribe": [
        {
            "jsonFromServer": "",
            "name": "service-provider",
            "groupName": "DEFAULT_GROUP",
            "clusters": null,
            "cacheMillis": 1000,
            "hosts": [],
            "lastRefTime": 0,
            "checksum": "",
            "allIPs": false,
            "key": "service-provider",
            "valid": true,
            "keyEncoded": "service-provider"
        },
        {
            "jsonFromServer": "",
            "name": "service-consumer",
            "groupName": "DEFAULT_GROUP",
            "clusters": null,
            "cacheMillis": 1000,
            "hosts": [],
            "lastRefTime": 0,
            "checksum": "",
            "allIPs": false,
            "key": "service-consumer",
            "valid": true,
            "keyEncoded": "service-consumer"
        }
    ],
    "NacosDiscoveryProperties": {
        "serverAddr": "192.168.141.132:8848",
        "endpoint": "",
        "namespace": "",
        "watchDelay": 30000,
        "logName": "",
        "service": "service-consumer",
        "weight": 1,
        "clusterName": "DEFAULT",
        "namingLoadCacheAtStart": "false",
        "metadata": {
            "preserved.register.source": "SPRING_CLOUD"
        },
        "registerEnabled": true,
        "ip": "192.168.141.1",
        "networkInterface": "",
        "port": 8080,
        "secure": false,
        "accessKey": "",
        "secretKey": ""
    }
}
Nacos Feign 客户端
什么是 Feign
Feign 是一个声明式的伪 HTTP 客户端,它使得写 HTTP 客户端变得更简单。使用 Feign,只需要创建一个接口并注解。它具有可插拔的注解特性,可使用 Feign 注解和 JAX-RS 注解。Feign 支持可插拔的编码器和解码器。Feign 默认集成了 Ribbon,Nacos 也很好的兼容了 Feign,默认实现了负载均衡的效果
- Feign 采用的是基于接口的注解
- Feign 整合了 Ribbon
POM
在 hello-spring-cloud-alibaba-consumer 项目中增加 org.springframework.cloud:spring-cloud-starter-openfeign 依赖
<dependency>
	<groupId>org.springframework.cloud</groupId>
	<artifactId>spring-cloud-starter-openfeign</artifactId>
</dependency>
Application
通过 @EnableFeignClients 注解开启 Feign 功能
package com.funtl.spring.cloud.alibaba.consumer;

import org.springframework.boot.SpringApplication;
import org.springframework.boot.autoconfigure.SpringBootApplication;
import org.springframework.cloud.client.discovery.EnableDiscoveryClient;
import org.springframework.cloud.openfeign.EnableFeignClients;

@SpringBootApplication
@EnableDiscoveryClient
@EnableFeignClients
public class ConsumerApplication {
    public static void main(String[] args) {
        SpringApplication.run(ConsumerApplication.class, args);
    }
}
Service
创建业务结构,通过 @FeignClient("服务名") 注解来指定调用哪个服务
package com.funtl.spring.cloud.alibaba.consumer.service;

import org.springframework.cloud.openfeign.FeignClient;
import org.springframework.web.bind.annotation.GetMapping;
import org.springframework.web.bind.annotation.PathVariable;

@FeignClient(value = "service-provider")
public interface EchoService {
    @GetMapping(value = "/echo/{string}")
    String echo(@PathVariable("string") String string);
}
Controller
package com.funtl.spring.cloud.alibaba.consumer.controller;

import com.funtl.spring.cloud.alibaba.consumer.service.EchoService;
import org.springframework.beans.factory.annotation.Autowired;
import org.springframework.web.bind.annotation.GetMapping;
import org.springframework.web.bind.annotation.PathVariable;
import org.springframework.web.bind.annotation.RestController;

@RestController
public class TestEchoController {

    @Autowired
    private EchoService echoService;

    @GetMapping(value = "/feign/echo/{str}")
    public String echo(@PathVariable String str) {
        return echoService.echo(str);
    }
}
验证是否成功
通过浏览器访问 http://localhost:8080/feign/echo/hi
Hello Nacos Provider hi
配置负载均衡
- 修改
service-provider服务的端口号如 8071,并启动多个实例,IDEA 中依次点击 Run -> Edit Configurations 并勾选 Allow parallel run 以允许 IDEA 多实例运行项目
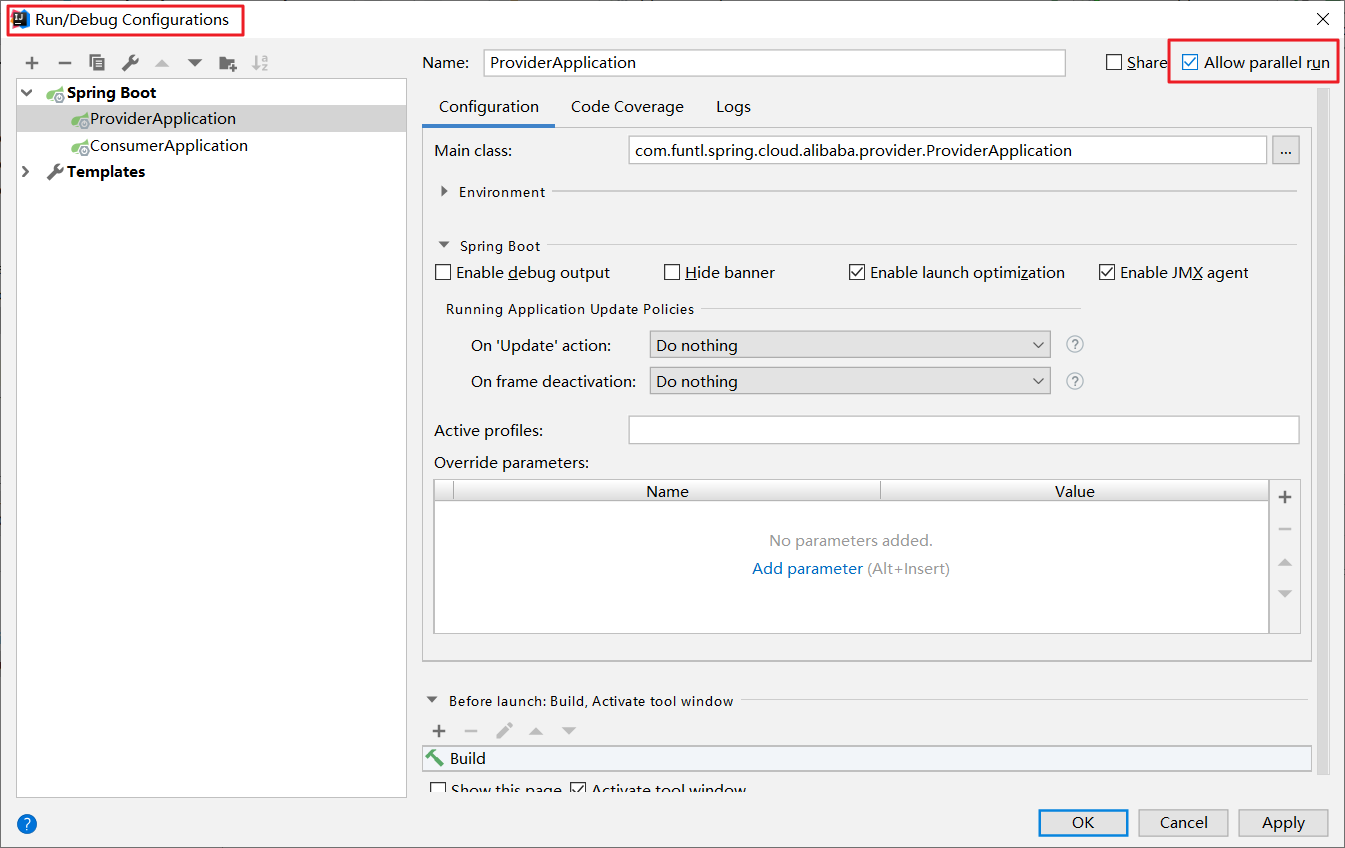
- 再次启动
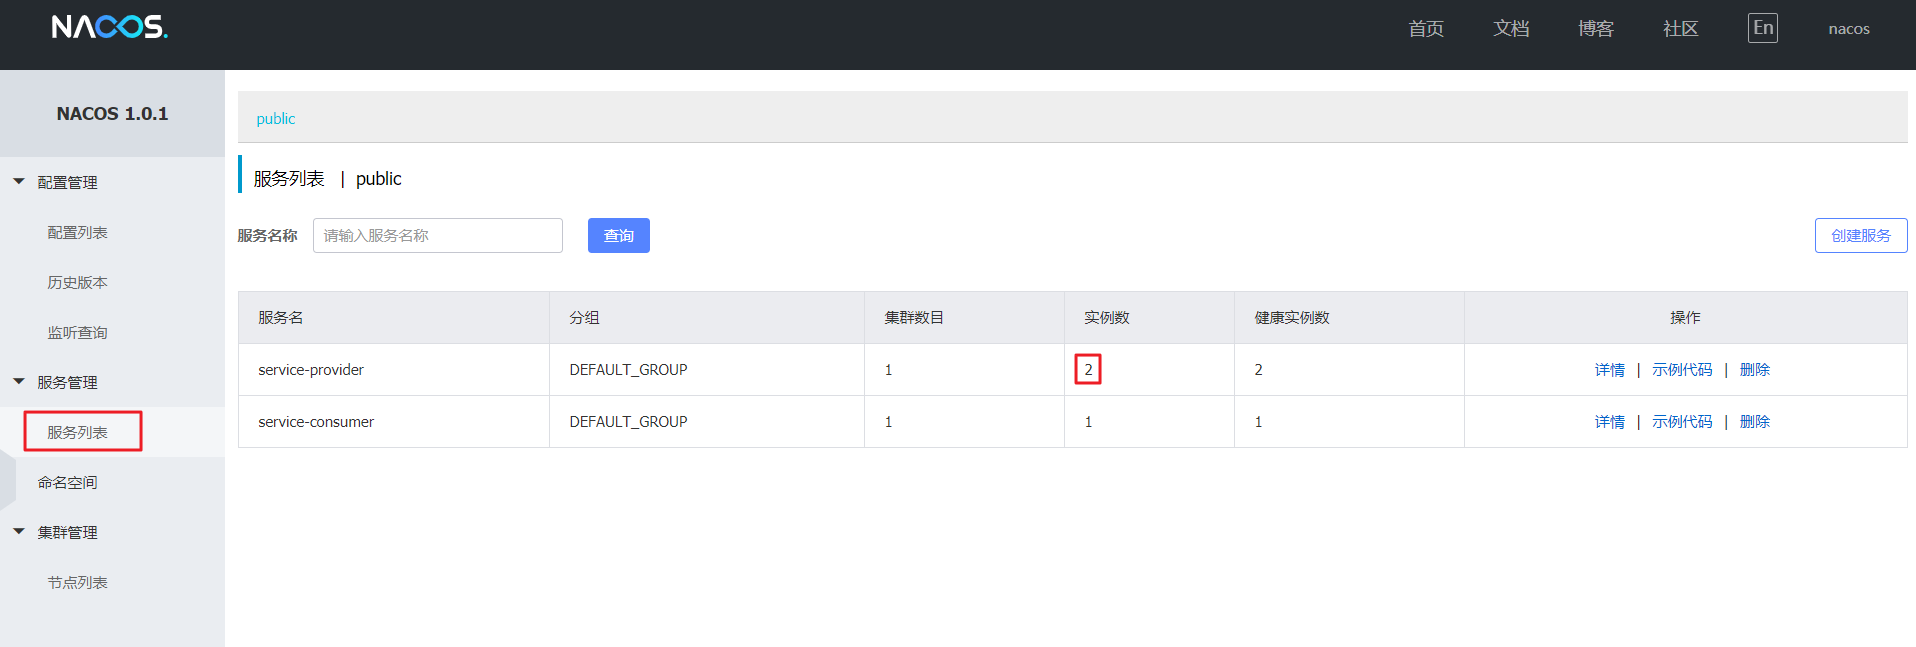
service-provider实例,IDEA Spring Boot 面板可以看到

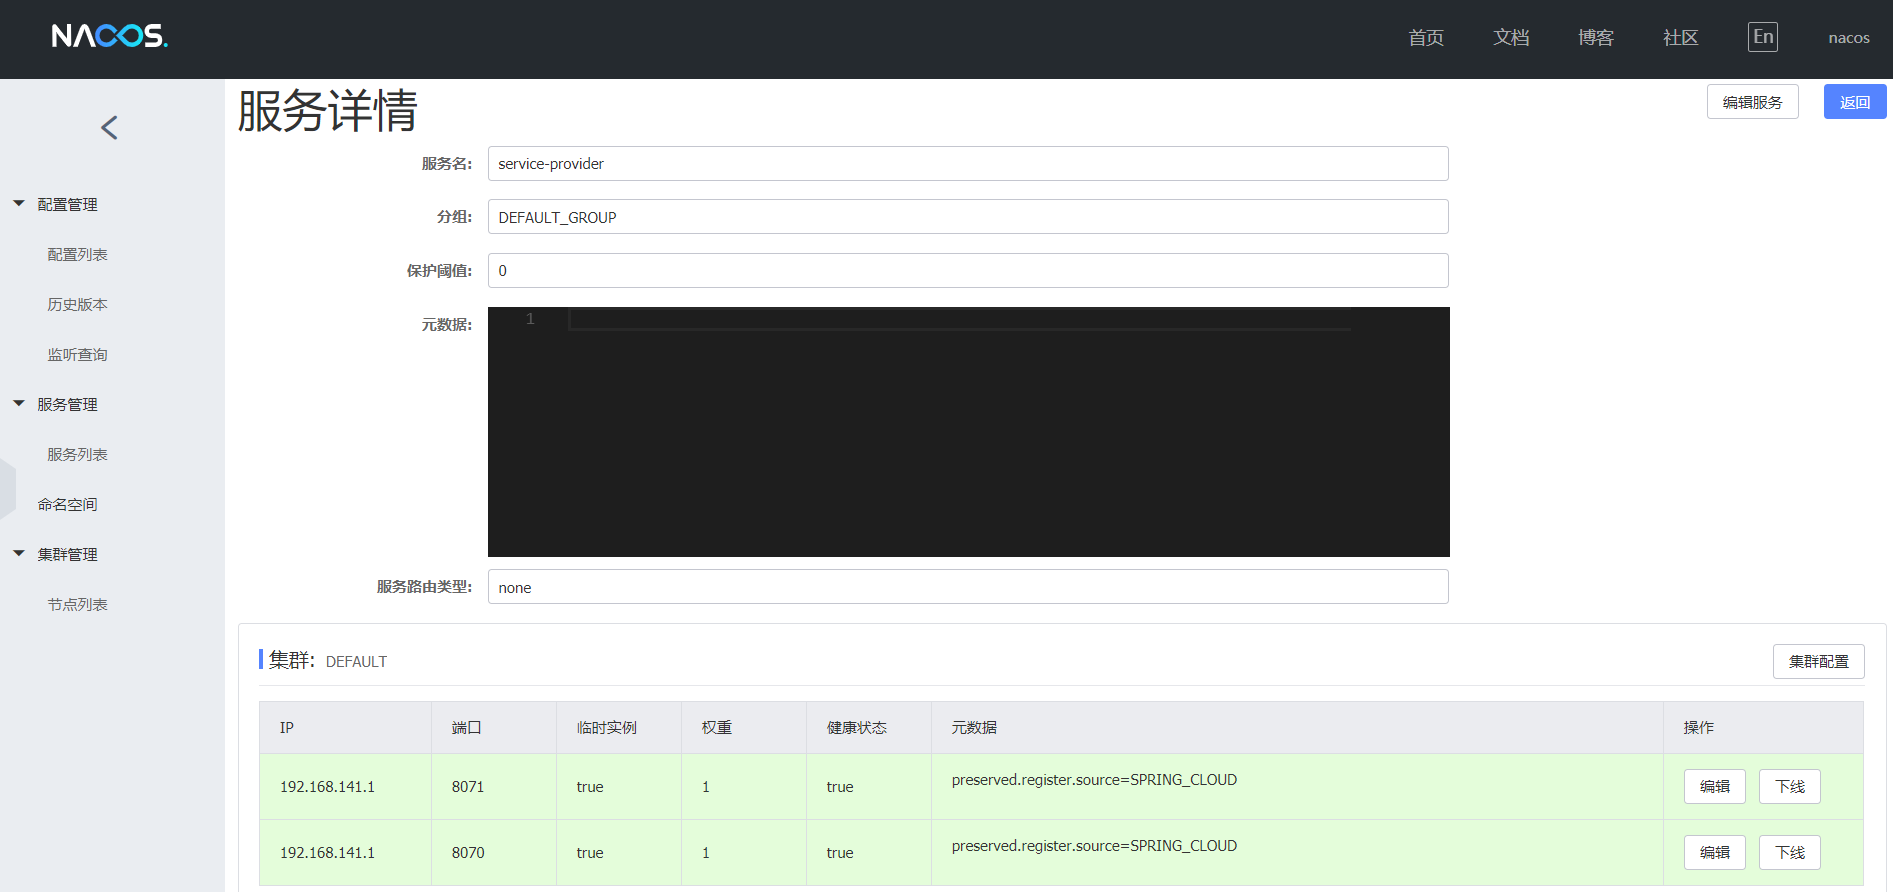
- Nacos Server 控制台可以看到
service-provider有 2 个实例
服务: 通过预定义接口网络访问的提供给客户端的软件功能 服务名: 服务提供的标识,通过该标识可以唯一确定其指代的服务 服务分组: 不同的服务可以归类到同一分组 虚拟集群: 同一个服务下的所有服务实例组成一个默认集群,集群可以被进一步按需求划分,划分的单位可以是虚拟集群 实例: 提供一个或多个服务的具有可访问网络地址(IP:Port)的进程 权重: 实例级别的配置。权重为浮点数。权重越大,分配给该实例的流量越大 健康保护阈值: 为了防止因过多实例 (Instance) 不健康导致流量全部流向健康实例 (Instance) ,继而造成流量压力把健康 健康实例 (Instance) 压垮并形成雪崩效应,应将健康保护阈值定义为一个 0 到 1 之间的浮点数。当域名健康实例 (Instance) 占总服务实例 (Instance) 的比例小于该值时,无论实例 (Instance) 是否健康,都会将这个实例 (Instance) 返回给客户端。这样做虽然损失了一部分流量,但是保证了集群的剩余健康实例 (Instance) 能正常工作
- 在
service-provider项目的EchoController中增加测试方法
@Value("${server.port}")
private String port;

@GetMapping(value = "/lb")
public String lb() {
	return "Hello Nacos Provider i am from port: " + port;
}
- 在
service-consumer项目的EchoService中增加测试方法
@GetMapping(value = "/lb")
String lb();
- 在
service-consumer项目的TestEchoController中增加测试方法
@GetMapping(value = "/lb")
public String lb() {
	return echoService.lb();
}
- 重启服务,通过浏览器访问 http://localhost:8080/lb ,反复刷新浏览器,浏览器交替显示
Hello Nacos Provider i am from port: 8070
Hello Nacos Provider i am from port: 8071
附:扩展阅读
常见负载均衡策略
负载主机可以提供很多种负载均衡方法,也就是我们常说的调度方法或算法
轮循
Round Robin: 这种方法会将收到的请求循环分配到服务器集群中的每台机器,即有效服务器。如果使用这种方式,所有的标记进入虚拟服务的服务器应该有相近的资源容量 以及负载形同的应用程序。如果所有的服务器有相同或者相近的性能那么选择这种方式会使服务器负载形同。基于这个前提,轮循调度是一个简单而有效的分配请求 的方式。然而对于服务器不同的情况,选择这种方式就意味着能力比较弱的服务器也会在下一轮循环中接受轮循,即使这个服务器已经不能再处理当前这个请求了。 这可能导致能力较弱的服务器超载。
加权轮循
Weighted Round Robin: 这种算法解决了简单轮循调度算法的缺点:传入的请求按顺序被分配到集群中服务器,但是会考虑提前为每台服务器分配的权重。管理员只是简单的通过服务 器的处理能力来定义各台服务器的权重。例如,能力最强的服务器 A 给的权重是 100,同时能力最低的服务器给的权重是 50。这意味着在服务器 B 接收到第一个 请求之前前,服务器 A 会连续的接受到 2 个请求,以此类推。
最少连接数
Least Connection: 以上两种方法都没有考虑的是系统不能识别在给定的时间里保持了多少连接。因此可能发生,服务器 B 服务器收到的连接比服务器 A 少但是它已经超载,因为 服务器 B 上的用户打开连接持续的时间更长。这就是说连接数即服务器的负载是累加的。这种潜在的问题可以通过 “最少连接数” 算法来避免:传入的请求是根据每 台服务器当前所打开的连接数来分配的。即活跃连接数最少的服务器会自动接收下一个传入的请求。接本上和简单轮询的原则相同:所有拥有虚拟服务的服务器资源 容量应该相近。值得注意的是,在流量率低的配置环境中,各服务器的流量并不是相同的,会优先考虑第一台服务器。这是因为,如果所有的服务器是相同的,那么 第一个服务器优先,直到第一台服务器有连续的活跃流量,否则总是会优先选择第一台服务器。
最少连接数慢启动时间
Least Connection Slow Start Time: 对最少连接数和带权重的最小连接数调度方法来说,当一个服务器刚加入线上环境是,可以为其配置一个时间段,在这段时间内连接数是有限制的而且是缓慢 增加的。这为服务器提供了一个‘过渡时间’以保证这个服务器不会因为刚启动后因为分配的连接数过多而超载。这个值在 L7 配置界面设置。
加权最少连接
Weighted Least Connection: 如果服务器的资源容量各不相同,那么 “加权最少连接” 方法更合适:由管理员根据服务器情况定制的权重所决定的活跃连接数一般提供了一种对服务器非常 平衡的利用,因为他它借鉴了最少连接和权重两者的优势。通常,这是一个非常公平的分配方式,因为它使用了连接数和服务器权重比例;集群中比例最低的服务器 自动接收下一个请求。但是请注意,在低流量情况中使用这种方法时,请参考 “最小连接数” 方法中的注意事项。
基于代理的自适应负载均衡
Agent Based Adaptive Balancing: 除了上述方法之外,负载主机包含一个自适用逻辑用来定时监测服务器状态和该服务器的权重。对于非常强大的 “基于代理的自适应负载均衡” 方法来说,负 载主机以这种方式来定时检测所有服务器负载情况:每台服务器都必须提供一个包含文件,这个文件包含一个 0~99 的数字用来标明改服务器的实际负载情况 (0 = 空前,99 = 超载,101 = 失败,102 = 管理员禁用),而服务器同构 http get 方法来获取这个文件;同时对集群中服务器来说,以二进制文件形式提供自身负载情况也是该服务器工作之一,然而,并没有限制服务器如何计算自身的负载 情况。根据服务器整体负载情况,有两种策略可以选择:在常规的操作中,调度算法通过收集的服务器负载值和分配给该服务器的连接数的比例计算出一个权重比 例。因此,如果一个服务器负载过大,权重会通过系统透明的作重新调整。和加权轮循调度方法一样,不正确的分配可以被记录下来使得可以有效的为不同服务器分 配不同的权重。然而,在流量非常低的环境下,服务器报上来的负载值将不能建立一个有代表性的样本;那么基于这些值来分配负载的话将导致失控以及指令震荡。 因此,在这种情况下更合理的做法是基于静态的权重比来计算负载分配。当所有服务器的负载低于管理员定义的下限时,负载主机就会自动切换为加权轮循方式来分 配请求;如果负载大于管理员定义的下限,那么负载主机又会切换回自适应方式。
固定权重
Fixed Weighted: 最高权重只有在其他服务器的权重值都很低时才使用。然而,如果最高权重的服务器下降,则下一个最高优先级的服务器将为客户端服务。这种方式中每个真实服务器的权重需要基于服务器优先级来配置。
加权响应
Weighted Response: 流量的调度是通过加权轮循方式。加权轮循中所使用的权重是根据服务器有效性检测的响应时间来计算。每个有效性检测都会被计时,用来标记它响应成功花 了多长时间。但是需要注意的是,这种方式假定服务器心跳检测是基于机器的快慢,但是这种假设也许不总是能够成立。所有服务器在虚拟服务上的响应时间的总和 加在一起,通过这个值来计算单个服务物理服务器的权重;这个权重值大约每 15 秒计算一次。
源 IP 哈希
Source IP Hash: 这种方式通过生成请求源 IP 的哈希值,并通过这个哈希值来找到正确的真实服务器。这意味着对于同一主机来说他对应的服务器总是相同。使用这种方式,你不需要保存任何源 IP。但是需要注意,这种方式可能导致服务器负载不平衡。
Nacos 分布式配置中心
概述
在分布式系统中,由于服务数量巨多,为了方便服务配置文件统一管理,实时更新,所以需要分布式配置中心组件
什么是 Nacos Config
Nacos 提供用于存储配置和其他元数据的 key/value 存储,为分布式系统中的外部化配置提供服务器端和客户端支持。使用 Spring Cloud Alibaba Nacos Config,您可以在 Nacos Server 集中管理你 Spring Cloud 应用的外部属性配置。
Spring Cloud Alibaba Nacos Config 是 Spring Cloud Config Server 和 Client 的替代方案,客户端和服务器上的概念与 Spring Environment 和 PropertySource 有着一致的抽象,在特殊的 bootstrap 阶段,配置被加载到 Spring 环境中。当应用程序通过部署管道从开发到测试再到生产时,您可以管理这些环境之间的配置,并确保应用程序具有迁移时需要运行的所有内容。
接入配置中心
POM
我们以 service-consumer 项目为例,修改 pom.xml ,引入 Nacos Config Starter
<dependency>
    <groupId>org.springframework.cloud</groupId>
    <artifactId>spring-cloud-starter-alibaba-nacos-config</artifactId>
</dependency>
Controller
完成上述两步后,应用会从 Nacos Config 中获取相应的配置,并添加在 Spring Environment 的 PropertySources 中。这里我们使用 @Value 注解来将对应的配置注入到 TestEchoController 的 username字段,并添加 @RefreshScope 打开动态刷新功能
package com.funtl.spring.cloud.alibaba.consumer.controller;

import com.funtl.spring.cloud.alibaba.consumer.service.EchoService;
import org.springframework.beans.factory.annotation.Autowired;
import org.springframework.beans.factory.annotation.Value;
import org.springframework.cloud.context.config.annotation.RefreshScope;
import org.springframework.web.bind.annotation.GetMapping;
import org.springframework.web.bind.annotation.PathVariable;
import org.springframework.web.bind.annotation.RestController;

@RefreshScope
@RestController
public class TestEchoController {

    @Autowired
    private EchoService echoService;

    @Value("${user.name}")
    private String username;

    @GetMapping(value = "/config")
    public String config() {
        return echoService.echo(username);
    }
}
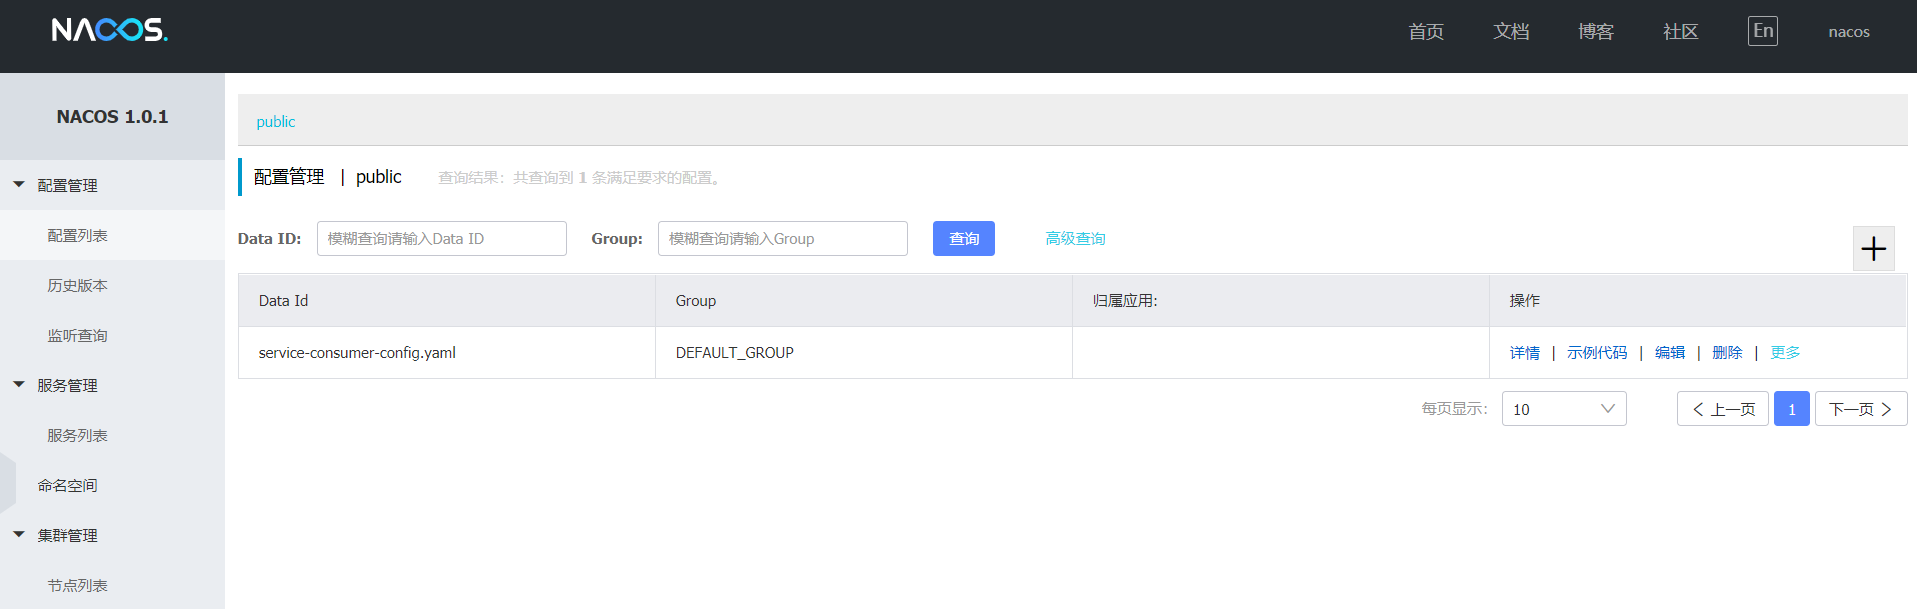
使用控制台发布配置
通过浏览器访问 http://192.168.141.132:8848/nacos ,访问 Nacos Server
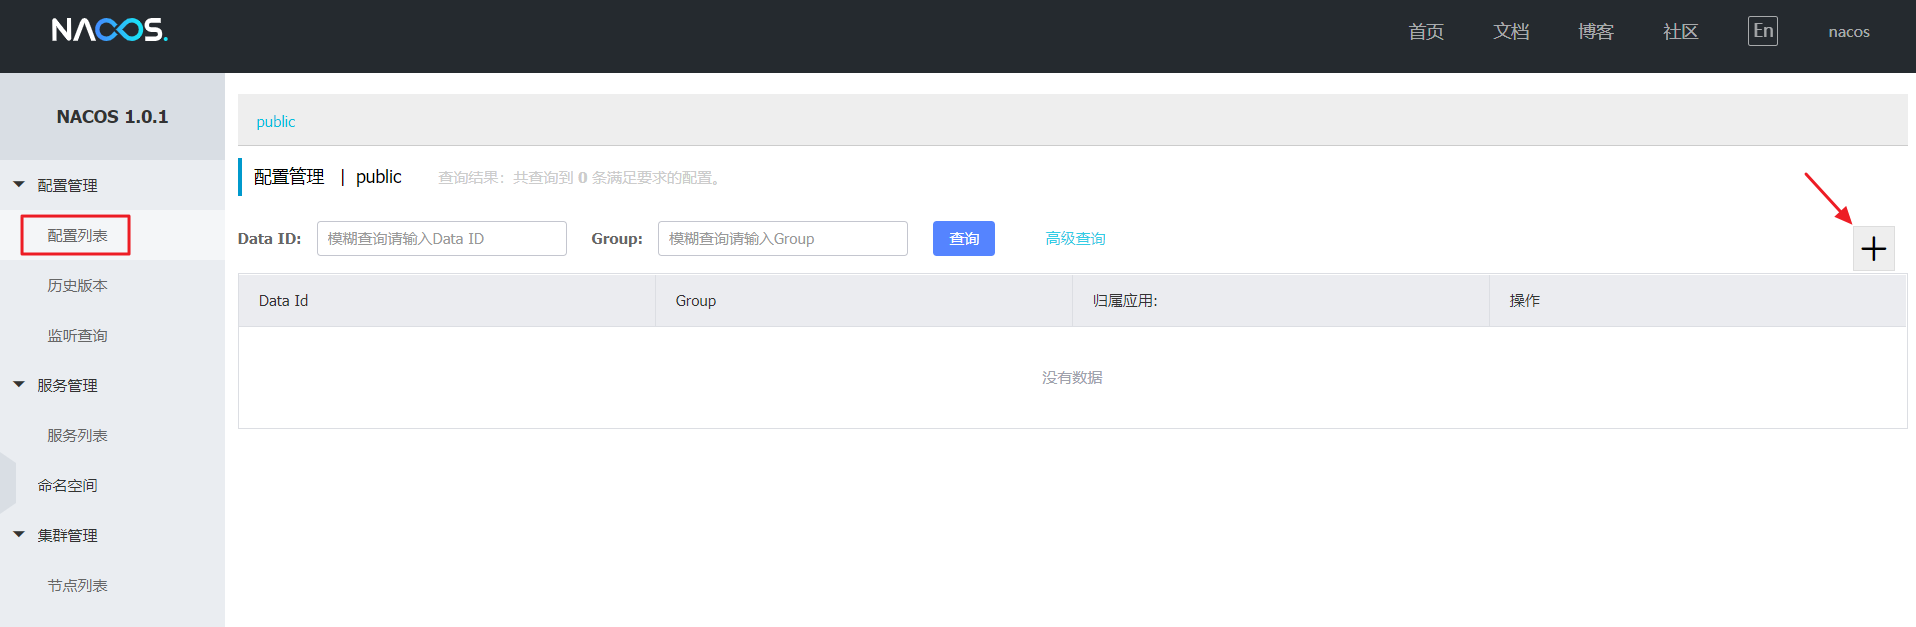

注意: Data ID 的默认扩展名为
.properties,希望使用 YAML 配置,此处必须指明是.yaml
spring:
  application:
    # 服务名
    name: service-consumer
  cloud:
    nacos:
      discovery:
        # 服务注册中心
        server-addr: 192.168.141.132:8848

server:
  # 服务端口
  port: 8080

management:
  # 端点检查(健康检查)
  endpoints:
    web:
      exposure:
        include: "*"

user:
  name: "灶门炭治郎"
修改客户端配置
创建名为 bootstrap.properties 的配置文件并删除之前创建的 application.yml 配置文件
spring.application.name=service-consumer-config
spring.cloud.nacos.config.server-addr=192.168.141.132:8848
spring.cloud.nacos.config.file-extension=yaml
通过浏览器访问 http://localhost:8080/config ,浏览器输出如下
Hello Nacos Provider 灶门炭治郎
注意: Spring Boot 配置文件的加载顺序,依次为
bootstrap.properties->bootstrap.yml->application.properties->application.yml,其中 bootstrap.properties 配置为最高优先级
动态刷新配置
在 Nacos Server 控制台修改配置文件,将 user.name 属性修改为 灶门祢豆子,此时观察控制台日志,你会发现我们已经成功刷新了配置

验证是否成功
通过浏览器访问 http://localhost:8080/config ,浏览器输出如下
Hello Nacos Provider 灶门祢豆子
提示: 你可以使用
spring.cloud.nacos.config.refresh.enabled=false来关闭动态刷新
附:扩展阅读
Endpoint 信息查看
Spring Boot 应用支持通过 Endpoint 来暴露相关信息,Nacos Config Starter 也支持这一点。在使用之前需要在 maven 中添加 spring-boot-starter-actuator 依赖,并在配置中允许 Endpoints 的访问。
- nacos-discovery: http://localhost:8080/actuator/nacos-discovery
{
    "subscribe": [
        {
            "jsonFromServer": "",
            "name": "service-consumer",
            "groupName": "DEFAULT_GROUP",
            "clusters": null,
            "cacheMillis": 1000,
            "hosts": [],
            "lastRefTime": 0,
            "checksum": "",
            "allIPs": false,
            "key": "service-consumer",
            "valid": true,
            "keyEncoded": "service-consumer"
        },
        {
            "jsonFromServer": "",
            "name": "service-provider",
            "groupName": "DEFAULT_GROUP",
            "clusters": null,
            "cacheMillis": 1000,
            "hosts": [],
            "lastRefTime": 0,
            "checksum": "",
            "allIPs": false,
            "key": "service-provider",
            "valid": true,
            "keyEncoded": "service-provider"
        }
    ],
    "NacosDiscoveryProperties": {
        "serverAddr": "192.168.141.132:8848",
        "endpoint": "",
        "namespace": "",
        "watchDelay": 30000,
        "logName": "",
        "service": "service-consumer",
        "weight": 1,
        "clusterName": "DEFAULT",
        "namingLoadCacheAtStart": "false",
        "metadata": {
            "preserved.register.source": "SPRING_CLOUD"
        },
        "registerEnabled": true,
        "ip": "192.168.141.1",
        "networkInterface": "",
        "port": 8080,
        "secure": false,
        "accessKey": "",
        "secretKey": ""
    }
}
- nacos-config: http://localhost:8080/actuator/nacos-config
{
    "NacosConfigProperties": {
        "serverAddr": "192.168.141.132:8848",
        "encode": null,
        "group": "DEFAULT_GROUP",
        "prefix": null,
        "fileExtension": "yaml",
        "timeout": 3000,
        "endpoint": null,
        "namespace": null,
        "accessKey": null,
        "secretKey": null,
        "contextPath": null,
        "clusterName": null,
        "name": null,
        "sharedDataids": null,
        "refreshableDataids": null,
        "extConfig": null
    },
    "RefreshHistory": [
        {
            "timestamp": "2019-06-30 18:30:45",
            "dataId": "service-consumer-config.yaml",
            "md5": "690fd78b5ae9fac5b545c1a8d7ec4e2b"
        },
        {
            "timestamp": "2019-06-30 18:22:08",
            "dataId": "service-consumer-config.yaml",
            "md5": "40b12ffc9d305ec1cad65d606e8f4708"
        }
    ],
    "Sources": [
        {
            "lastSynced": "2019-06-30 18:22:05",
            "dataId": "service-consumer-config.yaml"
        }
    ]
}
注意: Sources 表示此客户端从哪些 Nacos Config 配置项中获取了信息,RefreshHistory 表示动态刷新的历史记录,最多保存20条,NacosConfigProperties 则为 Nacos Config Starter 本身的配置
更多配置
| 配置项 | key | 默认值 | 说明 |
|---|---|---|---|
| 服务端地址 | spring.cloud.nacos.config.server-addr | ||
| DataId前缀 | spring.cloud.nacos.config.prefix | spring.application.name | |
| Group | spring.cloud.nacos.config.group | DEFAULT_GROUP | |
| dataID后缀及内容文件格式 | spring.cloud.nacos.config.file-extension | properties | dataId的后缀,同时也是配置内容的文件格式,目前只支持 properties |
| 配置内容的编码方式 | spring.cloud.nacos.config.encode | UTF-8 | 配置的编码 |
| 获取配置的超时时间 | spring.cloud.nacos.config.timeout | 3000 | 单位为 ms |
| 配置的命名空间 | spring.cloud.nacos.config.namespace | 常用场景之一是不同环境的配置的区分隔离,例如开发测试环境和生产环境的资源隔离等。 | |
| AccessKey | spring.cloud.nacos.config.access-key | ||
| SecretKey | spring.cloud.nacos.config.secret-key | ||
| 相对路径 | spring.cloud.nacos.config.context-path | 服务端 API 的相对路径 | |
| 接入点 | spring.cloud.nacos.config.endpoint | UTF-8 | 地域的某个服务的入口域名,通过此域名可以动态地拿到服务端地址 |
| 是否开启监听和自动刷新 | spring.cloud.nacos.config.refresh.enabled | true |
更多介绍
Nacos为用户提供包括动态服务发现,配置管理,服务管理等服务基础设施,帮助用户更灵活,更轻松地构建,交付和管理他们的微服务平台,基于 Nacos, 用户可以更快速的构建以“服务”为中心的现代云原生应用。Nacos 可以和 Spring Cloud、Kubernetes/CNCF、Dubbo 等微服务生态无缝融合,为用户提供更卓越的体验
Nacos 多环境配置
概述
我们在做项目开发的时候,生产环境和测试环境的一些配置可能会不一样,有时候一些功能也可能会不一样,所以我们可能会在上线的时候手工修改这些配置信息。Spring 为我们提供了 Spring Boot Profile 这个功能(Maven 也为我们提供了 Maven Profile)。我们只需要在启动的时候添加一个虚拟机参数,激活自己环境所要用的 Profile 就可以了。
操作起来很简单,只需要为不同的环境编写专门的配置文件,如:application-dev.yml、application-prod.yml, 启动项目时只需要增加一个命令参数 --spring.profiles.active= 环境配置即可
java -jar 1.0.0-SNAPSHOT.jar --spring.profiles.active=prod
什么是 Nacos Config Profile
spring-cloud-starter-alibaba-nacos-config 在加载配置的时候,不仅仅加载了以 dataid 为 ${spring.application.name}.${file-extension:properties} 为前缀的基础配置,还加载了 dataid 为 ${spring.application.name}-${profile}.${file-extension:properties} 的基础配置。在日常开发中如果遇到多套环境下的不同配置,可以通过 Spring 提供的 ${spring.profiles.active} 这个配置项来配置。
使用 Nacos Config Profile
我们以 service-provider 项目为例,演示多环境配置效果,不要忘记依赖 Nacos Config Starter
<dependency>
    <groupId>org.springframework.cloud</groupId>
    <artifactId>spring-cloud-starter-alibaba-nacos-config</artifactId>
</dependency>
使用控制台发布配置
注意: 控制台发布配置时不要加注释,否则打成 Jar 包后运行会报无法解析配置文件的错误
通过浏览器访问 http://192.168.141.132:8848/nacos ,访问 Nacos Server
- 发布一个名为
service-provider-config.yaml的 测试环境 配置
spring:
  application:
    # 服务名
    name: service-provider
  cloud:
    nacos:
      discovery:
        # 服务注册中心
        server-addr: 192.168.141.132:8848

server:
  # 服务端口
  port: 8070

management:
  # 端点检查(健康检查)
  endpoints:
    web:
      exposure:
        include: "*"
- 发布一个名为
service-provider-config-prod.yaml的 生产环境 配置
spring:
  application:
    # 服务名
    name: service-provider
  cloud:
    nacos:
      discovery:
        # 服务注册中心
        server-addr: 192.168.141.132:8848

server:
  # 修改了上面的端口号,区分配置的不同
  port: 8071

management:
  # 端点检查(健康检查)
  endpoints:
    web:
      exposure:
        include: "*"
修改客户端配置
- 创建名为
bootstrap.properties的配置文件并删除之前创建的application.yml配置文件
spring.application.name=service-provider-config
spring.cloud.nacos.config.server-addr=192.168.141.132:8848
spring.cloud.nacos.config.file-extension=yaml
- 创建名为
bootstrap-prod.properties的配置文件
spring.profiles.active=prod
spring.application.name=service-provider-config
spring.cloud.nacos.config.server-addr=192.168.141.132:8848
spring.cloud.nacos.config.file-extension=yaml
测试多环境配置
此时我们有两个配置文件,分别为 bootstrap.properties 和 bootstrap-prod.properties ,我们需要指定启动时加载哪一个配置文件
Run -> Edit Configurations -> Active profiles:
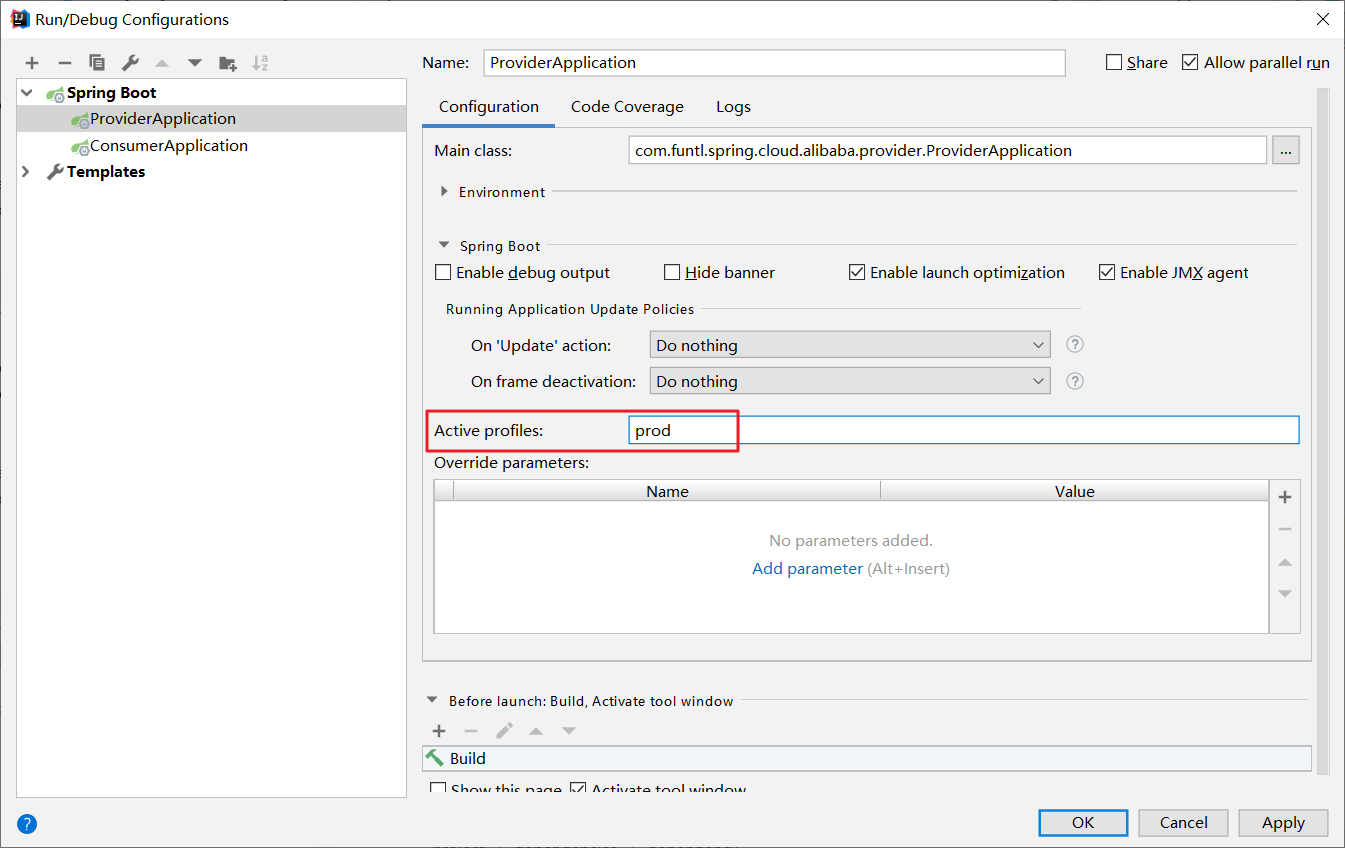
运行项目并观察日志

由上图可知,我们成功加载了不同环境的配置
Sentinel 分布式系统的流量防卫兵
什么是服务雪崩
在微服务架构中,根据业务来拆分成一个个的服务,服务与服务之间可以通过 HTTP/RPC 相互调用,在 Spring Cloud 中可以用 RestTemplate + LoadBalanceClient 和 Feign 来调用。为了保证其高可用,单个服务通常会集群部署。由于网络原因或者自身的原因,服务并不能保证 100% 可用,如果单个服务出现问题,调用这个服务就会出现线程阻塞,此时若有大量的请求涌入,Servlet 容器的线程资源会被消耗完毕,导致服务瘫痪。服务与服务之间的依赖性,故障会传播,会对整个微服务系统造成灾难性的严重后果,这就是服务故障的 “雪崩” 效应。为了解决这个问题,业界提出了 熔断器模型。
阿里巴巴开源了 Sentinel 组件,实现了熔断器模式,Spring Cloud 对这一组件进行了整合。在微服务架构中,一个请求需要调用多个服务是非常常见的

较底层的服务如果出现故障,会导致连锁故障。当对特定的服务的调用的不可用达到一个阀值熔断器将会被打开

熔断器打开后,为了避免连锁故障,通过 fallback 方法可以直接返回一个固定值。
什么是 Sentinel
随着微服务的流行,服务和服务之间的稳定性变得越来越重要。Sentinel 以流量为切入点,从流量控制、熔断降级、系统负载保护等多个维度保护服务的稳定性。
Sentinel 的特征
- 丰富的应用场景: Sentinel 承接了阿里巴巴近 10 年的双十一大促流量的核心场景,例如秒杀(即突发流量控制在系统容量可以承受的范围)、消息削峰填谷(对于突然到来的大量请求,您可以配置流控规则,以稳定的速度逐步处理这些请求,从而避免流量突刺造成系统负载过高)、集群流量控制、实时熔断下游不可用应用等
- 完备的实时监控: Sentinel 同时提供实时的监控功能。您可以在控制台中看到接入应用的单台机器秒级数据,甚至 500 台以下规模的集群的汇总运行情况
- 广泛的开源生态: Sentinel 提供开箱即用的与其它开源框架 / 库的整合模块,例如与 Spring Cloud、Dubbo、gRPC 的整合。您只需要引入相应的依赖并进行简单的配置即可快速地接入 Sentinel
- 完善的 SPI 扩展点: Sentinel 提供简单易用、完善的 SPI 扩展接口。您可以通过实现扩展接口来快速地定制逻辑。例如定制规则管理、适配动态数据源等
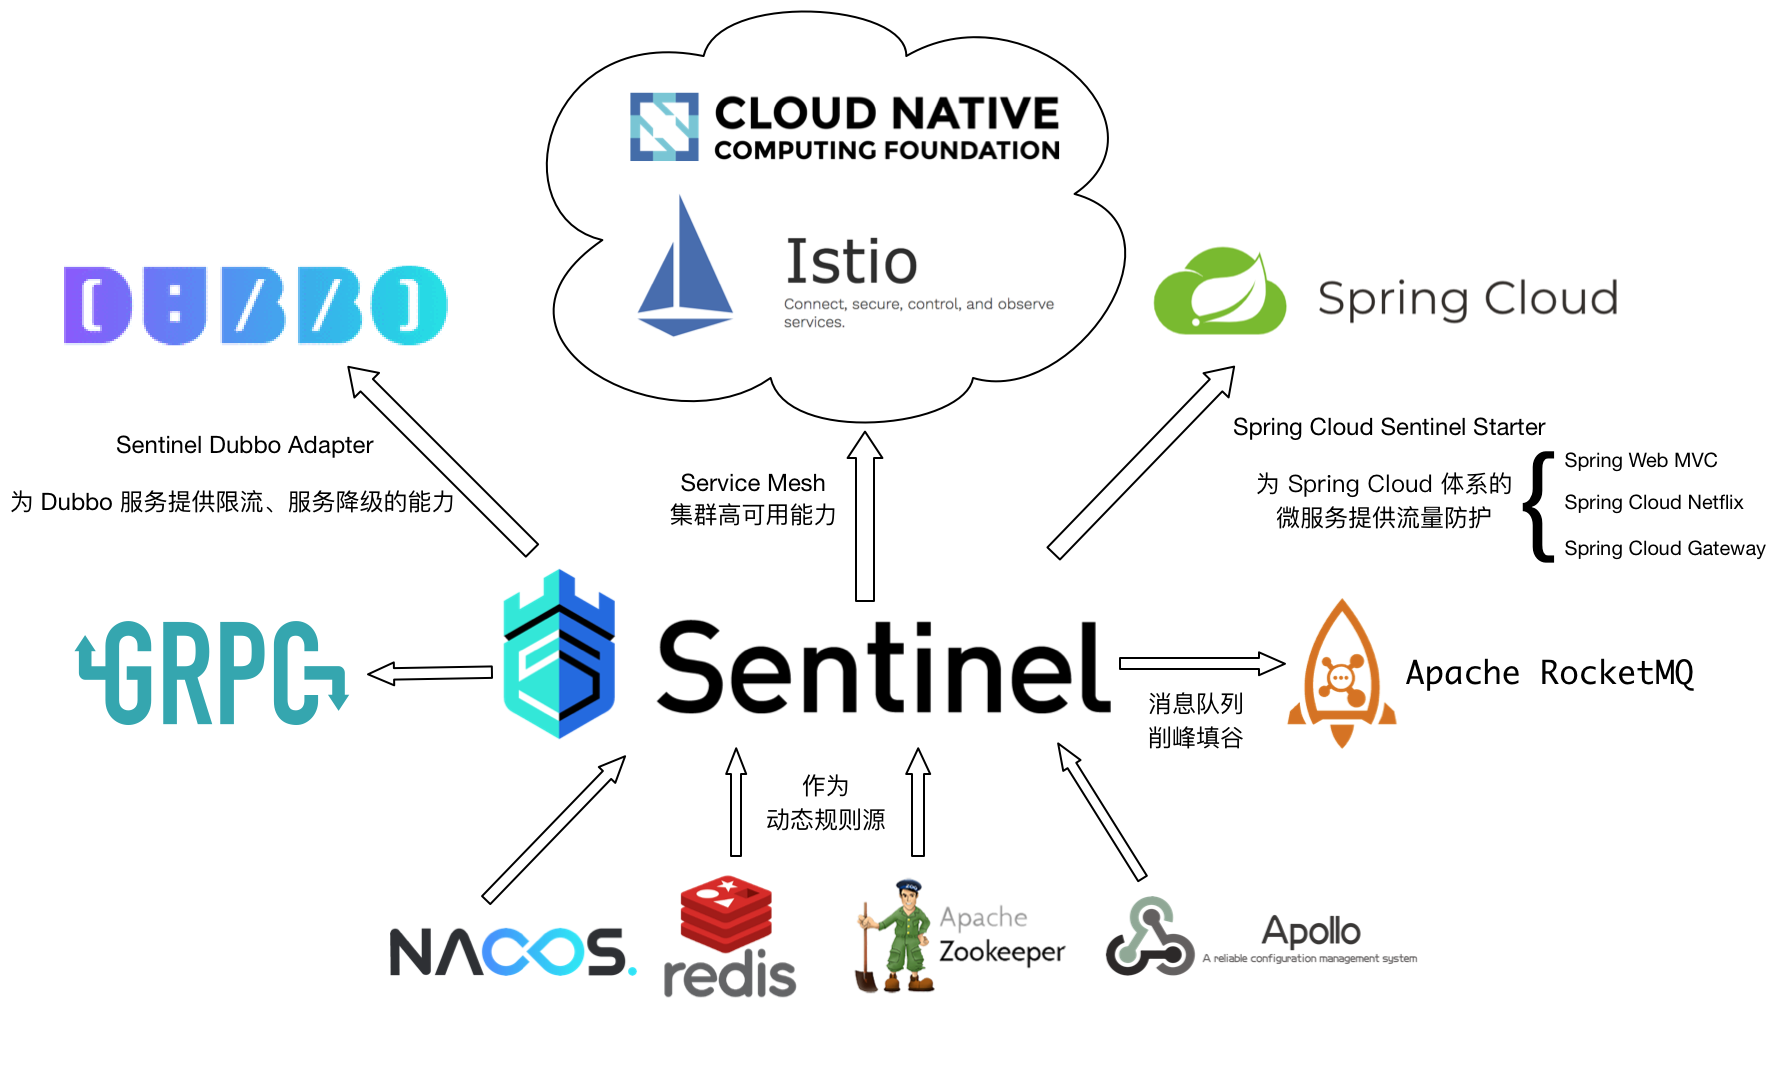
Sentinel 的主要特性

Sentinel 的开源生态
Sentinel 的组成
- 核心库(Java 客户端): 不依赖任何框架 / 库,能够运行于所有 Java 运行时环境,同时对 Dubbo / Spring Cloud 等框架也有较好的支持
- 控制台(Dashboard): 基于 Spring Boot 开发,打包后可以直接运行,不需要额外的 Tomcat 等应用容器
Sentinel 控制台
概述
Sentinel 提供一个轻量级的开源控制台,它提供机器发现以及健康情况管理、监控(单机和集群),规则管理和推送的功能。另外,鉴权在生产环境中也必不可少。这里,我们将会详细讲述如何通过简单的步骤就可以使用这些功能。Sentinel 控制台最少应该包含如下功能
- 查看机器列表以及健康情况: 收集 Sentinel 客户端发送的心跳包,用于判断机器是否在线。
- 监控 (单机和集群聚合): 通过 Sentinel 客户端暴露的监控 API,定期拉取并且聚合应用监控信息,最终可以实现秒级的实时监控。
- 规则管理和推送: 统一管理推送规则。
- 鉴权: 生产环境中鉴权非常重要。这里每个开发者需要根据自己的实际情况进行定制。
启动控制台
获取
您可以从 官方 GitHub Release 页面 页面下载最新版本的控制台 JAR 包。
启动
注意: 启动 Sentinel 控制台需要 JDK 版本为 1.8 及以上版本
java -Dserver.port=8080 -Dcsp.sentinel.dashboard.server=localhost:8080 -Dproject.name=sentinel-dashboard -jar sentinel-dashboard.jar
其中 -Dserver.port=8080 用于指定 Sentinel 控制台端口为 8080
注意: 从 Sentinel 1.6.0 起,Sentinel 控制台引入基本的 登录 功能,默认用户名和密码都是 sentinel
鉴权
用户可以通过如下参数进行配置
-Dsentinel.dashboard.auth.username=sentinel用于指定控制台的登录用户名为 sentinel-Dsentinel.dashboard.auth.password=123456用于指定控制台的登录密码为 123456;如果省略这两个参数,默认用户和密码均为 sentinel-Dserver.servlet.session.timeout=7200用于指定 Spring Boot 服务端 session 的过期时间,如 7200 表示 7200 秒;60m 表示 60 分钟,默认为 30 分钟
验证安装是否成功
通过浏览器访问 http://localhost:8080/#/login

- 账号: sentinel
- 密码: sentinel

详细说明请参考 官方 Sentinel Wiki
Sentinel 客户端接入
POM
如果要在您的项目中引入 Sentinel,需要增加 org.springframework.cloud:spring-cloud-starter-alibaba-sentinel Starter POM
<dependency>
    <groupId>org.springframework.cloud</groupId>
    <artifactId>spring-cloud-starter-alibaba-sentinel</artifactId>
</dependency>
修改配置文件
在 Nacos 控制台修改配置文件,增加对 Sentinel 的支持
spring:
  application:
    # 服务名
    name: service-consumer
  cloud:
    nacos:
      discovery:
        # 服务注册中心
        server-addr: 192.168.141.132:8848
      config:
        # 服务配置中心
        server-addr: 192.168.141.132:8848
    # 熔断限流
    sentinel:
      transport:
        dashboard: localhost:8888

# 开启 Feign 对 Sentinel 的支持
feign:
  sentinel:
    enabled: true

server:
  # 服务端口
  port: 8080

management:
  # 端点检查(健康检查)
  endpoints:
    web:
      exposure:
        include: "*"

user:
  name: "灶门祢豆子"
配置熔断类
编写一个 Feign 接口的实现类并增加 @Component 注解
package com.funtl.spring.cloud.alibaba.consumer.service.fallback;

import com.funtl.spring.cloud.alibaba.consumer.service.EchoService;
import org.springframework.stereotype.Component;

@Component
public class EchoServiceFallback implements EchoService {

    @Override
    public String echo(String string) {
        return "echo fallback";
    }

    @Override
    public String lb() {
        return "lb fallback";
    }
}
修改 Feign 接口
在 @FeignClient 接口上增加 fallback 属性指定熔断类即可
package com.funtl.spring.cloud.alibaba.consumer.service;

import com.funtl.spring.cloud.alibaba.consumer.service.fallback.EchoServiceFallback;
import org.springframework.cloud.openfeign.FeignClient;
import org.springframework.web.bind.annotation.GetMapping;
import org.springframework.web.bind.annotation.PathVariable;

@FeignClient(value = "service-provider", fallback = EchoServiceFallback.class)
public interface EchoService {

    @GetMapping(value = "/echo/{string}")
    String echo(@PathVariable("string") String string);

    @GetMapping(value = "/lb")
    String lb();
}
测试熔断
启动 service-consumer 服务并停止 service-provider 服务,通过浏览器访问 http://localhost:8080/feign/echo/hi
echo fallback
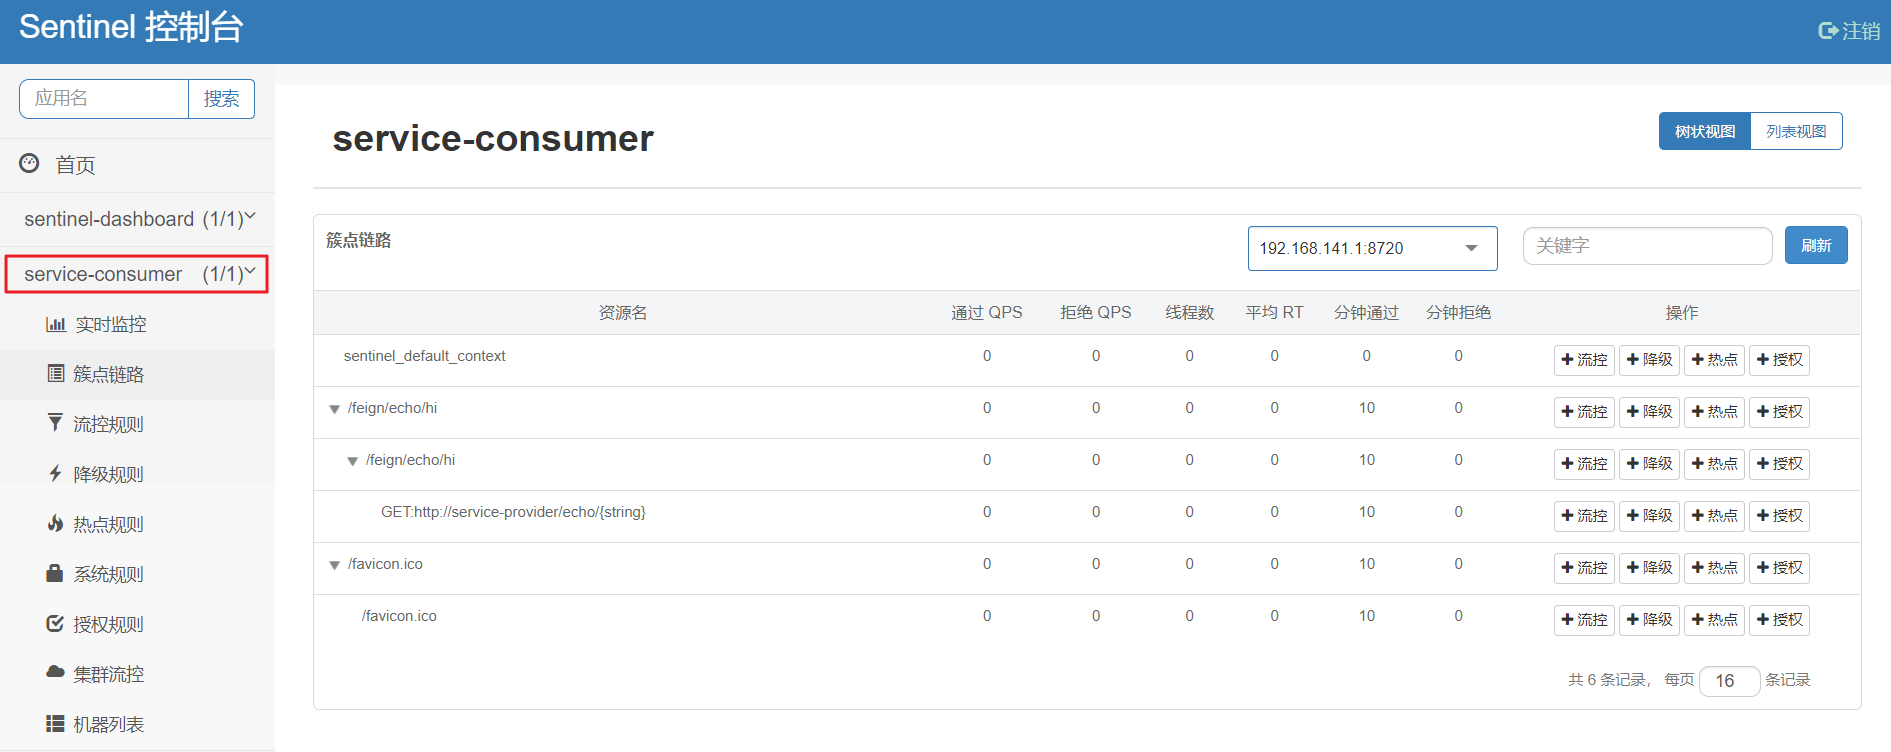
注意: 必须至少请求过一次才能在 Sentinel 控制台看到对应的服务