Spring Boot 简介
概述
Spring Boot 可以称之为 新一代 JavaEE 开发标准;随着动态语言的流行 (Ruby、Groovy、Scala、Node.js),Java 的开发显得格外的笨重:繁多的配置、低下的开发效率、复杂的部署流程以及第三方技术集成难度大。
在上述环境下,Spring Boot 应运而生。它使用 “习惯优于配置” (项目中存在大量的配置,此外还内置了一个习惯性的配置,让你无需手动进行配置)的理念让你的项目快速的运行起来。使用 Spring Boot 很容易创建一个独立运行(运行 Jar,内嵌 Servlet 容器)准生产级别的基于 Spring 框架的项目,使用 Spring Boot 你可以不用或者只需很少的 Spring 配置。
Spring 简史
Spring 1.x 时代
在 Spring1.x 时代,都是通过 xml 文件配置 bean,随着项目的不断扩大,需要将 xml 配置分放到不同的配置文件中,需要频繁的在 java 类和 xml 配置文件中切换。
Spring 2.x 时代
随着 JDK 1.5 带来的注解支持,Spring2.x 可以使用注解对 Bean 进行申明和注入,大大的减少了 xml 配置文件,同时也大大简化了项目的开发。
那么,问题来了,究竟是应该使用 xml 还是注解呢?
最佳实践:
- 应用的基本配置用 xml,比如:数据源、资源文件等
- 业务开发用注解,比如:Service 中注入 bean 等
Spring 3.x 时代
从 Spring3.x 开始提供了 Java 配置方式,使用 Java 配置方式可以更好的理解你配置的 Bean,现在我们就处于这个时代,并且 Spring4.x 和 Spring boot 都推荐使用 java 配置的方式。
Spring 5.x 时代
Spring5.x 是 Java 界首个支持响应式的 Web 框架,是 Spring 的一个重要版本,距离 Spring4.x 差不多四年。在此期间,大多数增强都是在 Spring Boot 项目中完成的,其最大的亮点就是提供了完整的端到端响应式编程的支持(新增 Spring WebFlux 模块)。
Spring WebFlux 同时支持使用旧的 Spring MVC 注解声明 Reactive Controller。和传统的 MVC Controller 不同,Reactive Controller 操作的是 非阻塞 的 ServerHttpRequest 和 ServerHttpResponse,而不再是 Spring MVC 里的 HttpServletRequest 和 HttpServletResponse。
至此也代表着 Java 正式迎来了响应式异步编程的时代。
Spring Boot 优缺点
优点
- 快速构建项目
- 对主流开发框架的无配置集成
- 项目可独立运行,无需外部依赖 Servlet 容器
- 提供运行时的应用监控
- 极大地提高了开发、部署效率
- 与云计算的天然集成
缺点
- 版本迭代速度很快,一些模块改动很大
- 由于不用自己做配置,报错时很难定位
第一个 Spring Boot 应用程序
创建项目
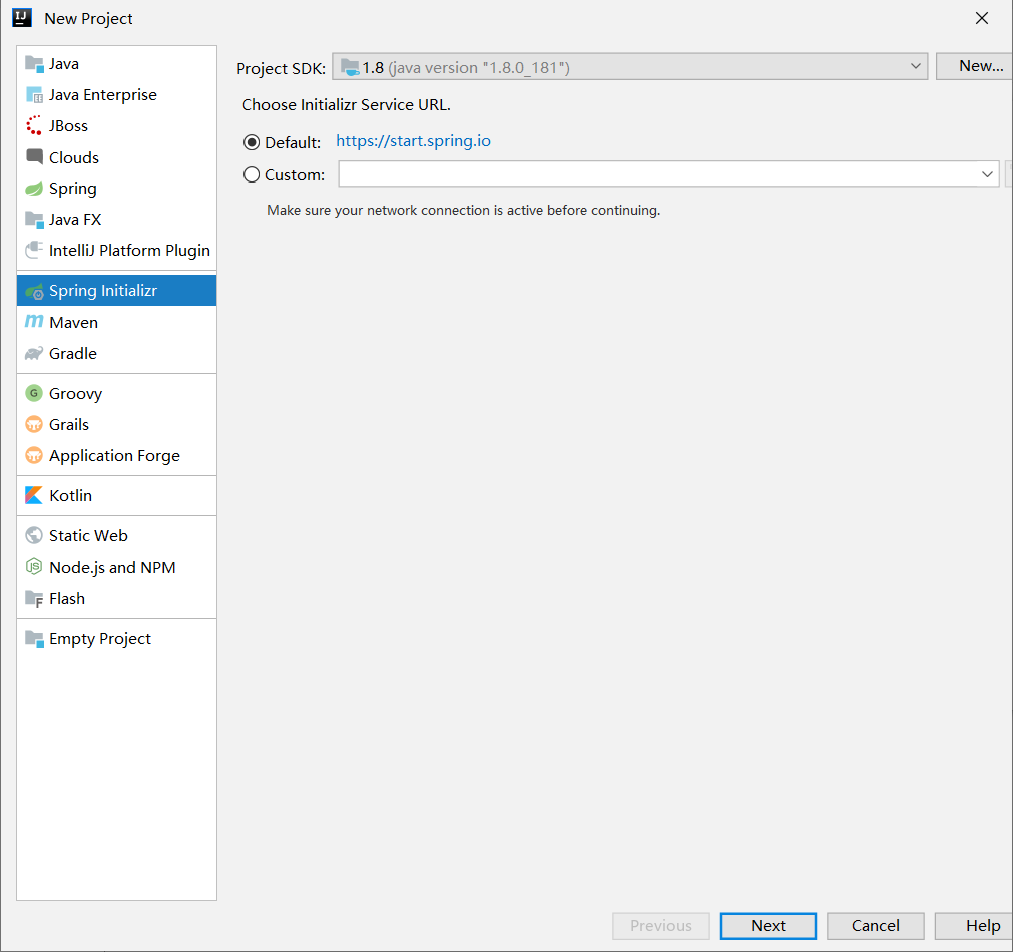
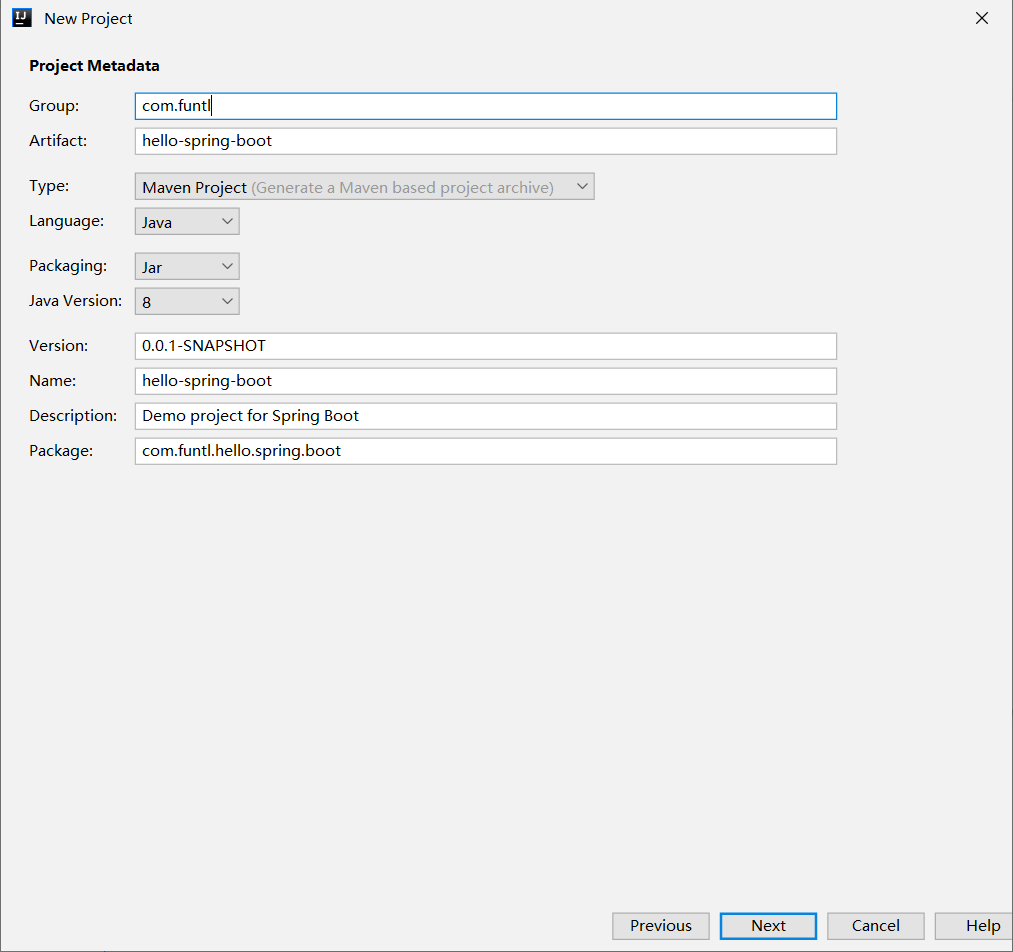
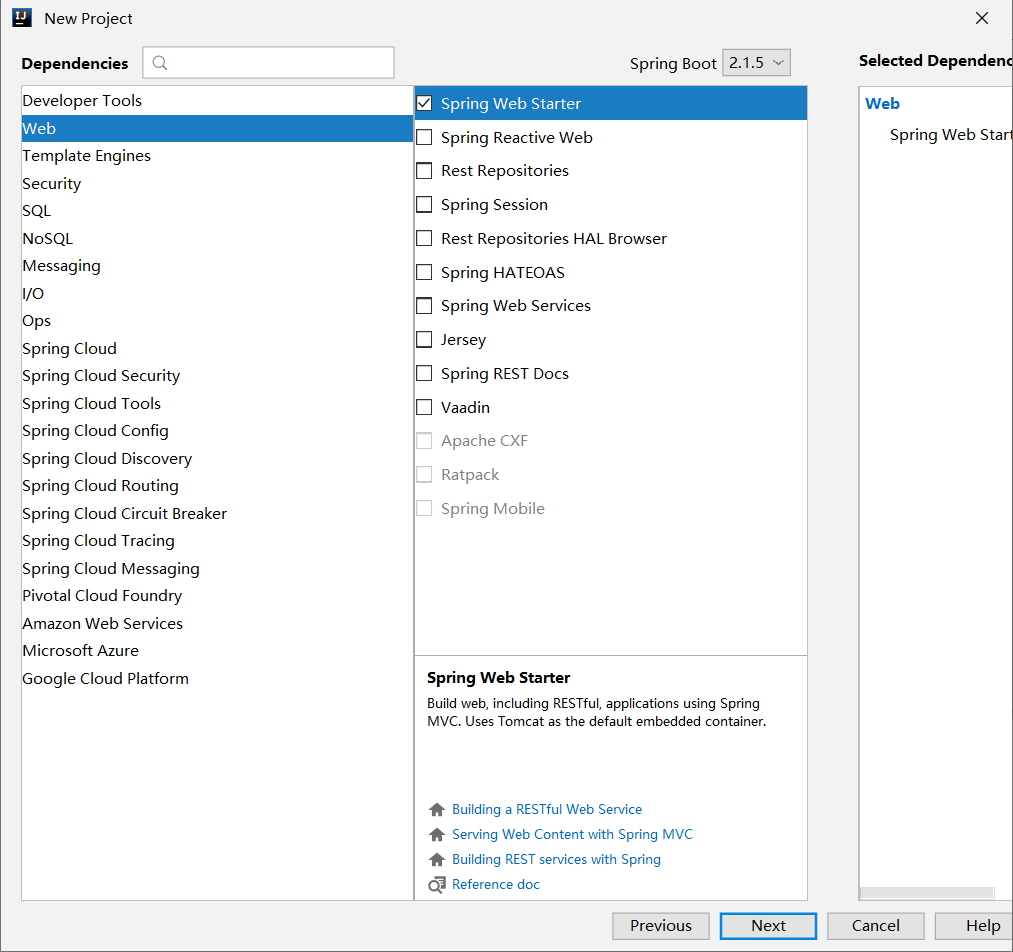
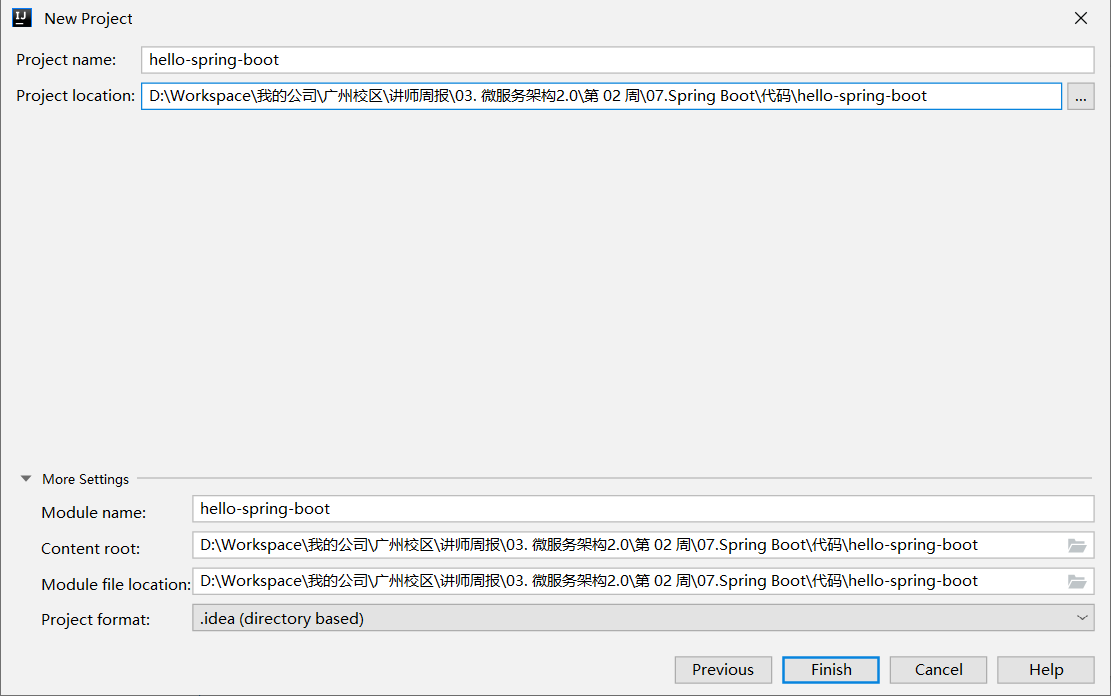
这里我们使用 Intellij IDEA 来新建一个 Spring Boot 项目。
Spring 初始化器
填写项目信息
选择版本和依赖
保存项目到指定目录
工程目录结构
创建完成后的工程目录结构如下:
│  .gitignore
│  pom.xml
│
│
└─src
    ├─main
    │  ├─java
    │  │  └─com
    │  │      └─funtl
    │  │          └─hello
    │  │              └─spring
    │  │                  └─boot
    │  │                          HelloSpringBootApplication.java
    │  │
    │  └─resources
    │      │  application.properties
    │      │
    │      ├─static
    │      └─templates
    └─test
        └─java
            └─com
                └─funtl
                    └─hello
                        └─spring
                            └─boot
                                    HelloSpringBootApplicationTests.java
- .gitignore:Git 过滤配置文件
- pom.xml:Maven 的依赖管理配置文件
- HelloSpringBootApplication.java:程序入口
- resources:资源文件目录
- static: 静态资源文件目录
- templates:模板资源文件目录
- application.properties:Spring Boot 的配置文件,实际开发中会替换成 YAML 语言配置(application.yml)
POM
<?xml version="1.0" encoding="UTF-8"?>
<project xmlns="http://maven.apache.org/POM/4.0.0" xmlns:xsi="http://www.w3.org/2001/XMLSchema-instance"
         xsi:schemaLocation="http://maven.apache.org/POM/4.0.0 http://maven.apache.org/xsd/maven-4.0.0.xsd">
    <modelVersion>4.0.0</modelVersion>
    <parent>
        <groupId>org.springframework.boot</groupId>
        <artifactId>spring-boot-starter-parent</artifactId>
        <version>2.1.6.RELEASE</version>
        <relativePath/> <!-- lookup parent from repository -->
    </parent>
    <groupId>com.funtl</groupId>
    <artifactId>hello-spring-boot</artifactId>
    <version>0.0.1-SNAPSHOT</version>
    <name>hello-spring-boot</name>
    <description>Demo project for Spring Boot</description>

    <properties>
        <java.version>1.8</java.version>
    </properties>

    <dependencies>
        <dependency>
            <groupId>org.springframework.boot</groupId>
            <artifactId>spring-boot-starter-web</artifactId>
        </dependency>

        <dependency>
            <groupId>org.springframework.boot</groupId>
            <artifactId>spring-boot-starter-test</artifactId>
            <scope>test</scope>
        </dependency>
    </dependencies>

    <build>
        <plugins>
            <plugin>
                <groupId>org.springframework.boot</groupId>
                <artifactId>spring-boot-maven-plugin</artifactId>
                <configuration>
                    <mainClass>com.funtl.hello.spring.boot.HelloSpringBootApplication</mainClass>
                </configuration>
            </plugin>
        </plugins>
    </build>

</project>
- parent:继承了 Spring Boot 的 Parent,表示我们是一个 Spring Boot 工程
spring-boot-starter-web:包含了spring-boot-starter还自动帮我们开启了 Web 支持
功能演示
我们创建一个 Controller 来演示一下 Spring Boot 的神奇功能
package com.funtl.hello.spring.boot.controller;

import org.springframework.web.bind.annotation.GetMapping;
import org.springframework.web.bind.annotation.RestController;

@RestController
public class HelloController {
    @GetMapping(value = "/")
    public String sayHi() {
        return "Hello Spring Boot.";
    }
}
启动 HelloSpringBootApplication 的 main() 方法,浏览器访问 http://localhost:8080 可以看到:
Hello Spring Boot.
神奇之处
- 没有配置 web.xml
- 没有配置 application.xml,Spring Boot 帮你配置了
- 没有配置 application-mvc.xml,Spring Boot 帮你配置了
- 没有配置 Tomcat,Spring Boot 内嵌了 Tomcat 容器
Spring Boot 单元测试
概述
主要是通过 @RunWith 和 @SpringBootTest 注解来开启单元测试功能
package com.funtl.hello.spring.boot;

import org.junit.Before;
import org.junit.Test;
import org.junit.runner.RunWith;
import org.springframework.beans.factory.annotation.Autowired;
import org.springframework.boot.test.context.SpringBootTest;
import org.springframework.boot.test.web.client.TestRestTemplate;
import org.springframework.boot.web.server.LocalServerPort;
import org.springframework.http.ResponseEntity;
import org.springframework.test.context.junit4.SpringRunner;

import java.net.URL;

import static org.hamcrest.CoreMatchers.equalTo;
import static org.junit.Assert.assertThat;

@RunWith(SpringRunner.class)
@SpringBootTest(classes = HelloSpringBootApplication.class, webEnvironment = SpringBootTest.WebEnvironment.RANDOM_PORT)
public class HelloSpringBootApplicationTests {

    @LocalServerPort
    private int port;

    private URL base;

    @Autowired
    private TestRestTemplate template;

    @Before
    public void setUp() throws Exception {
        this.base = new URL("http://localhost:" + port + "/");
    }

    @Test
    public void contextLoads() {
        ResponseEntity<String> response = template.getForEntity(base.toString(), String.class);
        assertThat(response.getBody(), equalTo("Hello Spring Boot"));
    }

}
运行它会先启动 Spring Boot 工程,再启动单元测试
Spring Boot 常用配置
概述
本章节主要介绍一下 Spring Boot 中的一些常用配置,比如:自定义 Banner、配置日志、关闭特定的自动配置等。
自定义 Banner
在 Spring Boot 启动的时候会有一个默认的启动图案
  .   ____          _            __ _ _
 /\\ / ___'_ __ _ _(_)_ __  __ _ \ \ \ \
( ( )\___ | '_ | '_| | '_ \/ _` | \ \ \ \
 \\/  ___)| |_)| | | | | || (_| |  ) ) ) )
  '  |____| .__|_| |_|_| |_\__, | / / / /
 =========|_|==============|___/=/_/_/_/
 :: Spring Boot ::        (v2.1.6.RELEASE)
我们在 src/main/resources 目录下新建一个 banner.txt
通过 http://patorjk.com/software/taag 网站生成字符串,将网站生成的字符复制到 banner.txt 中
再次运行这个程序
${AnsiColor.BRIGHT_RED}
////////////////////////////////////////////////////////////////////
//                          _ooOoo_                               //
//                         o8888888o                              //
//                         88" . "88                              //
//                         (| ^_^ |)                              //
//                         O\  =  /O                              //
//                      ____/`---'\____                           //
//                    .'  \\|     |//  `.                         //
//                   /  \\|||  :  |||//  \                        //
//                  /  _||||| -:- |||||-  \                       //
//                  |   | \\\  -  /// |   |                       //
//                  | \_|  ''\---/''  |   |                       //
//                  \  .-\__  `-`  ___/-. /                       //
//                ___`. .'  /--.--\  `. . ___                     //
//              ."" '<  `.___\_<|>_/___.'  >'"".                  //
//            | | :  `- \`.;`\ _ /`;.`/ - ` : | |                 //
//            \  \ `-.   \_ __\ /__ _/   .-` /  /                 //
//      ========`-.____`-.___\_____/___.-`____.-'========         //
//                           `=---='                              //
//      ^^^^^^^^^^^^^^^^^^^^^^^^^^^^^^^^^^^^^^^^^^^^^^^^^^        //
//            佛祖保佑       永不宕机     永无BUG                  //
////////////////////////////////////////////////////////////////////
常用属性设置:
${AnsiColor.BRIGHT_RED}:设置控制台中输出内容的颜色${application.version}:用来获取MANIFEST.MF文件中的版本号${application.formatted-version}:格式化后的${application.version}版本信息${spring-boot.version}:Spring Boot 的版本号${spring-boot.formatted-version}:格式化后的${spring-boot.version}版本信息
配置文件
Spring Boot 项目使用一个全局的配置文件 application.properties 或者是 application.yml,在 resources 目录下或者类路径下的 /config 下,一般我们放到 resources 下。
修改 Tomcat 的端口为 9090,并将默认的访问路径 “/” 修改为 “boot”,可以在 application.properties 中添加:
server.port=9090
server.context-path=/boot
或在 application.yml 中添加:
server:
  port: 9090
  context-path: /boot
测试效果:

Starter POM
Spring Boot 为我们提供了简化企业级开发绝大多数场景的 starter pom ,只要使用了应用场景所需要的 starter pom ,相关的技术配置将会消除,就可以得到 Spring Boot 为我们提供的自动配置的 Bean。
日志配置
Spring Boot 对各种日志框架都做了支持,我们可以通过配置来修改默认的日志的配置
默认情况下,Spring Boot 使用 Logback 作为日志框架
logging:
  file: ../logs/spring-boot-hello.log
  level.org.springframework.web: DEBUG
关闭特定的自动配置
关闭特定的自动配置使用 @SpringBootApplication 注解的 exclude 参数即可,这里以关闭数据源的自动配置为例
@SpringBootApplication(exclude = {DataSourceAutoConfiguration.class})
Thymeleaf 简介
什么是 Thymeleaf
Thymeleaf 是一个跟 Velocity、FreeMarker 类似的模板引擎,它可以完全替代 JSP 。相较与其他的模板引擎,它有如下三个极吸引人的特点
- Thymeleaf 在有网络和无网络的环境下皆可运行,即它可以让美工在浏览器查看页面的静态效果,也可以让程序员在服务器查看带数据的动态页面效果。这是由于它支持 html 原型,然后在 html 标签里增加额外的属性来达到模板 + 数据的展示方式。浏览器解释 html 时会忽略未定义的标签属性,所以 thymeleaf 的模板可以静态地运行;当有数据返回到页面时,Thymeleaf 标签会动态地替换掉静态内容,使页面动态显示。
- Thymeleaf 开箱即用的特性。它提供标准和 Spring 标准两种方言,可以直接套用模板实现 JSTL、 OGNL 表达式效果,避免每天套模板、改 JSTL、改标签的困扰。同时开发人员也可以扩展和创建自定义的方言。
- Thymeleaf 提供 Spring 标准方言和一个与 SpringMVC 完美集成的可选模块,可以快速的实现表单绑定、属性编辑器、国际化等功能。
为什么需要 Thymeleaf
如果希望以 Jar 形式发布模块则尽量不要使用 JSP 相关知识,这是因为 JSP 在内嵌的 Servlet 容器上运行有一些问题 (内嵌 Tomcat、 Jetty 不支持 Jar 形式运行 JSP,Undertow 不支持 JSP)。
Spring Boot 中推荐使用 Thymeleaf 作为模板引擎,因为 Thymeleaf 提供了完美的 Spring MVC 支持,Spring Boot 提供了大量模板引擎,包括:
- FreeMarker
- Groovy
- Mustache
- Thymeleaf
- Velocity
- Beetl
第一个 Thymeleaf 页面
引入依赖
主要增加 spring-boot-starter-thymeleaf 和 nekohtml 这两个依赖
spring-boot-starter-thymeleaf:Thymeleaf 自动配置nekohtml:允许使用非严格的 HTML 语法
完整的 pom.xml 如下:
<?xml version="1.0" encoding="UTF-8"?>
<project xmlns="http://maven.apache.org/POM/4.0.0" xmlns:xsi="http://www.w3.org/2001/XMLSchema-instance"
         xsi:schemaLocation="http://maven.apache.org/POM/4.0.0 http://maven.apache.org/xsd/maven-4.0.0.xsd">
    <modelVersion>4.0.0</modelVersion>

    <groupId>com.funtl</groupId>
    <artifactId>hello-spring-boot</artifactId>
    <version>0.0.1-SNAPSHOT</version>
    <packaging>jar</packaging>

    <name>hello-spring-boot</name>
    <description></description>

    <parent>
        <groupId>org.springframework.boot</groupId>
        <artifactId>spring-boot-starter-parent</artifactId>
        <version>2.1.6.RELEASE</version>
        <relativePath/> <!-- lookup parent from repository -->
    </parent>

    <properties>
        <project.build.sourceEncoding>UTF-8</project.build.sourceEncoding>
        <project.reporting.outputEncoding>UTF-8</project.reporting.outputEncoding>
        <java.version>1.8</java.version>
    </properties>

    <dependencies>
        <dependency>
            <groupId>org.springframework.boot</groupId>
            <artifactId>spring-boot-starter-web</artifactId>
        </dependency>
        <dependency>
            <groupId>org.springframework.boot</groupId>
            <artifactId>spring-boot-starter-tomcat</artifactId>
        </dependency>
        <dependency>
            <groupId>org.springframework.boot</groupId>
            <artifactId>spring-boot-starter-thymeleaf</artifactId>
        </dependency>
        <dependency>
            <groupId>org.springframework.boot</groupId>
            <artifactId>spring-boot-starter-actuator</artifactId>
        </dependency>
        <dependency>
            <groupId>org.springframework.boot</groupId>
            <artifactId>spring-boot-starter-test</artifactId>
            <scope>test</scope>
        </dependency>

        <dependency>
            <groupId>net.sourceforge.nekohtml</groupId>
            <artifactId>nekohtml</artifactId>
            <version>1.9.22</version>
        </dependency>
    </dependencies>

    <build>
        <plugins>
            <plugin>
                <groupId>org.springframework.boot</groupId>
                <artifactId>spring-boot-maven-plugin</artifactId>
                <configuration>
                    <mainClass>com.funtl.hello.spring.boot.HelloSpringBootApplication</mainClass>
                </configuration>
            </plugin>
        </plugins>
    </build>
</project>
配置 Thymeleaf
在 application.yml 配置 Thymeleaf
spring:
  thymeleaf:
    cache: false # 开发时关闭缓存,不然没法看到实时页面
    mode: HTML # 用非严格的 HTML
    encoding: UTF-8
    servlet:
      content-type: text/html
创建测试用 JavaBean
创建一个测试效果的 JavaBean,简单封装一下即可
package com.funtl.hello.spring.boot.entity;

import java.io.Serializable;

public class PersonBean implements Serializable {

    private String name;
    private Integer age;

    public String getName() {
        return name;
    }

    public void setName(String name) {
        this.name = name;
    }

    public Integer getAge() {
        return age;
    }

    public void setAge(Integer age) {
        this.age = age;
    }
}
创建测试用 Controller
创建一个 Controller,造一些测试数据并设置跳转
package com.funtl.hello.spring.boot.controller;

import com.funtl.hello.spring.boot.entity.PersonBean;
import org.springframework.stereotype.Controller;
import org.springframework.ui.Model;
import org.springframework.web.bind.annotation.RequestMapping;
import org.springframework.web.bind.annotation.RequestMethod;

import java.util.ArrayList;
import java.util.List;

@Controller
@RequestMapping(value = "thymeleaf")
public class IndexController {

    @RequestMapping(value = "index", method = RequestMethod.GET)
    public String index(Model model) {
        PersonBean person = new PersonBean();
        person.setName("张三");
        person.setAge(22);

        List<PersonBean> people = new ArrayList<>();
        PersonBean p1 = new PersonBean();
        p1.setName("李四");
        p1.setAge(23);
        people.add(p1);

        PersonBean p2 = new PersonBean();
        p2.setName("王五");
        p2.setAge(24);
        people.add(p2);

        PersonBean p3 = new PersonBean();
        p3.setName("赵六");
        p3.setAge(25);
        people.add(p3);

        model.addAttribute("person", person);
        model.addAttribute("people", people);

        return "index";
    }
}
创建测试页面
在 templates 目录下创建 index.html 文件,代码如下:
<!DOCTYPE html SYSTEM "http://www.thymeleaf.org/dtd/xhtml1-strict-thymeleaf-spring4-4.dtd">
<html xmlns="http://www.w3.org/1999/xhtml" xmlns:th="http://www.thymeleaf.org">
<head>
    <meta charset="UTF-8">
    <title>Hello Thymeleaf</title>
</head>
<body>
    <div>
        <span>访问 Model:</span><span th:text="${person.name}"></span>
    </div>
    <div>
        <span>访问列表</span>
        <table>
            <thead>
                <tr>
                    <th>姓名</th>
                    <th>年龄</th>
                </tr>
            </thead>
            <tbody>
                <tr th:each="human : ${people}">
                    <td th:text="${human.name}"></td>
                    <td th:text="${human.age}"></td>
                </tr>
            </tbody>
        </table>
    </div>
</body>
</html>
修改 html 标签用于引入 thymeleaf 引擎,这样才可以在其他标签里使用 th:* 语法,声明如下:
<!DOCTYPE html SYSTEM "http://www.thymeleaf.org/dtd/xhtml1-strict-thymeleaf-spring4-4.dtd">
<html xmlns="http://www.w3.org/1999/xhtml" xmlns:th="http://www.thymeleaf.org">
测试访问
启动成功后,访问:http://localhost:9090/thymeleaf/index 即可看到效果

Spring Boot 整合 HikariCP
什么是 HikariCP
HiKariCP 是数据库连接池的一个后起之秀,号称性能最好,可以完美地 PK 掉其他连接池。是一个高性能的 JDBC 连接池,基于 BoneCP 做了不少的改进和优化。超快,快到连 Spring Boot 2 都宣布支持了。
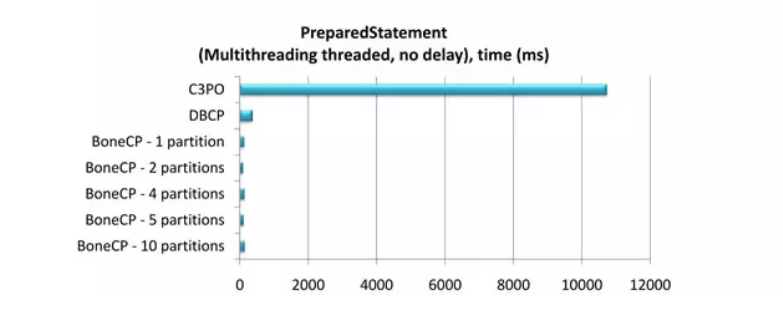
什么是 BoneCP
传说中 BoneCP 在快速这个特点上做到了极致,官方数据是 C3P0 等的 25 倍左右,以下为性能测试报告。
单线程
- 1,000,000 获取连接/释放连接请求
- 获取/释放连接之间没有延迟
- 连接池范围:20-50
- 增量:5
- 线程:1
- 分区:1

多线程
- 500 个线程分别获取释放 100 个连接
- 在获取连接和释放连接之间引入了 10ms 的延迟
Thread.sleep(),模拟连接完成工作 - 连接池范围:50-200
- 增量:5
- 线程:5

Prepared Statement
- 500 个线程分别获取释放 100 个连接
- 无延迟
- 连接池范围:50-200
- 增量:5
- 线程:5
为什么需要 HikariCP
BoneCP 作者放弃维护,并在 Github 项目主页推荐大家使用 HikariCP,Hikari(ひかり[shi ga li]) 来自日文,是 光 的意思。这个产品的口号是 快速、简单、可靠
优化
- 字节码精简 : 优化代码,直到编译后的字节码最少,这样,CPU 缓存可以加载更多的程序代码
- 优化代理和拦截器 : 减少代码,例如 HikariCP 的 Statement proxy 只有 100 行代码,只有 BoneCP 的十分之一
- 自定义数组类型(FastStatementList)代替 ArrayList : 避免每次
get()调用都要进行 range check,避免调用remove()时的从头到尾的扫描 - 自定义集合类型(ConcurrentBag): 提高并发读写的效率
- 其他针对 BoneCP 缺陷的优化: 比如对于耗时超过一个 CPU 时间片的方法调用的研究(但没说具体怎么优化)
代码量
几个连接池的代码量对比(代码量越少,一般意味着执行效率越高、发生 BUG 的可能性越低)
| Pool | Files | Code |
|---|---|---|
| Vibur | 34 | 1927 |
| HikariCP | 21 | 2228 |
| Tomcat | 31 | 6345 |
| BoneCP | 49 | 7293 |
| C3P0 | 120 | 15550 |
速度
别人发推文测试 Hikari 速度

稳定性

可靠性
另外,关于可靠性方面,也是有实验和数据支持的。对于数据库连接中断的情况,通过测试 getConnection(),各种 CP 的不相同处理方法如下(所有 CP 都配置了跟 connectionTimeout 类似的参数为 5 秒钟)
- HikariCP(A): 等待 5 秒钟后,如果连接还是没有恢复,则抛出一个
SQLExceptions异常;后续的getConnection()也是一样处理 - C3P0(C-): 完全没有反应,没有提示,也不会在
CheckoutTimeout配置的时长超时后有任何通知给调用者;然后等待 2 分钟后终于醒来了,返回一个 error - Tomcat(F): 返回一个 connection,然后调用者如果利用这个无效的 connection 执行 SQL 语句 结果可想而知;大约 55 秒之后终于醒来了,这时候的
getConnection()终于可以返回一个 error,但没有等待参数配置的 5 秒钟,而是立即返回 error - BoneCP(C): 跟 Tomcat 的处理方法一样;也是大约 55 秒之后才醒来,有了正常的反应,并且终于会等待 5 秒钟之后返回 error 了
整合 HikariCP
POM
<!-- 主要增加 HikariCP 依赖 -->
<dependency>
    <groupId>com.zaxxer</groupId>
    <artifactId>HikariCP</artifactId>
    <version>${hikaricp.version}</version>
</dependency>
<dependency>
    <groupId>org.springframework.boot</groupId>
    <artifactId>spring-boot-starter-jdbc</artifactId>
    <exclusions>
        <!-- 排除 tomcat-jdbc 以使用 HikariCP -->
        <exclusion>
            <groupId>org.apache.tomcat</groupId>
            <artifactId>tomcat-jdbc</artifactId>
        </exclusion>
    </exclusions>
</dependency>
<!-- MySQL 驱动 -->
<dependency>
    <groupId>mysql</groupId>
    <artifactId>mysql-connector-java</artifactId>
    <version>${mysql.version}</version>
</dependency>
application.yml
spring:
  datasource:
    type: com.zaxxer.hikari.HikariDataSource
    driver-class-name: com.mysql.cj.jdbc.Driver
    url: jdbc:mysql://192.168.141.130:3306/myshop?useUnicode=true&characterEncoding=utf-8&useSSL=false
    username: root
    password: 123456
    hikari:
      minimum-idle: 5
      idle-timeout: 600000
      maximum-pool-size: 10
      auto-commit: true
      pool-name: MyHikariCP
      max-lifetime: 1800000
      connection-timeout: 30000
      connection-test-query: SELECT 1
注意: 具体使用方法在 测试 MyBatis 操作数据库 时进行介绍,此处仅为准备环节
Spring Boot 整合 TkMyBatis
什么是 TkMyBatis
tk.mybatis 是在 MyBatis 框架的基础上提供了很多工具,让开发更加高效
POM
在 pom.xml 文件中引入 mapper-spring-boot-starter 依赖,该依赖会自动引入 MyBaits 相关依赖
<dependency>
    <groupId>tk.mybatis</groupId>
    <artifactId>mapper-spring-boot-starter</artifactId>
    <version>2.1.5</version>
</dependency>
application.yml
mybatis:
    # 实体类的存放路径
    type-aliases-package: com.funtl.hello.spring.boot.domain
    mapper-locations: classpath:mapper/*.xml
创建通用父级接口
主要作用是让 DAO 层的接口继承该接口,以达到使用 tk.mybatis 的目的
package tk.mybatis.mapper;

import tk.mybatis.mapper.common.Mapper;
import tk.mybatis.mapper.common.MySqlMapper;

/**
 * 自己的 Mapper
 * 特别注意,该接口不能被扫描到,否则会出错
 * <p>Title: MyMapper</p>
 * <p>Description: </p>
 *
 * @author Lusifer
 * @version 1.0.0
 * @date 2018/5/29 0:57
 */
public interface MyMapper<T> extends Mapper<T>, MySqlMapper<T> {
}
什么是 PageHelper
PageHelper 是 Mybatis 的分页插件,支持多数据库、多数据源。可以简化数据库的分页查询操作,整合过程也极其简单,只需引入依赖即可。
POM
在 pom.xml 文件中引入 pagehelper-spring-boot-starter 依赖
<dependency>
    <groupId>com.github.pagehelper</groupId>
    <artifactId>pagehelper-spring-boot-starter</artifactId>
    <version>1.2.12</version>
</dependency>
代码生成插件
概述
我们无需手动编写 实体类、DAO、XML 配置文件,只需要使用 MyBatis 提供的一个 Maven 插件就可以自动生成所需的各种文件便能够满足基本的业务需求,如果业务比较复杂只需要修改相关文件即可。
配置插件
在 pom.xml 文件中增加 mybatis-generator-maven-plugin 插件
<build>
    <plugins>
        <plugin>
            <groupId>org.mybatis.generator</groupId>
            <artifactId>mybatis-generator-maven-plugin</artifactId>
            <version>1.3.7</version>
            <configuration>
                <configurationFile>${basedir}/src/main/resources/generator/generatorConfig.xml</configurationFile>
                <overwrite>true</overwrite>
                <verbose>true</verbose>
            </configuration>
            <dependencies>
                <dependency>
                    <groupId>mysql</groupId>
                    <artifactId>mysql-connector-java</artifactId>
                    <version>${mysql.version}</version>
                </dependency>
                <dependency>
                    <groupId>tk.mybatis</groupId>
                    <artifactId>mapper</artifactId>
                    <version>4.1.5</version>
                </dependency>
            </dependencies>
        </plugin>
    </plugins>
</build>
注意:
configurationFile自动生成所需的配置文件路径
自动生成的配置
在 src/main/resources/generator/ 目录下创建 generatorConfig.xml 配置文件:
<?xml version="1.0" encoding="UTF-8"?>
<!DOCTYPE generatorConfiguration
        PUBLIC "-//mybatis.org//DTD MyBatis Generator Configuration 1.0//EN"
        "http://mybatis.org/dtd/mybatis-generator-config_1_0.dtd">

<generatorConfiguration>
    <!-- 引入数据库连接配置 -->
    <properties resource="jdbc.properties"/>

    <context id="Mysql" targetRuntime="MyBatis3Simple" defaultModelType="flat">
        <property name="beginningDelimiter" value="`"/>
        <property name="endingDelimiter" value="`"/>

        <!-- 配置 tk.mybatis 插件 -->
        <plugin type="tk.mybatis.mapper.generator.MapperPlugin">
            <property name="mappers" value="com.funtl.utils.MyMapper"/>
        </plugin>

        <!-- 配置数据库连接 -->
        <jdbcConnection
                driverClass="${jdbc.driverClass}"
                connectionURL="${jdbc.connectionURL}"
                userId="${jdbc.username}"
                password="${jdbc.password}">
        </jdbcConnection>

        <!-- 配置实体类存放路径 -->
        <javaModelGenerator targetPackage="com.funtl.hello.spring.boot.domain" targetProject="src/main/java"/>

        <!-- 配置 XML 存放路径 -->
        <sqlMapGenerator targetPackage="mapper" targetProject="src/main/resources"/>

        <!-- 配置 DAO 存放路径 -->
        <javaClientGenerator
                targetPackage="com.funtl.hello.spring.boot.mapper"
                targetProject="src/main/java"
                type="XMLMAPPER"/>

        <!-- 配置需要指定生成的数据库和表,% 代表所有表 -->
        <table catalog="myshop" tableName="%">
            <!-- 默认为 false,如果设置为 true,在生成的 SQL 中,table 名字不会加上 catalog 或 schema -->
            <property name="ignoreQualifiersAtRuntime" value="true"/>

            <!-- mysql 配置 -->
            <generatedKey column="id" sqlStatement="Mysql" identity="true"/>
        </table>
    </context>
</generatorConfiguration>
配置数据源
在 src/main/resources 目录下创建 jdbc.properties 数据源配置:
jdbc.driverClass=com.mysql.cj.jdbc.Driver
jdbc.connectionURL=jdbc:mysql://192.168.141.130:3306/myshop?useUnicode=true&characterEncoding=utf-8&useSSL=false
jdbc.username=root
jdbc.password=123456
插件自动生成
mvn mybatis-generator:generate

# 输出如下
"C:\Program Files\Java\jdk1.8.0_181\bin\java.exe" -Dvisualvm.id=757855494303000 -Dmaven.multiModuleProjectDirectory=D:\Workspace\Study\other\hello-spring-boot "-Dmaven.home=C:\Program Files\JetBrains\IntelliJ IDEA 2019.1.3\plugins\maven\lib\maven3" "-Dclassworlds.conf=C:\Program Files\JetBrains\IntelliJ IDEA 2019.1.3\plugins\maven\lib\maven3\bin\m2.conf" "-javaagent:C:\Program Files\JetBrains\IntelliJ IDEA 2019.1.3\lib\idea_rt.jar=64651:C:\Program Files\JetBrains\IntelliJ IDEA 2019.1.3\bin" -Dfile.encoding=UTF-8 -classpath "C:\Program Files\JetBrains\IntelliJ IDEA 2019.1.3\plugins\maven\lib\maven3\boot\plexus-classworlds-2.5.2.jar" org.codehaus.classworlds.Launcher -Didea.version2019.1.3 --update-snapshots -s D:\apache-maven-3.6.1\conf\settings.xml org.mybatis.generator:mybatis-generator-maven-plugin:1.3.7:generate
[INFO] Scanning for projects...
[INFO]
[INFO] ------------------------------------------------------------------------
[INFO] Building hello-spring-boot 0.0.1-SNAPSHOT
[INFO] ------------------------------------------------------------------------
[INFO]
[INFO] --- mybatis-generator-maven-plugin:1.3.7:generate (default-cli) @ hello-spring-boot ---
[INFO] Connecting to the Database
[INFO] Introspecting table myshop..%
[INFO] Generating Record class for table myshop..tb_item_param_item
[INFO] Generating Mapper Interface for table myshop..tb_item_param_item
[INFO] Generating SQL Map for table myshop..tb_item_param_item
[INFO] Generating Record class for table myshop..tb_item_cat
[INFO] Generating Mapper Interface for table myshop..tb_item_cat
[INFO] Generating SQL Map for table myshop..tb_item_cat
[INFO] Generating Record class for table myshop..tb_order
[INFO] Generating Mapper Interface for table myshop..tb_order
[INFO] Generating SQL Map for table myshop..tb_order
[INFO] Generating Record class for table myshop..tb_content
[INFO] Generating Mapper Interface for table myshop..tb_content
[INFO] Generating SQL Map for table myshop..tb_content
[INFO] Generating Record class for table myshop..tb_order_item
[INFO] Generating Mapper Interface for table myshop..tb_order_item
[INFO] Generating SQL Map for table myshop..tb_order_item
[INFO] Generating Record class for table myshop..tb_item
[INFO] Generating Mapper Interface for table myshop..tb_item
[INFO] Generating SQL Map for table myshop..tb_item
[INFO] Generating Record class for table myshop..tb_item_desc
[INFO] Generating Mapper Interface for table myshop..tb_item_desc
[INFO] Generating SQL Map for table myshop..tb_item_desc
[INFO] Generating Record class for table myshop..tb_item_param
[INFO] Generating Mapper Interface for table myshop..tb_item_param
[INFO] Generating SQL Map for table myshop..tb_item_param
[INFO] Generating Record class for table myshop..tb_order_shipping
[INFO] Generating Mapper Interface for table myshop..tb_order_shipping
[INFO] Generating SQL Map for table myshop..tb_order_shipping
[INFO] Generating Record class for table myshop..tb_user
[INFO] Generating Mapper Interface for table myshop..tb_user
[INFO] Generating SQL Map for table myshop..tb_user
[INFO] Generating Record class for table myshop..tb_content_category
[INFO] Generating Mapper Interface for table myshop..tb_content_category
[INFO] Generating SQL Map for table myshop..tb_content_category
[INFO] Saving file TbItemParamItemMapper.xml
[INFO] Saving file TbItemCatMapper.xml
[INFO] Saving file TbOrderMapper.xml
[INFO] Saving file TbContentMapper.xml
[INFO] Saving file TbOrderItemMapper.xml
[INFO] Saving file TbItemMapper.xml
[INFO] Saving file TbItemDescMapper.xml
[INFO] Saving file TbItemParamMapper.xml
[INFO] Saving file TbOrderShippingMapper.xml
[INFO] Saving file TbUserMapper.xml
[INFO] Saving file TbContentCategoryMapper.xml
[INFO] Saving file TbItemParamItem.java
[INFO] Saving file TbItemParamItemMapper.java
[INFO] Saving file TbItemCat.java
[INFO] Saving file TbItemCatMapper.java
[INFO] Saving file TbOrder.java
[INFO] Saving file TbOrderMapper.java
[INFO] Saving file TbContent.java
[INFO] Saving file TbContentMapper.java
[INFO] Saving file TbOrderItem.java
[INFO] Saving file TbOrderItemMapper.java
[INFO] Saving file TbItem.java
[INFO] Saving file TbItemMapper.java
[INFO] Saving file TbItemDesc.java
[INFO] Saving file TbItemDescMapper.java
[INFO] Saving file TbItemParam.java
[INFO] Saving file TbItemParamMapper.java
[INFO] Saving file TbOrderShipping.java
[INFO] Saving file TbOrderShippingMapper.java
[INFO] Saving file TbUser.java
[INFO] Saving file TbUserMapper.java
[INFO] Saving file TbContentCategory.java
[INFO] Saving file TbContentCategoryMapper.java
[WARNING] Column id, specified as an identity column in table myshop..tb_order, does not exist in the table.
[WARNING] Column id, specified as an identity column in table myshop..tb_item_desc, does not exist in the table.
[WARNING] Column id, specified as an identity column in table myshop..tb_order_shipping, does not exist in the table.
[INFO] ------------------------------------------------------------------------
[INFO] BUILD SUCCESS
[INFO] ------------------------------------------------------------------------
[INFO] Total time: 1.892 s
[INFO] Finished at: 2019-06-24T03:40:09+08:00
[INFO] Final Memory: 30M/634M
[INFO] ------------------------------------------------------------------------

Process finished with exit code 0
附:扩展阅读
完整配置案例
<?xml version="1.0" encoding="UTF-8"?>
<!DOCTYPE generatorConfiguration
  PUBLIC "-//mybatis.org//DTD MyBatis Generator Configuration 1.0//EN"
"http://mybatis.org/dtd/mybatis-generator-config_1_0.dtd">
<!-- 配置生成器 -->
<generatorConfiguration>
<!-- 可以用于加载配置项或者配置文件,在整个配置文件中就可以使用${propertyKey}的方式来引用配置项
    resource:配置资源加载地址,使用resource,MBG从classpath开始找,比如com/myproject/generatorConfig.properties
    url:配置资源加载地质,使用URL的方式,比如file:///C:/myfolder/generatorConfig.properties.
    注意,两个属性只能选址一个;
    另外,如果使用了mybatis-generator-maven-plugin,那么在pom.xml中定义的properties都可以直接在generatorConfig.xml中使用
<properties resource="" url="" />
 -->

 <!-- 在MBG工作的时候,需要额外加载的依赖包
     location属性指明加载jar/zip包的全路径
<classPathEntry location="/Program Files/IBM/SQLLIB/java/db2java.zip" />
  -->

<!--
    context:生成一组对象的环境
    id:必选,上下文id,用于在生成错误时提示
    defaultModelType:指定生成对象的样式
        1,conditional:类似hierarchical;
        2,flat:所有内容(主键,blob)等全部生成在一个对象中;
        3,hierarchical:主键生成一个XXKey对象(key class),Blob等单独生成一个对象,其他简单属性在一个对象中(record class)
    targetRuntime:
        1,MyBatis3:默认的值,生成基于MyBatis3.x以上版本的内容,包括XXXBySample;
        2,MyBatis3Simple:类似MyBatis3,只是不生成XXXBySample;
    introspectedColumnImpl:类全限定名,用于扩展MBG
-->
<context id="mysql" defaultModelType="hierarchical" targetRuntime="MyBatis3Simple" >

    <!-- 自动识别数据库关键字,默认false,如果设置为true,根据SqlReservedWords中定义的关键字列表;
        一般保留默认值,遇到数据库关键字(Java关键字),使用columnOverride覆盖
     -->
    <property name="autoDelimitKeywords" value="false"/>
    <!-- 生成的Java文件的编码 -->
    <property name="javaFileEncoding" value="UTF-8"/>
    <!-- 格式化java代码 -->
    <property name="javaFormatter" value="org.mybatis.generator.api.dom.DefaultJavaFormatter"/>
    <!-- 格式化XML代码 -->
    <property name="xmlFormatter" value="org.mybatis.generator.api.dom.DefaultXmlFormatter"/>

    <!-- beginningDelimiter和endingDelimiter:指明数据库的用于标记数据库对象名的符号,比如ORACLE就是双引号,MYSQL默认是`反引号; -->
    <property name="beginningDelimiter" value="`"/>
    <property name="endingDelimiter" value="`"/>

    <!-- 必须要有的,使用这个配置链接数据库
        @TODO:是否可以扩展
        # MySQL 8.x: com.mysql.cj.jdbc.Driver
     -->
    <jdbcConnection driverClass="com.mysql.jdbc.Driver" connectionURL="jdbc:mysql:///pss" userId="root" password="admin">
        <!-- 这里面可以设置property属性,每一个property属性都设置到配置的Driver上 -->
    </jdbcConnection>

    <!-- java类型处理器
        用于处理DB中的类型到Java中的类型,默认使用JavaTypeResolverDefaultImpl;
        注意一点,默认会先尝试使用Integer,Long,Short等来对应DECIMAL和 NUMERIC数据类型;
    -->
    <javaTypeResolver type="org.mybatis.generator.internal.types.JavaTypeResolverDefaultImpl">
        <!--
            true:使用BigDecimal对应DECIMAL和 NUMERIC数据类型
            false:默认,
                scale>0;length>18:使用BigDecimal;
                scale=0;length[10,18]:使用Long;
                scale=0;length[5,9]:使用Integer;
                scale=0;length<5:使用Short;
         -->
        <property name="forceBigDecimals" value="false"/>
    </javaTypeResolver>


    <!-- java模型创建器,是必须要的元素
        负责:1,key类(见context的defaultModelType);2,java类;3,查询类
        targetPackage:生成的类要放的包,真实的包受enableSubPackages属性控制;
        targetProject:目标项目,指定一个存在的目录下,生成的内容会放到指定目录中,如果目录不存在,MBG不会自动建目录
     -->
    <javaModelGenerator targetPackage="com._520it.mybatis.domain" targetProject="src/main/java">
        <!--  for MyBatis3/MyBatis3Simple
            自动为每一个生成的类创建一个构造方法,构造方法包含了所有的field;而不是使用setter;
         -->
        <property name="constructorBased" value="false"/>

        <!-- 在targetPackage的基础上,根据数据库的schema再生成一层package,最终生成的类放在这个package下,默认为false -->
        <property name="enableSubPackages" value="true"/>

        <!-- for MyBatis3 / MyBatis3Simple
            是否创建一个不可变的类,如果为true,
            那么MBG会创建一个没有setter方法的类,取而代之的是类似constructorBased的类
         -->
        <property name="immutable" value="false"/>

        <!-- 设置一个根对象,
            如果设置了这个根对象,那么生成的keyClass或者recordClass会继承这个类;在Table的rootClass属性中可以覆盖该选项
            注意:如果在key class或者record class中有root class相同的属性,MBG就不会重新生成这些属性了,包括:
                1,属性名相同,类型相同,有相同的getter/setter方法;
         -->
        <property name="rootClass" value="com._520it.mybatis.domain.BaseDomain"/>

        <!-- 设置是否在getter方法中,对String类型字段调用trim()方法 -->
        <property name="trimStrings" value="true"/>
    </javaModelGenerator>


    <!-- 生成SQL map的XML文件生成器,
        注意,在Mybatis3之后,我们可以使用mapper.xml文件+Mapper接口(或者不用mapper接口),
            或者只使用Mapper接口+Annotation,所以,如果 javaClientGenerator配置中配置了需要生成XML的话,这个元素就必须配置
        targetPackage/targetProject:同javaModelGenerator
     -->
    <sqlMapGenerator targetPackage="com._520it.mybatis.mapper" targetProject="src/main/resources">
        <!-- 在targetPackage的基础上,根据数据库的schema再生成一层package,最终生成的类放在这个package下,默认为false -->
        <property name="enableSubPackages" value="true"/>
    </sqlMapGenerator>


    <!-- 对于mybatis来说,即生成Mapper接口,注意,如果没有配置该元素,那么默认不会生成Mapper接口
        targetPackage/targetProject:同javaModelGenerator
        type:选择怎么生成mapper接口(在MyBatis3/MyBatis3Simple下):
            1,ANNOTATEDMAPPER:会生成使用Mapper接口+Annotation的方式创建(SQL生成在annotation中),不会生成对应的XML;
            2,MIXEDMAPPER:使用混合配置,会生成Mapper接口,并适当添加合适的Annotation,但是XML会生成在XML中;
            3,XMLMAPPER:会生成Mapper接口,接口完全依赖XML;
        注意,如果context是MyBatis3Simple:只支持ANNOTATEDMAPPER和XMLMAPPER
    -->
    <javaClientGenerator targetPackage="com._520it.mybatis.mapper" type="ANNOTATEDMAPPER" targetProject="src/main/java">
        <!-- 在targetPackage的基础上,根据数据库的schema再生成一层package,最终生成的类放在这个package下,默认为false -->
        <property name="enableSubPackages" value="true"/>

        <!-- 可以为所有生成的接口添加一个父接口,但是MBG只负责生成,不负责检查
        <property name="rootInterface" value=""/>
         -->
    </javaClientGenerator>

    <!-- 选择一个table来生成相关文件,可以有一个或多个table,必须要有table元素
        选择的table会生成一下文件:
        1,SQL map文件
        2,生成一个主键类;
        3,除了BLOB和主键的其他字段的类;
        4,包含BLOB的类;
        5,一个用户生成动态查询的条件类(selectByExample, deleteByExample),可选;
        6,Mapper接口(可选)
        tableName(必要):要生成对象的表名;
        注意:大小写敏感问题。正常情况下,MBG会自动的去识别数据库标识符的大小写敏感度,在一般情况下,MBG会
            根据设置的schema,catalog或tablename去查询数据表,按照下面的流程:
            1,如果schema,catalog或tablename中有空格,那么设置的是什么格式,就精确的使用指定的大小写格式去查询;
            2,否则,如果数据库的标识符使用大写的,那么MBG自动把表名变成大写再查找;
            3,否则,如果数据库的标识符使用小写的,那么MBG自动把表名变成小写再查找;
            4,否则,使用指定的大小写格式查询;
        另外的,如果在创建表的时候,使用的""把数据库对象规定大小写,就算数据库标识符是使用的大写,在这种情况下也会使用给定的大小写来创建表名;
        这个时候,请设置delimitIdentifiers="true"即可保留大小写格式;
        可选:
        1,schema:数据库的schema;
        2,catalog:数据库的catalog;
        3,alias:为数据表设置的别名,如果设置了alias,那么生成的所有的SELECT SQL语句中,列名会变成:alias_actualColumnName
        4,domainObjectName:生成的domain类的名字,如果不设置,直接使用表名作为domain类的名字;可以设置为somepck.domainName,那么会自动把domainName类再放到somepck包里面;
        5,enableInsert(默认true):指定是否生成insert语句;
        6,enableSelectByPrimaryKey(默认true):指定是否生成按照主键查询对象的语句(就是getById或get);
        7,enableSelectByExample(默认true):MyBatis3Simple为false,指定是否生成动态查询语句;
        8,enableUpdateByPrimaryKey(默认true):指定是否生成按照主键修改对象的语句(即update);
        9,enableDeleteByPrimaryKey(默认true):指定是否生成按照主键删除对象的语句(即delete);
        10,enableDeleteByExample(默认true):MyBatis3Simple为false,指定是否生成动态删除语句;
        11,enableCountByExample(默认true):MyBatis3Simple为false,指定是否生成动态查询总条数语句(用于分页的总条数查询);
        12,enableUpdateByExample(默认true):MyBatis3Simple为false,指定是否生成动态修改语句(只修改对象中不为空的属性);
        13,modelType:参考context元素的defaultModelType,相当于覆盖;
        14,delimitIdentifiers:参考tableName的解释,注意,默认的delimitIdentifiers是双引号,如果类似MYSQL这样的数据库,使用的是`(反引号,那么还需要设置context的beginningDelimiter和endingDelimiter属性)
        15,delimitAllColumns:设置是否所有生成的SQL中的列名都使用标识符引起来。默认为false,delimitIdentifiers参考context的属性
        注意,table里面很多参数都是对javaModelGenerator,context等元素的默认属性的一个复写;
     -->
    <table tableName="userinfo" >

        <!-- 参考 javaModelGenerator 的 constructorBased属性-->
        <property name="constructorBased" value="false"/>

        <!-- 默认为false,如果设置为true,在生成的SQL中,table名字不会加上catalog或schema; -->
        <property name="ignoreQualifiersAtRuntime" value="false"/>

        <!-- 参考 javaModelGenerator 的 immutable 属性 -->
        <property name="immutable" value="false"/>

        <!-- 指定是否只生成domain类,如果设置为true,只生成domain类,如果还配置了sqlMapGenerator,那么在mapper XML文件中,只生成resultMap元素 -->
        <property name="modelOnly" value="false"/>

        <!-- 参考 javaModelGenerator 的 rootClass 属性
        <property name="rootClass" value=""/>
         -->

        <!-- 参考javaClientGenerator 的  rootInterface 属性
        <property name="rootInterface" value=""/>
        -->

        <!-- 如果设置了runtimeCatalog,那么在生成的SQL中,使用该指定的catalog,而不是table元素上的catalog
        <property name="runtimeCatalog" value=""/>
        -->

        <!-- 如果设置了runtimeSchema,那么在生成的SQL中,使用该指定的schema,而不是table元素上的schema
        <property name="runtimeSchema" value=""/>
        -->

        <!-- 如果设置了runtimeTableName,那么在生成的SQL中,使用该指定的tablename,而不是table元素上的tablename
        <property name="runtimeTableName" value=""/>
        -->

        <!-- 注意,该属性只针对MyBatis3Simple有用;
            如果选择的runtime是MyBatis3Simple,那么会生成一个SelectAll方法,如果指定了selectAllOrderByClause,那么会在该SQL中添加指定的这个order条件;
         -->
        <property name="selectAllOrderByClause" value="age desc,username asc"/>

        <!-- 如果设置为true,生成的model类会直接使用column本身的名字,而不会再使用驼峰命名方法,比如BORN_DATE,生成的属性名字就是BORN_DATE,而不会是bornDate -->
        <property name="useActualColumnNames" value="false"/>


        <!-- generatedKey用于生成生成主键的方法,
            如果设置了该元素,MBG会在生成的<insert>元素中生成一条正确的<selectKey>元素,该元素可选
            column:主键的列名;
            sqlStatement:要生成的selectKey语句,有以下可选项:
                Cloudscape:相当于selectKey的SQL为: VALUES IDENTITY_VAL_LOCAL()
                DB2       :相当于selectKey的SQL为: VALUES IDENTITY_VAL_LOCAL()
                DB2_MF    :相当于selectKey的SQL为:SELECT IDENTITY_VAL_LOCAL() FROM SYSIBM.SYSDUMMY1
                Derby      :相当于selectKey的SQL为:VALUES IDENTITY_VAL_LOCAL()
                HSQLDB      :相当于selectKey的SQL为:CALL IDENTITY()
                Informix  :相当于selectKey的SQL为:select dbinfo('sqlca.sqlerrd1') from systables where tabid=1
                MySql      :相当于selectKey的SQL为:SELECT LAST_INSERT_ID()
                SqlServer :相当于selectKey的SQL为:SELECT SCOPE_IDENTITY()
                SYBASE      :相当于selectKey的SQL为:SELECT @@IDENTITY
                JDBC      :相当于在生成的insert元素上添加useGeneratedKeys="true"和keyProperty属性
        <generatedKey column="" sqlStatement=""/>
         -->

        <!--
            该元素会在根据表中列名计算对象属性名之前先重命名列名,非常适合用于表中的列都有公用的前缀字符串的时候,
            比如列名为:CUST_ID,CUST_NAME,CUST_EMAIL,CUST_ADDRESS等;
            那么就可以设置searchString为"^CUST_",并使用空白替换,那么生成的Customer对象中的属性名称就不是
            custId,custName等,而是先被替换为ID,NAME,EMAIL,然后变成属性:id,name,email;
            注意,MBG是使用java.util.regex.Matcher.replaceAll来替换searchString和replaceString的,
            如果使用了columnOverride元素,该属性无效;
        <columnRenamingRule searchString="" replaceString=""/>
         -->


         <!-- 用来修改表中某个列的属性,MBG会使用修改后的列来生成domain的属性;
             column:要重新设置的列名;
             注意,一个table元素中可以有多个columnOverride元素哈~
          -->
         <columnOverride column="username">
             <!-- 使用property属性来指定列要生成的属性名称 -->
             <property name="property" value="userName"/>

             <!-- javaType用于指定生成的domain的属性类型,使用类型的全限定名
             <property name="javaType" value=""/>
              -->

             <!-- jdbcType用于指定该列的JDBC类型
             <property name="jdbcType" value=""/>
              -->

             <!-- typeHandler 用于指定该列使用到的TypeHandler,如果要指定,配置类型处理器的全限定名
                 注意,mybatis中,不会生成到mybatis-config.xml中的typeHandler
                 只会生成类似:where id = #{id,jdbcType=BIGINT,typeHandler=com._520it.mybatis.MyTypeHandler}的参数描述
             <property name="jdbcType" value=""/>
             -->

             <!-- 参考table元素的delimitAllColumns配置,默认为false
             <property name="delimitedColumnName" value=""/>
              -->
         </columnOverride>

         <!-- ignoreColumn设置一个MGB忽略的列,如果设置了改列,那么在生成的domain中,生成的SQL中,都不会有该列出现
             column:指定要忽略的列的名字;
             delimitedColumnName:参考table元素的delimitAllColumns配置,默认为false
             注意,一个table元素中可以有多个ignoreColumn元素
         <ignoreColumn column="deptId" delimitedColumnName=""/>
         -->
    </table>

</context>

</generatorConfiguration>
CRUD 操作
案例代码如下
package com.funtl.hello.spring.boot;
import java.util.Date;

import com.funtl.hello.spring.boot.domain.TbUser;
import com.funtl.hello.spring.boot.mapper.TbUserMapper;
import com.github.pagehelper.PageHelper;
import com.github.pagehelper.PageInfo;
import org.junit.Test;
import org.junit.runner.RunWith;
import org.springframework.beans.factory.annotation.Autowired;
import org.springframework.boot.test.context.SpringBootTest;
import org.springframework.test.annotation.Rollback;
import org.springframework.test.context.junit4.SpringRunner;
import org.springframework.transaction.annotation.Transactional;
import tk.mybatis.mapper.entity.Example;

import java.util.List;

@RunWith(SpringRunner.class)
@SpringBootTest
@Transactional
@Rollback
public class HelloSpringBootApplicationTests {

    /**
     * 注入 DAO
     */
    @Autowired
    private TbUserMapper tbUserMapper;

    /**
     * 查询
     */
    @Test
    public void testSelectAll() {
        List<TbUser> tbUsers = tbUserMapper.selectAll();
        tbUsers.forEach(tbUser -> {
            System.out.println(tbUser);
        });
    }

    /**
     * 条件查询
     */
    @Test
    public void testSelectCondition() {
        Example example = new Example(TbUser.class);
        example.createCriteria().andEqualTo("username", "zhangsan");
        List<TbUser> tbUsers = tbUserMapper.selectByExample(example);
        tbUsers.forEach(tbUser -> {
            System.out.println(tbUser);
        });
    }

    /**
     * 新增
     */
    @Test
    public void testInsert() {
        TbUser tbUser = new TbUser();
        tbUser.setUsername("Lusifer");
        tbUser.setPassword("123456");
        tbUser.setPhone("15888888888");
        tbUser.setEmail("topsale@vip.qq.com");
        tbUser.setCreated(new Date());
        tbUser.setUpdated(new Date());

        tbUserMapper.insert(tbUser);
    }

    /**
     * 更新
     */
    @Test
    public void testUpdate() {
        TbUser tbUser = tbUserMapper.selectByPrimaryKey(37L);
        tbUser.setUsername("Happy");

        tbUserMapper.updateByPrimaryKey(tbUser);
    }

    /**
     * 修改
     */
    @Test
    public void testDelete() {
        tbUserMapper.deleteByPrimaryKey(37L);
    }

    /**
     * 分页
     */
    @Test
    public void testPage() {
        Example example = new Example(TbUser.class);
        example.createCriteria().andLike("username", "z%");

        PageHelper.startPage(1, 5);
        PageInfo<TbUser> pageInfo = new PageInfo<>(tbUserMapper.selectByExample(example));
        System.out.println(pageInfo.getTotal());
        System.out.println(pageInfo.getPages());
        pageInfo.getList().forEach(tbUser -> {
            System.out.println(tbUser);
        });
    }

}
Thymeleaf 常用语法
引入 Thymeleaf
修改 html 标签用于引入 thymeleaf 引擎,这样才可以在其他标签里使用 th:* 语法,这是下面语法的前提。
<!DOCTYPE html SYSTEM "http://www.thymeleaf.org/dtd/xhtml1-strict-thymeleaf-spring4-4.dtd">
<html xmlns="http://www.w3.org/1999/xhtml" xmlns:th="http://www.thymeleaf.org">
获取变量值
<p th:text="'Hello!, ' + ${name} + '!'" >name</p>
可以看出获取变量值用 $ 符号,对于javaBean的话使用 变量名.属性名 方式获取,这点和 EL 表达式一样.
另外 $ 表达式只能写在th标签内部,不然不会生效,上面例子就是使用 th:text 标签的值替换 p 标签里面的值,至于 p 里面的原有的值只是为了给前端开发时做展示用的.这样的话很好的做到了前后端分离.
引入 URL
Thymeleaf 对于 URL 的处理是通过语法 @{…} 来处理的
<a th:href="@{http://www.baidu.com}">绝对路径</a>
<a th:href="@{/}">相对路径</a>
<a th:href="@{css/bootstrap.min.css}">Content路径,默认访问static下的css文件夹</a>
类似的标签有:th:href 和 th:src
字符串替换
很多时候可能我们只需要对一大段文字中的某一处地方进行替换,可以通过字符串拼接操作完成:
<span th:text="'Welcome to our application, ' + ${user.name} + '!'">
一种更简洁的方式是:
<span th:text="|Welcome to our application, ${user.name}!|">
当然这种形式限制比较多,|…|中只能包含变量表达式${…},不能包含其他常量、条件表达式等。
运算符
在表达式中可以使用各类算术运算符,例如+, -, *, /, %
th:with="isEven=(${prodStat.count} % 2 == 0)"
逻辑运算符>, <, <=,>=,==,!=都可以使用,唯一需要注意的是使用<,>时需要用它的HTML转义符:
th:if="${prodStat.count} > 1"
th:text="'Execution mode is ' + ( (${execMode} == 'dev')? 'Development' : 'Production')"
条件
if/unless
Thymeleaf 中使用 th:if 和 th:unless 属性进行条件判断,下面的例子中,标签只有在 th:if 中条件成立时才显示:
<a th:href="@{/login}" th:unless=${session.user != null}>Login</a>
th:unless 于 th:if 恰好相反,只有表达式中的条件不成立,才会显示其内容。
switch
Thymeleaf 同样支持多路选择 Switch 结构:
<div th:switch="${user.role}">
  <p th:case="'admin'">User is an administrator</p>
  <p th:case="#{roles.manager}">User is a manager</p>
</div>
默认属性 default 可以用 * 表示:
<div th:switch="${user.role}">
  <p th:case="'admin'">User is an administrator</p>
  <p th:case="#{roles.manager}">User is a manager</p>
  <p th:case="*">User is some other thing</p>
</div>
循环
渲染列表数据是一种非常常见的场景,例如现在有 n 条记录需要渲染成一个表格,该数据集合必须是可以遍历的,使用 th:each 标签:
<body>
  <h1>Product list</h1>

  <table>
    <tr>
      <th>NAME</th>
      <th>PRICE</th>
      <th>IN STOCK</th>
    </tr>
    <tr th:each="prod : ${prods}">
      <td th:text="${prod.name}">Onions</td>
      <td th:text="${prod.price}">2.41</td>
      <td th:text="${prod.inStock}? #{true} : #{false}">yes</td>
    </tr>
  </table>

  <p>
    <a href="../home.html" th:href="@{/}">Return to home</a>
  </p>
</body>
可以看到,需要在被循环渲染的元素(这里是)中加入 th:each 标签,其中 th:each="prod : ${prods}" 意味着对集合变量 prods 进行遍历,循环变量是 prod 在循环体中可以通过表达式访问。
Thymeleaf 表达式语法
Message 表达式
#{...}
<p th:utext="#{home.welcome(${session.user.name})}"> Welcome to our grocery store, Sebastian Pepper!</p>
<p th:utext="#{${welcomeMsgKey}(${session.user.name})}"> Welcome to our grocery store, Sebastian Pepper!</p>
变量表达式
${}
ongl 标准语法,方法也可以被调用
选择变量表达式
*{}
<div th:object="${session.user}">
    <p>Name: <span th:text="*{firstName}">Sebastian</span>.</p>
    <p>Surname: <span th:text="*{lastName}">Pepper</span>.</p>
    <p>Nationality: <span th:text={nationality}">Saturn</span>.</p>
</div>

等价于

<div>
    <p>Name: <span th:text="${session.user.firstName}">Sebastian</span>.</p>
    <p>Surname: <span th:text="${session.user.lastName}">Pepper</span>.</p>
    <p>Nationality: <span th:text="${session.user.nationality}">Saturn</span>.</p>
</div>

当然了,这两者可以混合使用
还有一种方式

<div>
    <p>Name: <span th:text="*{session.user.name}">Sebastian</span>.</p>
    <p>Surname: <span th:text="*{session.user.surname}">Pepper</span>.</p>
    <p>Nationality: <span th:text="*{session.user.nationality}">Saturn</span>.</p>
</div>
链接 URL 表达式
@{}
<!-- Will produce 'http://localhost:8080/gtvg/order/details?orderId=3' (plus rewriting) --> <a href="details.html"

th:href="@{http://localhost:8080/gtvg/order/details(orderId=${o.id})}">view</a> <!-- Will produce '/gtvg/order/details?orderId=3' (plus rewriting) -->

<a href="details.html" th:href="@{/order/details(orderId=${o.id})}">view</a>

<!-- Will produce '/gtvg/order/3/details' (plus rewriting) -->

<a href="details.html" th:href="@{/order/{orderId}/details(orderId=${o.id})}">view</a>
变量
| 分类 | 实例 |
|---|---|
| 文本 | one text,Another one!,… |
| 数字 | 0 , 34 , 3.0 , 12.3 ,… |
| 真假 | true , false |
| 文字符号 | one , sometext , main ,… |
算数运算
| 分类 | 实例 |
|---|---|
| +, -, *, /, % | 二元运算符 |
| - | 减号(一元运算符) |
真假运算
| 分类 | 实例 |
|---|---|
| and , or | 二元运算符 |
| ! , not | 否定(一元运算符) |
比较运算
| 分类 | 实例 |
|---|---|
| >, <, >=, <= (gt, lt, ge, le) | 比较 |
| == , != ( eq , ne ) | 平等 |
条件运算
| 分类 | 实例 | |————–|—————————| | if-then | (if) ? (then) | | if-then-else | (if) ? (then) : (else) | | Default | (value) ?: (defaultvalue) |
Thymeleaf 参考手册
概述
本章为 Thymeleaf 语法参考,主要介绍如:循环、判断、模板布局、内置对象等。
声明
修改 html 标签用于引入 thymeleaf 引擎,这样才可以在其他标签里使用 th:* 语法。
<!DOCTYPE html SYSTEM "http://www.thymeleaf.org/dtd/xhtml1-strict-thymeleaf-spring4-4.dtd">
<html xmlns="http://www.w3.org/1999/xhtml" xmlns:th="http://www.thymeleaf.org">
使用文本
| 语法 | 说明 |
|---|---|
{home.welcome} |
使用国际化文本,国际化传参直接追加 (value…) |
${user.name} |
使用会话属性 |
@{} 表达式中使用超链接 |
<link rel="stylesheet" type="text/css" media="all"href="../../css/gtvg.css" th:href="@{/css/gtvg.css}" /> |
${} |
表达式中基本对象 |
| param | 获取请求参数,比如 ${param.name}, http://localhost:8080?name=jeff |
| session | 获取 session 的属性 |
| application | 获取 application 的属性 |
| execInfo | 有两个属性 templateName 和 now (是 java 的 Calendar 对象) |
| ctx | |
| vars | |
| locale | |
| httpServletRequest | |
| httpSession | |
| th 扩展标签 | |
th:text |
普通字符串 |
th:utext |
转义文本 |
th:href |
链接 |
th:attr 设置元素属性 |
<img src="../../images/gtvglogo.png" th:attr="src=@{/images/gtvglogo.png},title=#{logo},alt=#{logo}" /> |
th:with |
定义常量 |
th:attrappend |
追加属性 |
th:classappend |
追加类样式 |
th:styleappend |
追加样式 |
其他标签
| 语法 | 说明 |
|---|---|
th:abbr |
|
th:accept |
|
th:accept-charset |
|
th:accesskey |
|
th:action |
|
th:align |
|
th:alt |
|
th:archive |
|
th:audio |
|
th:autocomplete |
|
th:axis |
|
th:background |
|
th:bgcolor |
|
th:border |
|
th:cellpadding |
|
th:cellspacing |
|
th:challenge |
|
th:charset |
|
th:cite |
|
th:class |
|
th:classid |
|
th:codebase |
|
th:codetype |
|
th:cols |
|
th:colspan |
|
th:compact |
|
th:content |
|
th:contenteditable |
|
th:contextmenu |
|
th:data |
|
th:datetime |
|
th:dir |
|
th:draggable |
|
th:dropzone |
|
th:enctype |
|
th:for |
|
th:form |
|
th:formaction |
|
th:formenctype |
|
th:formmethod |
|
th:formtarget |
|
th:frame |
|
th:frameborder |
|
th:headers |
|
th:height |
|
th:high |
|
th:href |
|
th:hreflang |
|
th:hspace |
|
th:http-equiv |
|
th:icon |
|
th:id |
|
th:keytype |
|
th:kind |
|
th:label |
|
th:lang |
|
th:list |
|
th:longdesc |
|
th:low |
|
th:manifest |
|
th:marginheight |
|
th:marginwidth |
|
th:max |
|
th:maxlength |
|
th:media |
|
th:method |
|
th:min |
|
th:name |
|
th:optimum |
|
th:pattern |
|
th:placeholder |
|
th:poster |
|
th:preload |
|
th:radiogroup |
|
th:rel |
|
th:rev |
|
th:rows |
|
th:rowspan |
|
th:rules |
|
th:sandbox |
|
th:scheme |
|
th:scope |
|
th:scrolling |
|
th:size |
|
th:sizes |
|
th:span |
|
th:spellcheck |
|
th:src |
|
th:srclang |
|
th:standby |
|
th:start |
|
th:step |
|
th:style |
|
th:summary |
|
th:tabindex |
|
th:target |
|
th:title |
|
th:type |
|
th:usemap |
|
th:value |
|
th:valuetype |
|
th:vspace |
|
th:width |
|
th:wrap |
|
th:xmlbase |
|
th:xmllang |
|
th:xmlspace |
|
th:alt-title |
|
th:lang-xmllang |
循环
<tr th:each="prod : ${prods}">
    <td th:text="${prod.name}">Onions</td>
    <td th:text="${prod.price}">2.41</td>
    <td th:text="${prod.inStock}? #{true} : #{false}">yes</td>
</tr>

<table>
    <tr>
        <th>NAME</th>
        <th>PRICE</th>
        <th>IN STOCK</th>
    </tr>
    <tr th:each="prod,iterStat : ${prods}" th:class="${iterStat.odd}? 'odd'">
    <td th:text="${prod.name}">Onions</td>
    <td th:text="${prod.price}">2.41</td>
    <td th:text="${prod.inStock}? #{true} : #{false}">yes</td>
  </tr>
</table>
迭代器的状态:
- index: 当前的索引,从0开始
- count: 当前的索引,从1开始
- size:总数
- current:
- even/odd:
- first
- last
判断
if
<a href="comments.html" th:href="@{/product/comments(prodId=${prod.id})}" th:if="${not #lists.isEmpty(prod.comments)}">view</a>
unless
<a href="comments.html" th:href="@{/comments(prodId=${prod.id})}" th:unless="${#lists.isEmpty(prod.comments)}">view</a>
switch
<div th:switch="${user.role}">
    <p th:case="'admin'">User is an administrator</p> <p th:case="#{roles.manager}">User is a manager</p>
</div>

<div th:switch="${user.role}">
    <p th:case="'admin'">User is an administrator</p> <p th:case="#{roles.manager}">User is a manager</p> <p th:case="*">User is some other thing</p>
</div>
th:block
<table>
    <th:block th:each="user : ${users}">
    <tr>
        <td th:text="${user.login}">...</td> <td th:text="${user.name}">...</td>
    </tr>
    <tr>
        <td colspan="2" th:text="${user.address}">...</td>
    </tr>
    </th:block>
</table>
推荐下面写法(编译前看不见)
<table>
    <tr>
        <td th:text="${user.login}">...</td>
        <td th:text="${user.name}">...</td> </tr>
        <tr>
        <td colspan="2" th:text="${user.address}">...</td>
    </tr>
    <!--/*/ </th:block> /*/-->
</table>
th:inline
th:inline
th:inline 可以等于 text , javascript(dart) , none
text: [[…]]
<p th:inline="text">Hello, [[#{test}]]</p>
javascript: /[[…]]/
<script th:inline="javascript">
    var username = /*[[
        #{test}
    ]]*/;
    var name = /*[[
        ${param.name[0]}+${execInfo.templateName}+'-'+${#dates.createNow()}+'-'+${#locale}
    ]]*/;
</script>
<script th:inline="javascript">

/*<![CDATA[*/

    var username = [[#{test}]];

    var name = [[${param.name[0]}+${execInfo.templateName}+'-'+${#dates.createNow()}+'-'+${#locale}]];

/*]]>*/

</script>
adding code: /* [+…+]*/
var x = 23;
/*[+
var msg = 'Hello, ' + [[${session.user.name}]]; +]*/
var f = function() {
removind code: /[- / and /* -]*/
var x = 23;
/*[- */
var msg = 'This is a non-working template'; /* -]*/
var f = function() {
Thymeleaf 内置对象
#dates
/*
* ======================================================================
* See javadoc API for class org.thymeleaf.expression.Dates
* ======================================================================
*/
/*
* Format date with the standard locale format
* Also works with arrays, lists or sets
*/
${#dates.format(date)}
${#dates.arrayFormat(datesArray)}
${#dates.listFormat(datesList)}
${#dates.setFormat(datesSet)}
/*
* Format date with the ISO8601 format
* Also works with arrays, lists or sets
*/
${#dates.formatISO(date)}
${#dates.arrayFormatISO(datesArray)}
${#dates.listFormatISO(datesList)}
${#dates.setFormatISO(datesSet)}
/*
* Format date with the specified pattern
* Also works with arrays, lists or sets
*/
${#dates.format(date, 'dd/MMM/yyyy HH:mm')}
${#dates.arrayFormat(datesArray, 'dd/MMM/yyyy HH:mm')}
${#dates.listFormat(datesList, 'dd/MMM/yyyy HH:mm')}
${#dates.setFormat(datesSet, 'dd/MMM/yyyy HH:mm')}
/*
* Obtain date properties
* Also works with arrays, lists or sets
*/
${#dates.day(date)} // also arrayDay(...), listDay(...), etc.
${#dates.month(date)} // also arrayMonth(...), listMonth(...), etc.
${#dates.monthName(date)} // also arrayMonthName(...), listMonthName(...), etc.
${#dates.monthNameShort(date)} // also arrayMonthNameShort(...), listMonthNameShort(...), etc.
${#dates.year(date)} // also arrayYear(...), listYear(...), etc.
${#dates.dayOfWeek(date)} // also arrayDayOfWeek(...), listDayOfWeek(...), etc.
${#dates.dayOfWeekName(date)} // also arrayDayOfWeekName(...), listDayOfWeekName(...), etc.
${#dates.dayOfWeekNameShort(date)} // also arrayDayOfWeekNameShort(...), listDayOfWeekNameShort(...), etc.
${#dates.hour(date)} // also arrayHour(...), listHour(...), etc.
${#dates.minute(date)} // also arrayMinute(...), listMinute(...), etc.
${#dates.second(date)} // also arraySecond(...), listSecond(...), etc.
${#dates.millisecond(date)} // also arrayMillisecond(...), listMillisecond(...), etc.
/*
* Create date (java.util.Date) objects from its components
*/
${#dates.create(year,month,day)}
${#dates.create(year,month,day,hour,minute)}
${#dates.create(year,month,day,hour,minute,second)}
${#dates.create(year,month,day,hour,minute,second)}
${#dates.create(year,month,day,hour,minute,second,millisecond)}
/*
* Create a date (java.util.Date) object for the current date and time
*/
${#dates.createNow()}
/*
* Create a date (java.util.Date) object for the current date (time set to 00:00)
*/
${#dates.createToday()}
#Calendars
/*
* ======================================================================
* See javadoc API for class org.thymeleaf.expression.Calendars
* ======================================================================
*/
/*
* Format calendar with the standard locale format
* Also works with arrays, lists or sets
*/
${#calendars.format(cal)}
${#calendars.arrayFormat(calArray)}
${#calendars.listFormat(calList)}
${#calendars.setFormat(calSet)}
/*
* Format calendar with the ISO8601 format
* Also works with arrays, lists or sets
*/
${#calendars.formatISO(cal)}
${#calendars.arrayFormatISO(calArray)}
${#calendars.listFormatISO(calList)}
${#calendars.setFormatISO(calSet)}
/*
* Format calendar with the specified pattern
* Also works with arrays, lists or sets
*/
${#calendars.format(cal, 'dd/MMM/yyyy HH:mm')}
${#calendars.arrayFormat(calArray, 'dd/MMM/yyyy HH:mm')}
${#calendars.listFormat(calList, 'dd/MMM/yyyy HH:mm')}
${#calendars.setFormat(calSet, 'dd/MMM/yyyy HH:mm')}
/*
* Obtain calendar properties
* Also works with arrays, lists or sets
*/
${#calendars.day(date)} // also arrayDay(...), listDay(...), etc.
${#calendars.month(date)} // also arrayMonth(...), listMonth(...), etc.
${#calendars.monthName(date)} // also arrayMonthName(...), listMonthName(...), etc.
${#calendars.monthNameShort(date)} // also arrayMonthNameShort(...), listMonthNameShort(...), etc.
${#calendars.year(date)} // also arrayYear(...), listYear(...), etc.
${#calendars.dayOfWeek(date)} // also arrayDayOfWeek(...), listDayOfWeek(...), etc.
${#calendars.dayOfWeekName(date)} // also arrayDayOfWeekName(...), listDayOfWeekName(...), etc.
${#calendars.dayOfWeekNameShort(date)} // also arrayDayOfWeekNameShort(...), listDayOfWeekNameShort(...), etc.
${#calendars.hour(date)} // also arrayHour(...), listHour(...), etc.
${#calendars.hour(date)} // also arrayHour(...), listHour(...), etc.
${#calendars.minute(date)} // also arrayMinute(...), listMinute(...), etc.
${#calendars.second(date)} // also arraySecond(...), listSecond(...), etc.
${#calendars.millisecond(date)} // also arrayMillisecond(...), listMillisecond(...), etc.
/*
* Create calendar (java.util.Calendar) objects from its components
*/
${#calendars.create(year,month,day)}
${#calendars.create(year,month,day,hour,minute)}
${#calendars.create(year,month,day,hour,minute,second)}
${#calendars.create(year,month,day,hour,minute,second,millisecond)}
/*
* Create a calendar (java.util.Calendar) object for the current date and time
*/
${#calendars.createNow()}
/*
* Create a calendar (java.util.Calendar) object for the current date (time set to 00:00)
*/
${#calendars.createToday()}
#numbers
/*
* ======================================================================
* See javadoc API for class org.thymeleaf.expression.Numbers
* ======================================================================
*/
/*
* ==========================
* Formatting integer numbers
* ==========================
*/
/*
* Set minimum integer digits.
* Also works with arrays, lists or sets
*/
${#numbers.formatInteger(num,3)}
${#numbers.arrayFormatInteger(numArray,3)}
${#numbers.listFormatInteger(numList,3)}
${#numbers.setFormatInteger(numSet,3)}
/*
* Set minimum integer digits and thousands separator:
* 'POINT', 'COMMA', 'WHITESPACE', 'NONE' or 'DEFAULT' (by locale).
* Also works with arrays, lists or sets
*/
${#numbers.formatInteger(num,3,'POINT')}
${#numbers.arrayFormatInteger(numArray,3,'POINT')}
${#numbers.listFormatInteger(numList,3,'POINT')}
${#numbers.setFormatInteger(numSet,3,'POINT')}
/*
* ==========================
* Formatting decimal numbers
* ==========================
*/
/*
* Set minimum integer digits and (exact) decimal digits.
* Also works with arrays, lists or sets
*/
${#numbers.formatDecimal(num,3,2)}
${#numbers.arrayFormatDecimal(numArray,3,2)}
${#numbers.listFormatDecimal(numList,3,2)}
${#numbers.setFormatDecimal(numSet,3,2)}
/*
* Set minimum integer digits and (exact) decimal digits, and also decimal separator.
* Also works with arrays, lists or sets
*/
${#numbers.formatDecimal(num,3,2,'COMMA')}
${#numbers.arrayFormatDecimal(numArray,3,2,'COMMA')}
${#numbers.listFormatDecimal(numList,3,2,'COMMA')}
${#numbers.setFormatDecimal(numSet,3,2,'COMMA')}
/*
* Set minimum integer digits and (exact) decimal digits, and also thousands and
* decimal separator.
* Also works with arrays, lists or sets
*/
${#numbers.formatDecimal(num,3,'POINT',2,'COMMA')}
${#numbers.arrayFormatDecimal(numArray,3,'POINT',2,'COMMA')}
${#numbers.listFormatDecimal(numList,3,'POINT',2,'COMMA')}
${#numbers.setFormatDecimal(numSet,3,'POINT',2,'COMMA')}
/*
* ==========================
* Utility methods
* ==========================
*/
/*
* Create a sequence (array) of integer numbers going
* from x to y
*/
${#numbers.sequence(from,to)}
${#numbers.sequence(from,to,step)}
#strings
/*
* ======================================================================
* See javadoc API for class org.thymeleaf.expression.Strings
* ======================================================================
*/
/*
* Null-safe toString()
*/
${#strings.toString(obj)} // also array*, list* and set*
/*
* Check whether a String is empty (or null). Performs a trim() operation before check
* Also works with arrays, lists or sets
* * Also works with arrays, lists or sets
*/
${#strings.isEmpty(name)}
${#strings.arrayIsEmpty(nameArr)}
${#strings.listIsEmpty(nameList)}
${#strings.setIsEmpty(nameSet)}
/*
* Perform an 'isEmpty()' check on a string and return it if false, defaulting to
* another specified string if true.
* Also works with arrays, lists or sets
*/
${#strings.defaultString(text,default)}
${#strings.arrayDefaultString(textArr,default)}
${#strings.listDefaultString(textList,default)}
${#strings.setDefaultString(textSet,default)}
/*
* Check whether a fragment is contained in a String
* Also works with arrays, lists or sets
*/
${#strings.contains(name,'ez')} // also array*, list* and set*
${#strings.containsIgnoreCase(name,'ez')} // also array*, list* and set*
/*
* Check whether a String starts or ends with a fragment
* Also works with arrays, lists or sets
*/
${#strings.startsWith(name,'Don')} // also array*, list* and set*
${#strings.endsWith(name,endingFragment)} // also array*, list* and set*
/*
* Substring-related operations
* Also works with arrays, lists or sets
*/
${#strings.indexOf(name,frag)} // also array*, list* and set*
${#strings.substring(name,3,5)} // also array*, list* and set*
${#strings.substringAfter(name,prefix)} // also array*, list* and set*
${#strings.substringBefore(name,suffix)} // also array*, list* and set*
${#strings.replace(name,'las','ler')} // also array*, list* and set*
/*
* Append and prepend
* Also works with arrays, lists or sets
*/
${#strings.prepend(str,prefix)} // also array*, list* and set*
${#strings.append(str,suffix)} // also array*, list* and set*
/*
* Change case
* Also works with arrays, lists or sets
*/
${#strings.toUpperCase(name)} // also array*, list* and set*
${#strings.toLowerCase(name)} // also array*, list* and set*
/*
* Split and join
*/
${#strings.arrayJoin(namesArray,',')}
${#strings.listJoin(namesList,',')}
${#strings.setJoin(namesSet,',')}
${#strings.arraySplit(namesStr,',')} // returns String[]
${#strings.listSplit(namesStr,',')} // returns List<String>
${#strings.setSplit(namesStr,',')} // returns Set<String>
/*
* Trim
* Also works with arrays, lists or sets
*/
${#strings.trim(str)} // also array*, list* and set*
/*
* Compute length
* Also works with arrays, lists or sets
*/
${#strings.length(str)} // also array*, list* and set*
/*
* Abbreviate text making it have a maximum size of n. If text is bigger, it
* will be clipped and finished in "..."
* Also works with arrays, lists or sets
*/
${#strings.abbreviate(str,10)} // also array*, list* and set*
/*
* Convert the first character to upper-case (and vice-versa)
*/
${#strings.capitalize(str)} // also array*, list* and set*
${#strings.unCapitalize(str)} // also array*, list* and set*
/*
* Convert the first character of every word to upper-case
*/
${#strings.capitalizeWords(str)} // also array*, list* and set*
${#strings.capitalizeWords(str,delimiters)} // also array*, list* and set*
/*
* Escape the string
*/
${#strings.escapeXml(str)} // also array*, list* and set*
${#strings.escapeJava(str)} // also array*, list* and set*
${#strings.escapeJavaScript(str)} // also array*, list* and set*
${#strings.unescapeJava(str)} // also array*, list* and set*
${#strings.unescapeJavaScript(str)} // also array*, list* and set*
/*
* Null-safe comparison and concatenation
*/
${#strings.equals(first, second)}
${#strings.equalsIgnoreCase(first, second)}
${#strings.concat(values...)}
${#strings.concatReplaceNulls(nullValue, values...)}
/*
* Random
*/
${#strings.randomAlphanumeric(count)}
#objects
/*
* ======================================================================
* See javadoc API for class org.thymeleaf.expression.Objects
* ======================================================================
*/
/*
* Return obj if it is not null, and default otherwise
* Also works with arrays, lists or sets
*/
${#objects.nullSafe(obj,default)}
${#objects.arrayNullSafe(objArray,default)}
${#objects.listNullSafe(objList,default)}
${#objects.setNullSafe(objSet,default)}
#bools
/*
* ======================================================================
* See javadoc API for class org.thymeleaf.expression.Bools
* ======================================================================
*/
/*
* Evaluate a condition in the same way that it would be evaluated in a th:if tag
* (see conditional evaluation chapter afterwards).
* Also works with arrays, lists or sets
*/
${#bools.isTrue(obj)}
${#bools.arrayIsTrue(objArray)}
${#bools.listIsTrue(objList)}
${#bools.setIsTrue(objSet)}
/*
* Evaluate with negation
* Also works with arrays, lists or sets
*/
${#bools.isFalse(cond)}
${#bools.arrayIsFalse(condArray)}
${#bools.listIsFalse(condList)}
${#bools.setIsFalse(condSet)}
/*
* Evaluate and apply AND operator
* Receive an array, a list or a set as parameter
*/
${#bools.arrayAnd(condArray)}
${#bools.listAnd(condList)}
${#bools.setAnd(condSet)}
/*
* Evaluate and apply OR operator
* Receive an array, a list or a set as parameter
*/
${#bools.arrayOr(condArray)}
${#bools.listOr(condList)}
${#bools.setOr(condSet)}
#arrays
/*
* ======================================================================
* See javadoc API for class org.thymeleaf.expression.Arrays
* ======================================================================
*/
/*
* Converts to array, trying to infer array component class.
* Note that if resulting array is empty, or if the elements
* of the target object are not all of the same class,
* this method will return Object[].
*/
${#arrays.toArray(object)}
/*
* Convert to arrays of the specified component class.
*/
${#arrays.toStringArray(object)}
${#arrays.toIntegerArray(object)}
${#arrays.toLongArray(object)}
${#arrays.toDoubleArray(object)}
${#arrays.toFloatArray(object)}
${#arrays.toBooleanArray(object)}
/*
* Compute length
*/
${#arrays.length(array)}
/*
* Check whether array is empty
*/
${#arrays.isEmpty(array)}
/*
* Check if element or elements are contained in array
*/
${#arrays.contains(array, element)}
${#arrays.containsAll(array, elements)}
#lists
/*
* ======================================================================
* See javadoc API for class org.thymeleaf.expression.Lists
* ======================================================================
*/
/*
* Converts to list
*/
${#lists.toList(object)}
/*
* Compute size
*/
${#lists.size(list)}
/*
* Check whether list is empty
*/
${#lists.isEmpty(list)}
/*
* Check if element or elements are contained in list
*/
${#lists.contains(list, element)}
${#lists.containsAll(list, elements)}
/*
* Sort a copy of the given list. The members of the list must implement
* comparable or you must define a comparator.
*/
${#lists.sort(list)}
${#lists.sort(list, comparator)}
#sets
/*
* ======================================================================
* See javadoc API for class org.thymeleaf.expression.Sets
* ======================================================================
*/
/*
* Converts to set
*/
${#sets.toSet(object)}
/*
* Compute size
*/
${#sets.size(set)}
/*
* Check whether set is empty
*/
${#sets.isEmpty(set)}
/*
* Check if element or elements are contained in set
*/
${#sets.contains(set, element)}
${#sets.containsAll(set, elements)}
#maps
/*
* ======================================================================
* See javadoc API for class org.thymeleaf.expression.Maps
* ======================================================================
*/
/*
* Compute size
*/
${#maps.size(map)}
/*
* Check whether map is empty
*/
${#maps.isEmpty(map)}
/*
* Check if key/s or value/s are contained in maps
*/
${#maps.containsKey(map, key)}
${#maps.containsAllKeys(map, keys)}
${#maps.containsValue(map, value)}
${#maps.containsAllValues(map, value)}
#aggregates
/*
* ======================================================================
* See javadoc API for class org.thymeleaf.expression.Aggregates
* ======================================================================
*/
/*
* Compute sum. Returns null if array or collection is empty
*/
${#aggregates.sum(array)}
${#aggregates.sum(collection)}
/*
* Compute average. Returns null if array or collection is empty
*/
${#aggregates.avg(array)}
${#aggregates.avg(collection)}
#messages
/*
* ======================================================================
* See javadoc API for class org.thymeleaf.expression.Messages
* ======================================================================
*/
/*
* Obtain externalized messages. Can receive a single key, a key plus arguments,
* or an array/list/set of keys (in which case it will return an array/list/set of
* externalized messages).
* If a message is not found, a default message (like '??msgKey??') is returned.
*/
${#messages.msg('msgKey')}
${#messages.msg('msgKey', param1)}
${#messages.msg('msgKey', param1, param2)}
${#messages.msg('msgKey', param1, param2, param3)}
${#messages.msgWithParams('msgKey', new Object[] {param1, param2, param3, param4})}
${#messages.arrayMsg(messageKeyArray)}
${#messages.listMsg(messageKeyList)}
${#messages.setMsg(messageKeySet)}
/*
* Obtain externalized messages or null. Null is returned instead of a default
* message if a message for the specified key is not found.
*/
${#messages.msgOrNull('msgKey')}
${#messages.msgOrNull('msgKey', param1)}
${#messages.msgOrNull('msgKey', param1, param2)}
${#messages.msgOrNull('msgKey', param1, param2, param3)}
${#messages.msgOrNullWithParams('msgKey', new Object[] {param1, param2, param3, param4})}
${#messages.arrayMsgOrNull(messageKeyArray)}
${#messages.listMsgOrNull(messageKeyList)}
${#messages.setMsgOrNull(messageKeySet)}
#ids
/*
* ======================================================================
* See javadoc API for class org.thymeleaf.expression.Ids
* ======================================================================
*/
/*
* Normally used in th:id attributes, for appending a counter to the id attribute value
* so that it remains unique even when involved in an iteration process.
*/
${#ids.seq('someId')}
/*
* Normally used in th:for attributes in <label> tags, so that these labels can refer to Ids
* generated by means if the #ids.seq(...) function.
*
* Depending on whether the <label> goes before or after the element with the #ids.seq(...)
* function, the "next" (label goes before "seq") or the "prev" function (label goes after
* "seq") function should be called.
*/
${#ids.next('someId')}
${#ids.prev('someId')}
Thymeleaf 模板布局
概述
这节主要介绍模板的引入。及如何在不改变前端人员的 HTML 显示结果的情况下设计模板(通过属性配置动态时不显示的部分)。
模板模块导入
首先定义一个 /resources/templates/footer.html 文件:
<!DOCTYPE html SYSTEM "http://www.thymeleaf.org/dtd/xhtml1-strict-thymeleaf-4.dtd">
<html xmlns="http://www.w3.org/1999/xhtml" xmlns:th="http://www.thymeleaf.org">
<body>
<div th:fragment="copy">
© 2018 Copyright by Lusifer.
</div>
</body>
</html>
上面的代码定义了一个片段称为 copy,我们可以很容易地使用 th:include 或者 th:replace 属性包含在我们的主页上
<body>
	<div th:include="footer :: copy"></div>
</body>
include 的表达式想当简洁。这里有三种写法:
templatename::domselector或者templatename::[domselector]引入模板页面中的某个模块templatename引入模板页面::domselector或者this::domselector引入自身模板的模块
上面所有的 templatename 和 domselector 的写法都支持表达式写法:
<div th:include="footer :: (${user.isAdmin}? #{footer.admin} : #{footer.normaluser})"></div>
不使用 fragment 来引用模块
<div id="copy-section">
© 2018 Copyright by Lusifer.
</div>
我们可以用 CSS 的选择器写法来引入
<body>
	<div th:include="footer :: #copy-section"></div>
</body>
include 和 replace 的区别
th:include 和 th:replace 都可以引入模块,两者的区别在于:
th:include:引入子模块的 children,依然保留父模块的 tagth:replace:引入子模块的所有,不保留父模块的 tag
举个例子
<footer th:fragment="copy">
© 2018 Copyright by Lusifer.
</footer>
引入界面
<body>
	<div th:include="footer :: copy"></div>
	<div th:replace="footer :: copy"></div>
</body>
显示结果
<body>
<div>
© 2018 Copyright by Lusifer.
</div>
<footer>
© 2018 Copyright by Lusifer.
</footer>
</body>