用大白话告诉你什么是 Elasticsearch
Elasticsearch,分布式,高性能,高可用,可伸缩的搜索和分析系统
- 什么是搜索?
- 如果用数据库做搜索会怎么样?
- 什么是全文检索、倒排索引和Lucene?
- 什么是Elasticsearch?
什么是搜索?
百度:我们比如说想找寻任何的信息的时候,就会上百度去搜索一下,比如说找一部自己喜欢的电影,或者说找一本喜欢的书,或者找一条感兴趣的新闻(提到搜索的第一印象) 百度 != 搜索,这是不对的
垂直搜索(站内搜索)
互联网的搜索:电商网站,招聘网站,新闻网站,各种app IT系统的搜索:OA软件,办公自动化软件,会议管理,日程管理,项目管理,员工管理,搜索“张三”,“张三儿”,“张小三”;有个电商网站,卖家,后台管理系统,搜索“牙膏”,订单,“牙膏相关的订单”
搜索,就是在任何场景下,找寻你想要的信息,这个时候,会输入一段你要搜索的关键字,然后就期望找到这个关键字相关的有些信息
如果用数据库做搜索会怎么样?
做软件开发的话,或者对IT、计算机有一定的了解的话,都知道,数据都是存储在数据库里面的,比如说电商网站的商品信息,招聘网站的职位信息,新闻网站的新闻信息,等等吧。所以说,很自然的一点,如果说从技术的角度去考虑,如何实现如说,电商网站内部的搜索功能的话,就可以考虑,去使用数据库去进行搜索。
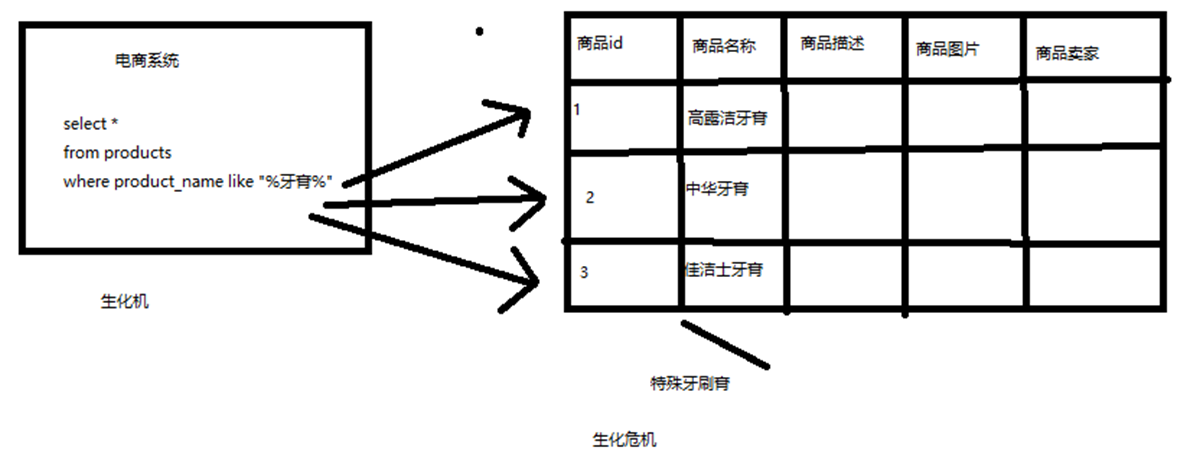
假如下图:电商系统的商品搜索
- 搜索含有牙膏的商品
- 在数据库中商品名称字段中存储有关键字
数据库来处理的话,不考虑数据库的全文索引什么的,假如商品有 1000万 个,那么基本上就要查找 1000 万次,且每次都需要加载商品的名称字段的整段字符串,并挨个寻找。
-
比方说,每条记录的指定字段的文本,可能会很长,比如说“商品描述”字段的长度,有长达数千个,甚至数万个字符,这个时候,每次都要对每条记录的所有文本进行扫描,懒判断说,你包不包含我指定的这个关键词(比如说“牙膏”)
-
还不能将搜索词拆分开来,尽可能去搜索更多的符合你的期望的结果,比如输入“生化机”,就搜索不出来“生化危机”
用数据库来实现搜索,是不太靠谱的。通常来说,性能会很差的。
什么是全文检索和Lucene?
- 全文检索,倒排索引
-
lucene,就是一个 jar 包,
里面包含了封装好的各种建立倒排索引,以及进行搜索的代码,包括各种算法。
我们就用 java 开发的时候,引入 lucene jar,然后基于 lucene 的 api 进行去进行开发就可以了。用 lucene,我们就可以去将已有的数据建立索引,lucene 会在本地磁盘上面,给我们组织索引的数据结构。另外的话,我们也可以用 lucene 提供的一些功能和 api 来针对磁盘上的数据进行搜索
全文索检索和倒排索引简述
简单说就如下图
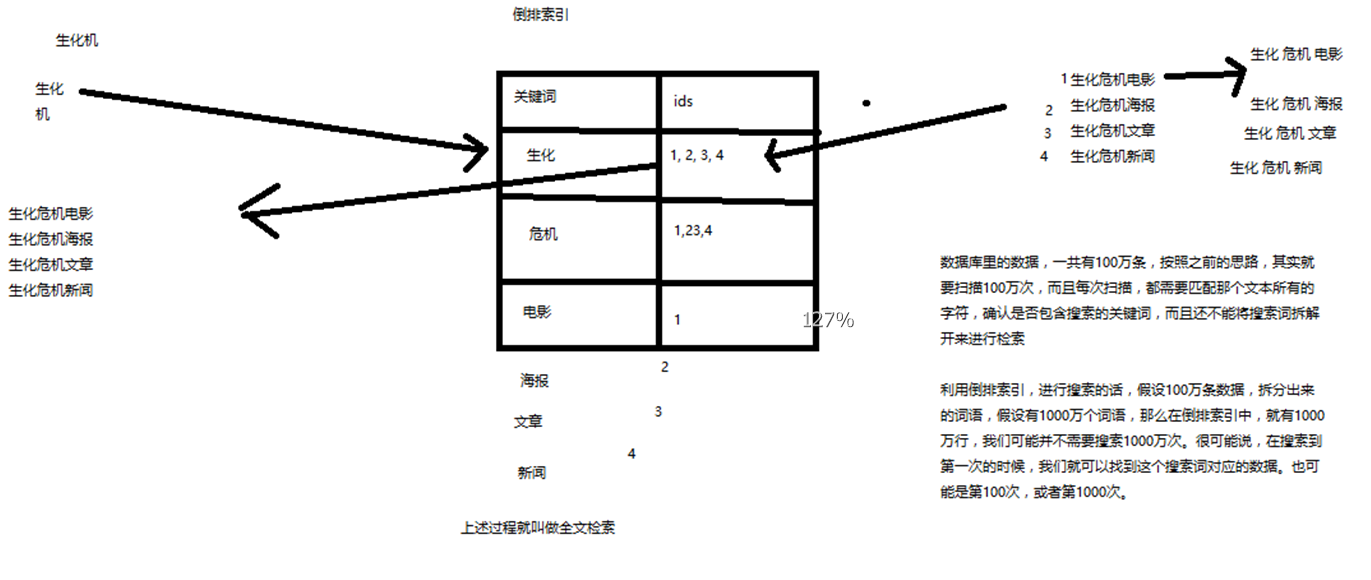
场景:搜索“生化机”(有可能是手抖打错了,本来是生化危机),但是期望需要出来右侧的 4条 记录
- 有 4条 数据
- 将每条数据进行词条拆分。如“生化危机电影”拆成:生化、危机、电影 关键词(拆分结果与策略算法有关)
- 每个关键词将对应包含此关键词的数据 ID
- 搜索的时候,直接匹配这些关键词,就能拿到包含关键词的数据
这个过程就叫做全文检索。而词条拆分和词条对应的 ID 这个就是倒排索引的的基本原理
什么是Elasticsearch?

我们可以使用 lucene 开发搜索服务,部署在一台机器上面,但是无法解决当数据量增大的时候出现的问题(图上右侧)。那么 elasticsearch 就是解决这种场景的工具;
- 自动维护数据的分布到多个节点的索引建立、检索请求分布到多个节点的执行
- 自动维护数据的冗余副本,保证一些机器宕机了,不会丢失任何数据
-
封装了更多的高级功能
给我们提供更多高级的支持,让我们快速的开发应用,开发更加复杂的应用; 复杂的搜索功能,聚合分析的功能,基于地理位置的搜多(距离我当前位置 1公里 以内的烤肉店)
Elasticsearch 核心概念
- lucene 和 elasticsearch 的前世今生
- elasticsearch 的核心概念
- elasticsearch 核心概念 vs 数据库核心概念
lucene 和 elasticsearch 的前世今生
lucene,最先进、功能最强大的搜索库;直接基于 lucene 开发,非常复杂,api 复杂(实现一些简单的功能,写大量的 java 代码),需要深入理解原理(各种索引结构)
elasticsearch 基于 lucene,隐藏复杂性,提供简单易用的 restful api 接口、java api 接口(还有其他语言的api接口)
- 分布式的文档存储引擎
- 分布式的搜索引擎和分析引擎
- 分布式,支持PB级数据
开箱即用,优秀的默认参数,不需要任何额外设置,完全开源
关于 elasticsearch 的一个传说,有一个程序员失业了,陪着自己老婆去英国伦敦学习厨师课程。程序员在失业期间想给老婆写一个菜谱搜索引擎,觉得 lucene 实在太复杂了,就开发了一个封装了 lucene 的开源项目 compass。后来程序员找到了工作,是做分布式的高性能项目的,觉得 compass 不够,就写了 elasticsearch,让 lucene 变成分布式的系统。
elasticsearch 的核心概念
-
Near Realtime(NRT)近实时
两个意思:
从写入数据到数据可以被搜索到有一个小延迟(大概1秒);
基于es执行搜索和分析可以达到秒级

-
Cluster 集群
包含多个节点,每个节点属于哪个集群是通过一个配置(集群名称,默认是 elasticsearch )来决定的,对于中小型应用来说,刚开始一个集群就一个节点很正常
-
Node 节点
集群中的一个节点,节点也有一个名称(默认是随机分配的),节点名称很重要(在执行运维管理操作的时候),默认节点会去加入一个名称为 “elasticsearch” 的集群,如果直接启动一堆节点,那么它们会自动组成一个 elasticsearch 集群,当然一个节点也可以组成一个 elasticsearch 集群
-
Document&field 文档
es中的最小数据单元,一个 document 可以是一条客户数据,一条商品分类数据,一条订单数据,通常用 JSON 数据结构表示
一个 index 下的 type 中,都可以去存储多个 document。
一个 document 里面有多个 field,每个field就是一个数据字段。
product document { "product_id": "1", "product_name": "高露洁牙膏", "product_desc": "高效美白", "category_id": "2", "category_name": "日化用品" } -
Index 索引
包含一堆有相似结构的文档数据,比如可以有一个客户索引,商品分类索引,订单索引,索引有一个名称。
一个 index 包含很多 document,一个 index 就代表了一类类似的或者相同的 document。比如说建立一个 product index,商品索引,里面可能就存放了所有的商品数据,所有的商品 document。
-
Type 类型
每个索引里都可以有一个或多个 type,type 是 index 中的一个逻辑数据分类,一个 type 下的 document,都有相同的 field,比如博客系统,有一个索引,可以定义用户数据 type,博客数据 type,评论数据 type。
商品index,里面存放了所有的商品数据,商品 document
但是商品分很多种类,每个种类的 document 的 field 可能不太一样,比如说电器商品,可能还包含一些诸如售后时间范围这样的特殊 field;生鲜商品,还包含一些诸如生鲜保质期之类的特殊 field
type,日化商品 type,电器商品 type,生鲜商品 type
日化商品 type:product_id,product_name,product_desc,category_id,category_name
电器商品 type:product_id,product_name,product_desc,category_id,category_name,service_period
生鲜商品 type:product_id,product_name,product_desc,category_id,category_name,eat_period
每一个 type 里面,都会包含一堆 document
{ "product_id": "2", "product_name": "长虹电视机", "product_desc": "4k高清", "category_id": "3", "category_name": "电器", "service_period": "1年" } { "product_id": "3", "product_name": "基围虾", "product_desc": "纯天然,冰岛产", "category_id": "4", "category_name": "生鲜", "eat_period": "7天" }- index :可以看成是一个数据库
- type :可以看成是数据库中的表
- document:可以看成是表中的记录
-
shard 分片
单台机器无法存储大量数据,es 可以将一个索引中的数据切分为多个 shard,分布在多台服务器上存储。有了 shard 就可以横向扩展,存储更多数据,让搜索和分析等操作分布到多台服务器上去执行,提升吞吐量和性能。每个 shard 都是一个 lucene index。
-
replica 复制集/副本
任何一个服务器随时可能故障或宕机,此时 shard 可能就会丢失,因此可以为每个 shard 创建多个 replica副本。replica 可以在 shard 故障时提供备用服务,保证数据不丢失,多个 replica 还可以提升搜索操作的吞吐量和性能。
- primary shard(建立索引时一次设置,不能修改,默认5个)
- replica shard(随时修改数量,默认1个)
默认每个索引 10 个 shard,5个 primary shard,5个 replica shard,最小的高可用配置,是 2台 服务器。

核心概念 vs 数据库核心概念
| Elasticsearch | 数据库 |
|---|---|
| Document | 行 |
| Type | 表 |
| Index | 库 |
windows 上启动 Elasticsearch
-
安装 JDK,至少 1.8.0_73 以上版本,java -version
-
下载和解压缩 Elasticsearch 安装包 elasticsearch-5.2.0.zip,并了解目录结构
-
启动 Elasticsearch:bin\elasticsearch.bat,
es本身特点之一就是开箱即用,如果是中小型应用,数据量少,操作不是很复杂,直接启动就可以用了
-
检查ES是否启动成功:http://localhost:9200/?pretty
name: node名称 cluster_name: 集群名称(默认的集群名称就是elasticsearch) version.number: 5.2.0,es版本号 { "name" : "4onsTYV", "cluster_name" : "elasticsearch", "cluster_uuid" : "nKZ9VK_vQdSQ1J0Dx9gx1Q", "version" : { "number" : "5.2.0", "build_hash" : "24e05b9", "build_date" : "2017-01-24T19:52:35.800Z", "build_snapshot" : false, "lucene_version" : "6.4.0" }, "tagline" : "You Know, for Search" } -
修改集群名称:elasticsearch.yml
-
下载和解压缩 Kibana 安装包 kibana-5.2.0-windows-x86.zip
使用里面的开发界面,去操作 elasticsearch,作为我们学习es知识点的一个主要的界面入口
-
启动Kibana:bin\kibana.bat
-
进入Dev Tools界面
-
GET _cluster/health
{
  "cluster_name": "elasticsearch",
  "status": "yellow",
  "timed_out": false,
  "number_of_nodes": 1,
  "number_of_data_nodes": 1,
  "active_primary_shards": 1,
  "active_shards": 1,
  "relocating_shards": 0,
  "initializing_shards": 0,
  "unassigned_shards": 1,
  "delayed_unassigned_shards": 0,
  "number_of_pending_tasks": 0,
  "number_of_in_flight_fetch": 0,
  "task_max_waiting_in_queue_millis": 0,
  "active_shards_percent_as_number": 50
}
快速上手-集群健康检查、文档 CRUD
- document 数据格式
- 电商网站商品管理案例:背景介绍
- 简单的集群管理
- 商品的 CRUD 操作(document CRUD 操作)
::: tip 快速上手的三章节,只是展示简单的使用 :::
document 数据格式
面向文档的搜索分析引擎
- 应用系统的数据结构都是面向对象的、复杂的
- 对象数据存储到数据库中,只能拆解开来,变为扁平的多张表,每次查询的时候还得还原回对象格式,相当麻烦
- ES 是面向文档的,文档中存储的数据结构,与面向对象的数据结构是一样的,基于这种文档数据结构,es 可以提供复杂的索引,全文检索,分析聚合等功能
- es 的 document 用 json 数据格式来表达
如下的一个场景,在 Java 中面向对象存入数据库的时候:
public class Employee {

  private String email;
  private String firstName;
  private String lastName;
  private EmployeeInfo info;
  private Date joinDate;

}

private class EmployeeInfo {

  private String bio; // 性格
  private Integer age;
  private String[] interests; // 兴趣爱好

}

EmployeeInfo info = new EmployeeInfo();
info.setBio("curious and modest");
info.setAge(30);
info.setInterests(new String[]{"bike", "climb"});

Employee employee = new Employee();
employee.setEmail("zhangsan@sina.com");
employee.setFirstName("san");
employee.setLastName("zhang");
employee.setInfo(info);
employee.setJoinDate(new Date());
employee 对象:里面包含了 Employee 类自己的属性,还有一个 EmployeeInfo 对象
两张表:employee 表,employee_info 表,将 employee 对象的数据重新拆开来,变成 Employee 数据和 EmployeeInfo 数据
- employee表:email,first_name,last_name,join_date,4个字段
- employee_info表:bio,age,interests,3个字段;此外还有一个外键字段,比如employee_id,关联着employee表
而在 es 中的 document
{
    "email":      "zhangsan@sina.com",
    "first_name": "san",
    "last_name": "zhang",
    "info": {
        "bio":         "curious and modest",
        "age":         30,
        "interests": [ "bike", "climb" ]
    },
    "join_date": "2017/01/01"
}
我们就明白了 es 的 document 数据格式和数据库的关系型数据格式的区别
电商网站商品管理案例背景介绍
::: tip 该实例纯粹是为了演示 es 的 crud 的基本操作 :::
现在考虑一个场景:有一个电商网站,需要为其基于 ES 构建一个后台系统,提供以下功能:
- 对商品信息进行 CRUD(增删改查)操作
- 执行简单的结构化查询
- 可以执行简单的全文检索,以及复杂的 phrase(短语)检索
- 对于全文检索的结果,可以进行高亮显示
- 对数据进行简单的聚合分析
简单的集群管理
快速检查集群的健康状况
es 提供了一套api,叫做 cat api,可以查看 es 中各种各样的数据;
::: tip 看到是 restuful api 的链接基本上都是在 kibana 中操作查询 :::
GET /_cat/health?v 获取当前集群关键的信息,参与 v : 显示标题头
epoch      timestamp cluster       status node.total node.data shards pri relo init unassign pending_tasks max_task_wait_time active_shards_percent
1546235661 13:54:21  elasticsearch yellow          1         1      1   1    0    0        1             0                  -                 50.0%

-------------
unassign:未分配数量
active_shards_percent:可用 shards 百分比
如何快速了解集群的健康状况?可以通过 status 的值: green、yellow、red?
- green:每个索引的 primary shard 和 replica shard 都是 active 状态的
- yellow:每个索引的 primary shard 都是 active 状态的,但是部分 replica shard 不是 active 状态,处于不可用的状态
- red:不是所有索引的 primary shard 都是 active 状态的,部分索引有数据丢失了
为什么现在会处于一个 yellow 状态?
我们现在就一个笔记本电脑,就启动了一个 es 进程,相当于就只有一个 node。
现在 es 中有一个 index,就是 kibana 自己内置建立的 index。由于默认的配置是给每个 index 分配 5个 primary shard 和 5个 replica shard,而且 primary shard 和 replica shard 不能在同一台机器上(为了容错)。
现在 kibana 自己建立的 index 是 1个 primary shard 和 1个 replica shard。
当前就一个 node,所以只有 1个 primary shard 被分配了和启动了,但是一个 replica shard 没有第二台机器去启动。
做一个小实验: 此时只要启动第二个 es 进程,就会在 es 集群中有 2个 node,然后那 1个 replica shard 就会自动分配过去,然后 cluster status 就会变成 green 状态。
步骤:值需要再把压缩包解压一份,直接启动 bin/elasticsearch.bat 即可,关于端口,通过观察应该会自动生成端口,这一点做得很强大
第一个 es 启动后端口情况:
 publish_address {127.0.0.1:9300}, bound_addresses {127.0.0.1:9300}, {[::1]:9300}

第二个 es 启动后端口情况:
 publish_address {127.0.0.1:9301}, bound_addresses {127.0.0.1:9301}, {[::1]:9301}
再次查看集群信息: GET /_cat/health?v
只有一个 es 的信息
epoch      timestamp cluster       status node.total node.data shards pri relo init unassign pending_tasks max_task_wait_time active_shards_percent
1546235661 13:54:21  elasticsearch yellow          1         1      1   1    0    0        1             0                  -                 50.0%

启动第二个 es 后的信息
epoch      timestamp cluster       status node.total node.data shards pri relo init unassign pending_tasks max_task_wait_time active_shards_percent
1546236258 14:04:18  elasticsearch green           2         2      2   1    0    0        0             0                  -                100.0%
快速查看集群中有哪些索引
GET /_cat/indices?v
health status index   uuid                   pri rep docs.count docs.deleted store.size pri.store.size
yellow open   .kibana id1SV_oGSjyGosKxeJApww   1   1          1            0      3.1kb          3.1kb
可以看到此时就只有一个 kibana 的索引,它的 primary shard(pri.store.size) 占用的大小是 3.1kb
简单的索引操作
创建索引 PUT /test_index?pretty;创建一个名为 test_index 的索引
{
  "acknowledged": true,
  "shards_acknowledged": true
}

------------- 再次查看索引 GET /_cat/indices?v

health status index      uuid                   pri rep docs.count docs.deleted store.size pri.store.size
yellow open   test_index JXdbMWj8T9-Y0JWW5-M7fg   5   1          0            0       650b           650b
yellow open   .kibana    id1SV_oGSjyGosKxeJApww   1   1          1            0      3.1kb          3.1kb
可以看到 pri 默认是 5 个,rep 默认是 1 个
删除索引 DELETE /test_index?pretty
{
  "acknowledged": true
}
商品的 CRUD 操作
新增
这里没有使用中文,由于中文分词需要安装插件,对于数据查询才会准确,所以这里使用拼音
PUT /ecommerce/product/1
{
    "name" : "gaolujie yagao",
    "desc" :  "gaoxiao meibai",
    "price" :  30,
    "producer" :      "gaolujie producer",
    "tags": [ "meibai", "fangzhu" ]
}

-------- 响应
// 可以看到 index 和 type 对应了 PUT 地址中的信息
{
  "_index": "ecommerce",
  "_type": "product",
  "_id": "1",
  "_version": 1,
  "result": "updated",
  "_shards": {
    "total": 2,
    "successful": 1,
    "failed": 0
  },
  "created": false
}
_version:数据版本号,用途一般是是乐观锁,后面会讲解_shards:分片信息- total :总的要写的分片数量是 2
- successful :成功了 1 个
- failed :失败了 0 个
这里为什么 total 是 2个?简单说:一个 pre 默认对应一个 rep 这里只有一台机器,所以 1 个 pre + rep 等于 2, 但是只有一台机器,rep 没有被分配,所以只成功了一个,总数是 2 个;反正这里有点懵逼,pre 和 rep 的分配策略什么的不知道,所以这里的数字有一点对不上,后面课程会讲解
再多增加几条数据
PUT /ecommerce/product/2
{
    "name" : "jiajieshi yagao",
    "desc" :  "youxiao fangzhu",
    "price" :  25,
    "producer" :      "jiajieshi producer",
    "tags": [ "fangzhu" ]
}

PUT /ecommerce/product/3
{
    "name" : "zhonghua yagao",
    "desc" :  "caoben zhiwu",
    "price" :  40,
    "producer" :      "zhonghua producer",
    "tags": [ "qingxin" ]
}
es 会自动建立 index 和 type,不需要提前创建,而且 es 默认会对 document 每个 field 都建立倒排索引,让其可以被搜索
查询商品:检索文档
语法:GET /index/type/id
`GET /ecommerce/product/1`

--------- 响应

{
  "_index": "ecommerce",
  "_type": "product",
  "_id": "1",
  "_version": 1,
  "found": true,
  "_source": {
    "name": "gaolujie yagao",
    "desc": "gaoxiao meibai",
    "price": 30,
    "producer": "gaolujie producer",
    "tags": [
      "meibai",
      "fangzhu"
    ]
  }
}
修改商品:替换文档
PUT /ecommerce/product/1
{
    "name" : "jiaqiangban gaolujie yagao",
    "desc" :  "gaoxiao meibai",
    "price" :  30,
    "producer" :      "gaolujie producer",
    "tags": [ "meibai", "fangzhu" ]
}

--------- 响应

{
  "_index": "ecommerce",
  "_type": "product",
  "_id": "1",
  "_version": 2,
  "result": "updated",
  "_shards": {
    "total": 2,
    "successful": 1,
    "failed": 0
  },
  "created": false
}
替换文档:顾名思义,原始 _id 中的所有 document 内容被覆盖;
修改商品:更新文档
POST /ecommerce/product/1/_update
{
  "doc": {
    "name": "jiaqiangban gaolujie yagao"
  }
}

--------- 响应

{
  "_index": "ecommerce",
  "_type": "product",
  "_id": "1",
  "_version": 8,
  "result": "updated",
  "_shards": {
    "total": 2,
    "successful": 1,
    "failed": 0
  }
}
删除商品:删除文档
DELETE /ecommerce/product/1

--------- 响应

{
  "found": true,
  "_index": "ecommerce",
  "_type": "product",
  "_id": "1",
  "_version": 4,
  "result": "deleted",
  "_shards": {
    "total": 2,
    "successful": 1,
    "failed": 0
  }
}

如果删除一个不存在的 id 文档将是

{
  "found": false,
  "_index": "ecommerce",
  "_type": "product",
  "_id": "1",
  "_version": 7,
  "result": "not_found",
  "_shards": {
    "total": 2,
    "successful": 1,
    "failed": 0
  }
}

_version :每执行一次操作 version 都会自增一次
快速上手-商品搜索多种方式
- query string search
- query DSL
- query filter
- full-text search
- phrase search
- highlight search - 真正意义上算不上一种搜索方式
query string search
通俗一点来说,就是以 http get 方式去拼接参数的一种方式
查询所有商品
GET /ecommerce/product/_search

----- 响应

{
  "took": 2,
  "timed_out": false,
  "_shards": {
    "total": 5,
    "successful": 5,
    "failed": 0
  },
  "hits": {
    "total": 2,
    "max_score": 1,
    "hits": [
      {
        "_index": "ecommerce",
        "_type": "product",
        "_id": "2",
        "_score": 1,
        "_source": {
          "name": "jiajieshi yagao",
          "desc": "youxiao fangzhu",
          "price": 25,
          "producer": "jiajieshi producer",
          "tags": [
            "fangzhu"
          ]
        }
      },
      {
        "_index": "ecommerce",
        "_type": "product",
        "_id": "3",
        "_score": 1,
        "_source": {
          "name": "zhonghua yagao",
          "desc": "caoben zhiwu",
          "price": 40,
          "producer": "zhonghua producer",
          "tags": [
            "qingxin"
          ]
        }
      }
    ]
  }
}
- took:耗费了几毫秒
- timed_out:是否超时,这里是没有
_shards:数据拆成了5个分片,所以对于搜索请求,会打到所有的 primary shard(或者是它的某个 replica shard 也可以)- hits.total:查询结果的数量,3个 document
- hits.max_score:score 的含义,就是 document 对于一个 search 的相关度的匹配分数,越相关,就越匹配,分数也高
- hits.hits:包含了匹配搜索的 document 的详细数据
条件查询
搜索名称中带有 “yagao” 的商品,且按价格降序排列:
GET /ecommerce/product/_search?q=name:yagao&sort=price:desc
适用于临时的在命令行使用一些工具,比如 curl,快速的发出请求,来检索想要的信息;但是如果查询请求很复杂,是很难去构建的 在生产环境中,几乎很少使用 query string search
query DSL
DSL:Domain Specified Language,特定领域的语言
http request body:请求体,可以用 json 的格式来构建查询语法,比较方便,可以构建各种复杂的语法,比 query string search 肯定强大多了
查询所有
GET /ecommerce/product/_search
{
  "query": {
    "match_all": {}
  }
}
条件查询
搜索名称中带有 “yagao” 的商品,且按价格降序排列:
GET /ecommerce/product/_search
{
  "query": {
    "match": {
      "name": "yagao"
    }
  },
  "sort": [
    {
      "price": {
        "order": "desc"
      }
    }
  ]
}

// price 这里也可以直接简写成 "price":"desc"

----------- 响应

{
  "took": 2,
  "timed_out": false,
  "_shards": {
    "total": 5,
    "successful": 5,
    "failed": 0
  },
  "hits": {
    "total": 3,
    "max_score": null,
    "hits": [
      {
        "_index": "ecommerce",
        "_type": "product",
        "_id": "3",
        "_score": null,
        "_source": {
          "name": "zhonghua yagao",
          "desc": "caoben zhiwu",
          "price": 40,
          "producer": "zhonghua producer",
          "tags": [
            "qingxin"
          ]
        },
        "sort": [
          40
        ]
      }
    ]
  }
}
.... 部分结果
分页查询
总共 3条 商品,假设每页就显示 1条 商品,现在显示第 2页,所以就查出来第 2个 商品
GET /ecommerce/product/_search
{
  "query": {
    "match_all": {}
  },
  "from": 1,
  "size": 1
}
注意这里的 from:表示是从第几条数据开始,而不是表示 页数
限制返回字段
指定要查询出来商品的名称和价格就可以
GET /ecommerce/product/_search
{
  "query": {
    "match_all": {}
  },
  "_source": ["name","price"]
}

---- 响应

{
  "took": 2,
  "timed_out": false,
  "_shards": {
    "total": 5,
    "successful": 5,
    "failed": 0
  },
  "hits": {
    "total": 3,
    "max_score": 1,
    "hits": [
      {
        "_index": "ecommerce",
        "_type": "product",
        "_id": "2",
        "_score": 1,
        "_source": {
          "price": 25,
          "name": "jiajieshi yagao"
        }
      },
      {
        "_index": "ecommerce",
        "_type": "product",
        "_id": "1",
        "_score": 1,
        "_source": {
          "price": 30,
          "name": "gaolujie yagao"
        }
      },
      {
        "_index": "ecommerce",
        "_type": "product",
        "_id": "3",
        "_score": 1,
        "_source": {
          "price": 40,
          "name": "zhonghua yagao"
        }
      }
    ]
  }
}
更加适合生产环境的使用,可以构建复杂的查询
query filter
简单说就是在查询后,再进行过滤操作(可以理解为多条件查询)。
搜索商品名称包含 yagao,而且售价大于 25元 的商品
GET /ecommerce/product/_search
{
  "query": {
    "bool": {
      "must": [
        {
          "match": {
            "name": "yagao"
          }
        }
      ],
      "filter": {
        "range": {
          "price": {
            "gte": 25
          }
        }
      }
    }
  }
}
full-text search(全文检索)
为了演示这个示例,先增加一条数据
PUT /ecommerce/product/4
{
  "name": "special yagao",
  "desc": "special meibai",
  "price": 50,
  "producer": "special yagao producer",
  "tags": [
    "meibai"
  ]
}
查询示例: 查询 producer 中包含 yagao 和 producer 的数据
GET /ecommerce/product/_search
{
    "query" : {
        "match" : {
            "producer" : "yagao producer"
        }
    }
}

-------- 响应

{
  "took": 8,
  "timed_out": false,
  "_shards": {
    "total": 5,
    "successful": 5,
    "failed": 0
  },
  "hits": {
    "total": 4,
    "max_score": 0.70293105,
    "hits": [
      {
        "_index": "ecommerce",
        "_type": "product",
        "_id": "4",
        "_score": 0.70293105,
        "_source": {
          "name": "special yagao",
          "desc": "special meibai",
          "price": 50,
          "producer": "special yagao producer",
          "tags": [
            "meibai"
          ]
        }
      },
      {
        "_index": "ecommerce",
        "_type": "product",
        "_id": "1",
        "_score": 0.25811607,
        "_source": {
          "name": "gaolujie yagao",
          "desc": "gaoxiao meibai",
          "price": 30,
          "producer": "gaolujie producer",
          "tags": [
            "meibai",
            "fangzhu"
          ]
        }
      },
      {
        "_index": "ecommerce",
        "_type": "product",
        "_id": "3",
        "_score": 0.25811607,
        "_source": {
          "name": "zhonghua yagao",
          "desc": "caoben zhiwu",
          "price": 40,
          "producer": "zhonghua producer",
          "tags": [
            "qingxin"
          ]
        }
      },
      {
        "_index": "ecommerce",
        "_type": "product",
        "_id": "2",
        "_score": 0.1805489,
        "_source": {
          "name": "jiajieshi yagao",
          "desc": "youxiao fangzhu",
          "price": 25,
          "producer": "jiajieshi producer",
          "tags": [
            "fangzhu"
          ]
        }
      }
    ]
  }
}
针对这个结果的一些说明:_score:相关度评分
回顾下倒排索引,针对 producer 字段:
producer 这个字段,会先被拆解,建立倒排索引
| 关键词 | ids |
|---|---|
| special | 4 |
| yagao | 4 |
| producer | 1,2,3,4 |
| gaolujie | 1 |
| zhognhua | 3 |
| jiajieshi | 2 |
id 为 4 的评分为什么这么高呢?
仔细观察 搜索目标 “yagao producer” 会被拆解成 yagao和 producer
在倒排索引中出现了 2次 ,而其他数据只出现了一次,所以它的评分是最高的
phrase search(短语搜索)
跟全文检索相对应,相反,全文检索会将输入的搜索串拆解开来,去倒排索引里面去一一匹配,只要能匹配上任意一个拆解后的单词,就可以作为结果返回
phrase search:要求输入的搜索串,必须在指定的字段文本中,完全包含一模一样的,才可以算匹配,才能作为结果返回
GET /ecommerce/product/_search
{
    "query" : {
        "match_phrase" : {
            "producer" : "yagao producer"
        }
    }
}

---- 响应

{
  "took": 10,
  "timed_out": false,
  "_shards": {
    "total": 5,
    "successful": 5,
    "failed": 0
  },
  "hits": {
    "total": 1,
    "max_score": 0.70293105,
    "hits": [
      {
        "_index": "ecommerce",
        "_type": "product",
        "_id": "4",
        "_score": 0.70293105,
        "_source": {
          "name": "special yagao",
          "desc": "special meibai",
          "price": 50,
          "producer": "special yagao producer",
          "tags": [
            "meibai"
          ]
        }
      }
    ]
  }
}
highlight search(高亮搜索结果)
GET /ecommerce/product/_search
{
    "query" : {
        "match_phrase" : {
            "producer" : "yagao producer"
        }
    },
    "highlight": {
      "fields": {
        "producer": {}
      }
    }
}

----- 响应

{
  "took": 61,
  "timed_out": false,
  "_shards": {
    "total": 5,
    "successful": 5,
    "failed": 0
  },
  "hits": {
    "total": 1,
    "max_score": 0.70293105,
    "hits": [
      {
        "_index": "ecommerce",
        "_type": "product",
        "_id": "4",
        "_score": 0.70293105,
        "_source": {
          "name": "special yagao",
          "desc": "special meibai",
          "price": 50,
          "producer": "special yagao producer",
          "tags": [
            "meibai"
          ]
        },
        "highlight": {
          "producer": [
            "special <em>yagao</em> <em>producer</em>"
          ]
        }
      }
    ]
  }
}
增加了 highlight 配置,响应结果中除了目标数据,还返回了 highlight 的信息;
仔细看 _source 中的 producer 和 highlight 中的 producer 文本信息的区别,这一整条信息中被搜索的关键词都被 em 标签包裹了。在显示的时候,可以针对 em 进行高亮样式处理,这就是高亮结果
"producer": "special yagao producer"

"producer": [
  "special <em>yagao</em> <em>producer</em>"
]
快速上手-聚合分析
嵌套聚合,下钻分析,聚合分析
计算每个 tag 下的商品数量
语法:
- aggs:聚合函数
- NAME:给这个操作取一个名字
- AGG_TYPE:聚合类型
GET /ecommerce/product/_search
{
  "aggs": {
    "NAME": {
      "AGG_TYPE": {}
    }
  }
}
GET /ecommerce/product/_search
{
  "aggs": {
    "group_by_tags": {
      "terms": {
        "field": "tags"
      }
    }
  }
}

------------ 响应

{
  "error": {
    "root_cause": [
      {
        "type": "illegal_argument_exception",
        "reason": "Fielddata is disabled on text fields by default. Set fielddata=true on [tags] in order to load fielddata in memory by uninverting the inverted index. Note that this can however use significant memory."
      }
    ],
    "type": "search_phase_execution_exception",
    "reason": "all shards failed",
    "phase": "query",
    "grouped": true,
    "failed_shards": [
      {
        "shard": 0,
        "index": "ecommerce",
        "node": "sEvAlYxFRJe598mrSDwUjQ",
        "reason": {
          "type": "illegal_argument_exception",
          "reason": "Fielddata is disabled on text fields by default. Set fielddata=true on [tags] in order to load fielddata in memory by uninverting the inverted index. Note that this can however use significant memory."
        }
      }
    ],
    "caused_by": {
      "type": "illegal_argument_exception",
      "reason": "Fielddata is disabled on text fields by default. Set fielddata=true on [tags] in order to load fielddata in memory by uninverting the inverted index. Note that this can however use significant memory."
    }
  },
  "status": 400
}
error.root_cause.reason 中说:在 text 字段上默认 fielddata=false, 需要设置为 true,通过生成正向索引并加载到内存中进行计算;
也就是说需要映射的修改:
PUT /ecommerce/product/_mapping
{
  "properties": {
    "tags":{
      "type": "text",
      "fielddata": true
    }
  }
}

--------------- 响应

{
  "acknowledged": true
}
GET /ecommerce/product/_search
{
  "aggs": {
    "group_by_tags": {
      "terms": { // 可以理解为是分组的意思
        "field": "tags"
      }
    }
  },
  "size": 0
}

--------------- 响应

{
  "took": 146,
  "timed_out": false,
  "_shards": {
    "total": 5,
    "successful": 5,
    "failed": 0
  },
  "hits": {
    "total": 4,
    "max_score": 0,
    "hits": []
  },
  "aggregations": {
    "group_by_tags": {
      "doc_count_error_upper_bound": 0,
      "sum_other_doc_count": 0,
      "buckets": [
        {
          "key": "fangzhu",
          "doc_count": 2
        },
        {
          "key": "meibai",
          "doc_count": 2
        },
        {
          "key": "qingxin",
          "doc_count": 1
        }
      ]
    }
  }
}
在请求的时候使用了一个 size=0,这个参数影响响应数据中的 hits.hits 中的数据
- hits.total:总共参与聚合运算的目标数据,这里是 4 条
- hits.hits:这 4条 数据的详细信息(原数据)
- aggregations 聚合的响应
- aggregations.group_by_tags.buckets:桶,也就是聚合的结果
doc_count_error_upper_bound 和 sum_other_doc_count 后面再讲解;
对于 buckets 返回的数据条数也可以通过 size 控制,aggs.group_by_tags.terms.size = n
先搜索,再聚合
需求:对名称中包含 yagao 的商品,计算每个 tag 下的商品数量
GET /ecommerce/product/_search
{
  "query": {
    "match": {
      "name": "yagao"
    }
  },
  "aggs": {
    "group_by_tags": {
      "terms": {
        "field": "tags"
      }
    }
  },
  "size": 0
}
很简单,之前的搜索,再加上 aggs 即可
嵌套聚合
需求:计算每个 tag 下的商品平均价格
也就是说:需要先对 tags 进行分组,再计算商品的平均价格
GET /ecommerce/product/_search
{
  "aggs": {
    "group_by_tags": {
      "terms": {
        "field": "tags"
      },
      "aggs": {
        "avg_by_price": {
          "avg": {
            "field": "price"
          }
        }
      }
    }
  },
  "size": 0
}
响应
{
  "took": 3,
  "timed_out": false,
  "_shards": {
    "total": 5,
    "successful": 5,
    "failed": 0
  },
  "hits": {
    "total": 4,
    "max_score": 0,
    "hits": []
  },
  "aggregations": {
    "group_by_tags": {
      "doc_count_error_upper_bound": 0,
      "sum_other_doc_count": 0,
      "buckets": [
        {
          "key": "fangzhu",
          "doc_count": 2,
          "avg_by_price": {
            "value": 27.5
          }
        },
        {
          "key": "meibai",
          "doc_count": 2,
          "avg_by_price": {
            "value": 40
          }
        },
        {
          "key": "qingxin",
          "doc_count": 1,
          "avg_by_price": {
            "value": 40
          }
        }
      ]
    }
  }
}
在聚合分析后再排序
需求:给上一个例子加上排序,按照计算结果(商品平均价格)降序排列
GET /ecommerce/product/_search
{
  "aggs": {
    "group_by_tags": {
      "terms": {
        "field": "tags",
        "order": {
          "avg_by_price": "desc"
        }
      },
      "aggs": {
        "avg_by_price": {
          "avg": {
            "field": "price"
          }
        }
      }
    }
  },
  "size": 0
}
在 terms 中增加 order 属性,并对 avg_by_price 这个计算结果进行排序
说明:为什么不用 java 代码讲解
我们现在全部都是用 es 的 restful api 在学习和讲解 es 的所欲知识点和功能点,但是没有使用一些编程语言去讲解(比如 java),原因有以下:
- es 最重要的 api,让我们进行各种尝试、学习甚至在某些环境下进行使用的 api,就是 restful api。如果你学习不用 es restful api,比如我上来就用 java api 来讲 es,也是可以的,但是你根本就漏掉了 es 知识的一大块,你都不知道它最重要的 restful api 是怎么用的
- 讲知识点,用 es restful api,更加方便,快捷,不用每次都写大量的 java 代码,能加快讲课的效率和速度,更加易于同学们关注es本身的知识和功能的学习
- 我们通常会讲完 es 知识点后,开始详细讲解 java api,如何用 java api 执行各种操作
- 我们每个篇章都会搭配一个项目实战,项目实战是完全基于 java 去开发的真实项目和系统
多次嵌套(下钻操作)
下钻操作:前面的列子,先分组,再聚合计算,这样的操作称为下钻操作(来源没有说)
需求:按照指定的价格区间进行分组,然后再每组内再按照 tags 进行分组,并计算每组内的商品平均价格,并按照平均价格进行降序排列
GET /ecommerce/product/_search
{
  "aggs": {
    "group_by_price": {
      "range": {
        "field": "price",
        "ranges": [
          {
            "from": 0,
            "to": 20
          },
          {
            "from": 20,
             "to": 40
          },
          {
            "from": 40,
            "to": 50
          }
        ]
      },
      "aggs": {
        "group_by_tags": {
          "terms": {
            "field": "tags",
            "order": {
              "group_by_avg": "desc"
            }
          },
          "aggs": {
            "group_by_avg": {
              "avg": {
                "field": "price"
              }
            }
          }
        }
      }
    }
  },
  "size": 0
}
响应
{
  "took": 3,
  "timed_out": false,
  "_shards": {
    "total": 5,
    "successful": 5,
    "failed": 0
  },
  "hits": {
    "total": 4,
    "max_score": 0,
    "hits": []
  },
  "aggregations": {
    "group_by_price": {
      "buckets": [
        {
          "key": "0.0-20.0",
          "from": 0,
          "to": 20,
          "doc_count": 0,
          "group_by_tags": {
            "doc_count_error_upper_bound": 0,
            "sum_other_doc_count": 0,
            "buckets": []
          }
        },
        {
          "key": "20.0-40.0",
          "from": 20,
          "to": 40,
          "doc_count": 2,
          "group_by_tags": {
            "doc_count_error_upper_bound": 0,
            "sum_other_doc_count": 0,
            "buckets": [
              {
                "key": "meibai",
                "doc_count": 1,
                "group_by_avg": {
                  "value": 30
                }
              },
              {
                "key": "fangzhu",
                "doc_count": 2,
                "group_by_avg": {
                  "value": 27.5
                }
              }
            ]
          }
        },
        {
          "key": "40.0-50.0",
          "from": 40,
          "to": 50,
          "doc_count": 1,
          "group_by_tags": {
            "doc_count_error_upper_bound": 0,
            "sum_other_doc_count": 0,
            "buckets": [
              {
                "key": "qingxin",
                "doc_count": 1,
                "group_by_avg": {
                  "value": 40
                }
              }
            ]
          }
        }
      ]
    }
  }
}
基础分布式架构剖析
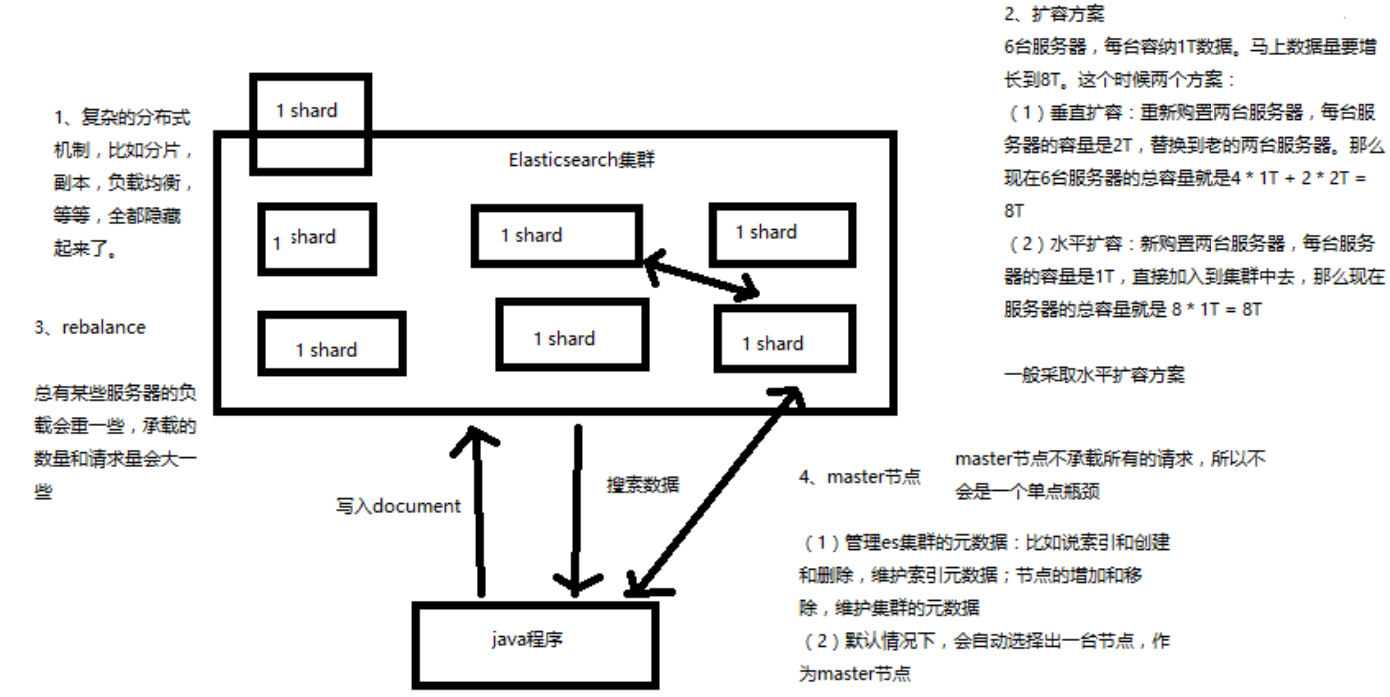
- Elasticsearch 对复杂分布式机制的透明隐藏特性
- Elasticsearch 的垂直扩容与水平扩容
- 增减或减少节点时的数据 rebalance
- master 节点
- 节点对等的分布式架构
Elasticsearch 对复杂分布式机制的透明隐藏特性
Elasticsearch 是一套分布式的系统,分布式是为了应对大数据量 隐藏了复杂的分布式机制
-
分片机制
我们之前随随便便就将一些 document 插入到 es 集群中去了,我们有没有关心过数据怎么进行分片的,数据到哪个 shard 中去
-
cluster discovery(集群发现机制)
我们之前在做那个集群 status 从 yellow 转 green 的实验里,直接启动了第二个 es 进程,那个进程作为一个 node 自动就发现了集群,并且加入了进去,还接受了部分数据 (replica shard)
-
shard 负载均衡
举例,假设现在有 3个 节点,总共有 25个 shard 要分配到 3个节点上去,es 会自动进行均匀分配,以保持每个节点的均衡的读写负载请求
shard 副本,请求路由,集群扩容,shard 重分配
Elasticsearch 的垂直扩容与水平扩容
-
垂直扩容
采购更强大的服务器,成本非常高昂,而且会有瓶颈,假设世界上最强大的服务器容量就是 10T,但是当你的总数据量达到 5000T 的时候,你要采购多少台最强大的服务器啊
-
水平扩容
业界经常采用的方案,采购越来越多的普通服务器,性能比较一般,但是很多普通服务器组织在一起,就能构成强大的计算和存储能力
假设服务器的价格如下:
-
普通服务器:1T,1万,100万
-
强大服务器:10T,50万,500万
扩容对应用程序的透明性
增减或减少节点时的数据 rebalance
目的:保持负载均衡
当有新节点加进来的时候,一些 shard 上承担数据量不平衡的时候,es 会自动做 rebalance 操作,将这些数据分担一部分到新机器上去
master 节点
管理 es 集群的元数据,默认情况下回自动选举出一台节点,作为 master 节点;
- 创建或删除索引
- 增加或删除节点
master 节点不承载所有的请求,所以不存在单节点瓶颈,那么这就涉及到一个概念:节点对等
节点对等的分布式架构
- 节点对等,每个节点都能接收所有的请求
- 自动请求路由
- 响应收集
单节点 shard & replica 机制
- shard & replica 机制再次梳理
- 图解单 node 环境下创建 index 是什么样子的
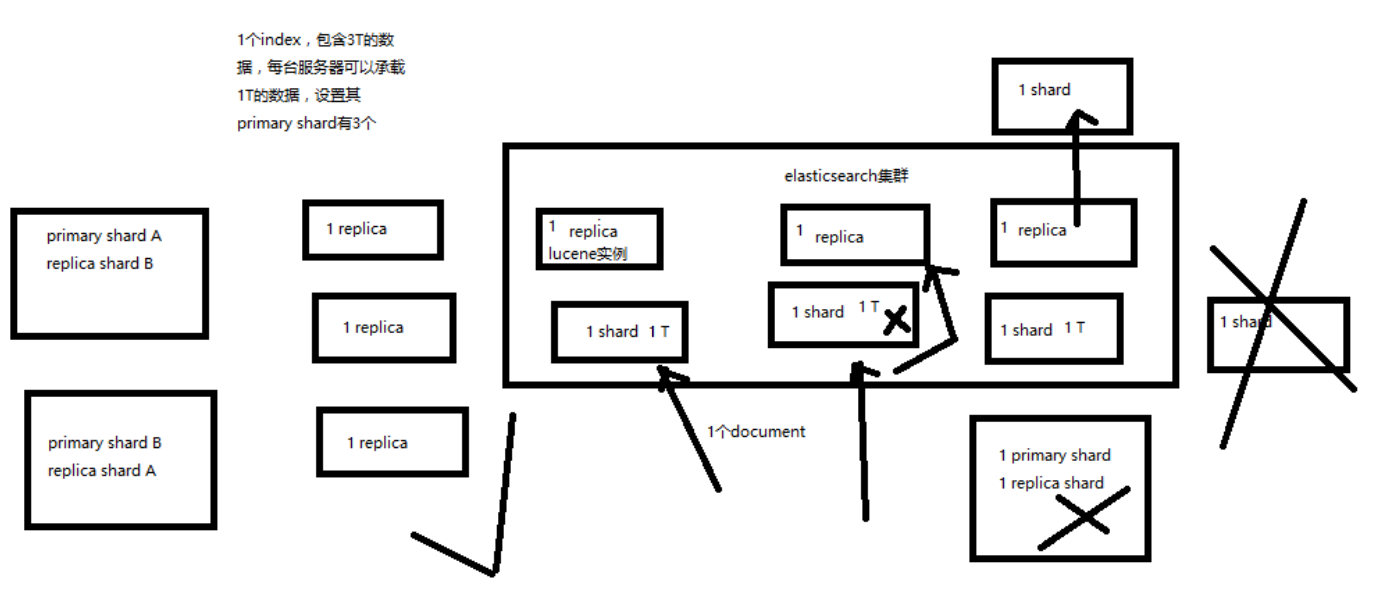
shard & replica 机制再次梳理
- index 包含多个 shard
- 每个 shard 都是一个最小工作单元,承载部分数据,是一个 lucene 实例,完整的建立索引和处理请求的能力
- 增减节点时,shard 会自动在 nodes 中负载均衡
- primary shard 和 replica shard,每个 document 肯定只存在于某一个 primary shard 以及其对应的 replica shard 中,不可能存在于多个 primary shard
- replica shard 是 primary shard 的副本,负责容错,以及承担读请求负载
- primary shard 的数量在创建索引的时候就固定了,replica shard 的数量可以随时修改
- primary shard 的默认数量是 5,replica 默认是 1,默认有 10个 shard,5个 primary shard,5个 replica shard
- primary shard 不能和自己的 replica shard 放在同一个节点上(否则节点宕机,primary shard 和副本都丢失,起不到容错的作用),但是可以和其他 primary shard 的 replica shard 放在同一个节点上
对于 shard 和 replica 的总结:
- pri : primary shard
- rep : replica shard
- 所以一个 es 实例叫做 shard
- rep 的配置是针对于每个 pri 的副本个数
如:test 的 pri=2,rep=2;那么将产生 2个 primary shard 和 4个 replica shard
图解单 node 环境下创建 index 是什么样子的
- 单 node 环境下,创建一个 index,有 3个 primary shard,3个 replica shard
- 集群 status 是 yellow
- 这个时候,只会将 3个 primary shard 分配到仅有的一个 node 上去,另外 3个 replica shard 是无法分配的
- 集群可以正常工作,但是一旦出现节点宕机,数据全部丢失,而且集群不可用,无法承接任何请求
PUT /test_index
{
  "settings": {
    "number_of_shards": 3,
    "number_of_replicas": 1
  }
}
GET /_cat/health?v

epoch      timestamp cluster       status node.total node.data shards pri relo init unassign pending_tasks max_task_wait_time active_shards_percent
1546323256 14:14:16  elasticsearch yellow          1         1      9   9    0    0        9             0                  -                 50.0%
GET /_cat/indices?v

health status index      uuid                   pri rep docs.count docs.deleted store.size pri.store.size
yellow open   ecommerce  ZpGp7bIBQBaZFk9SYmbJVQ   5   1          4            0     22.2kb         22.2kb
yellow open   test_index g4RJx2v8TXK95LdwlhRx5A   3   1          0            0       390b           390b
yellow open   .kibana    id1SV_oGSjyGosKxeJApww   1   1          1            0      3.1kb          3.1kb
来计算下是否是正确的:这个单节点集群有 9个 shards ,9个 pri,有 9个 unassign;
再来统计下这 3个 索引一共有 9个 pri,每个索引都有 1个 rep,那么一共会产生 9个 rep。 9个 unassign 全是这 9个 rep,因为 同一份数据的 pri 和 rep 不能在一台机器上;
也就是说,一共会产生 18 个 shard;这里只有 9个,还有 9个没有被分配

而 pri 的数据却可以再同一台机器上,这里创建的 3个 pri 都会在这个 node 上存在
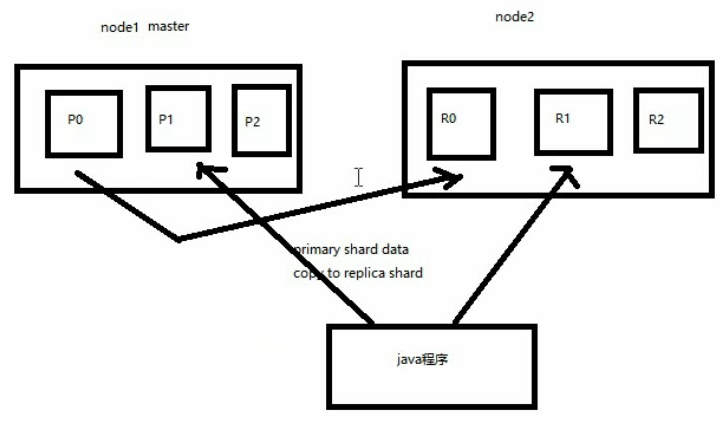
2 节点 shard & replica 机制
图解 2个 node 环境下 replica shard 是如何分配的
- replica shard 分配:3个 primary shard,3个 replica shard,1 node
- primary —> replica 同步
- 读请求:primary/replica
再启动一个 es 实例后,再次查看:
health status 变成了 green; shards 变成了 18
GET /_cat/health?v

epoch      timestamp cluster       status node.total node.data shards pri relo init unassign pending_tasks max_task_wait_time active_shards_percent
1546324075 14:27:55  elasticsearch green           2         2     18   9    0    0        0             0                  -                100.0%
indices 是没有任何变化的
GET /_cat/indices?v

health status index      uuid                   pri rep docs.count docs.deleted store.size pri.store.size
green  open   ecommerce  ZpGp7bIBQBaZFk9SYmbJVQ   5   1          4            0     44.5kb         22.2kb
green  open   test_index g4RJx2v8TXK95LdwlhRx5A   3   1          0            0       780b           390b
green  open   .kibana    id1SV_oGSjyGosKxeJApww   1   1          1            0      6.3kb          3.1kb
横向扩容机制浅析
图解横向扩容过程,如何超出扩容极限,以及如何提升容错性
-
primary&replica 自动负载均衡,6个shard,3 primary,3 replica
-
每个 node 有更少的 shard,IO/CPU/Memory 资源给每个 shard 分配更多,每个 shard 性能更好
-
扩容的极限,6个 shard(3 primary,3 replica),最多扩容到 6台 机器,每个 shard 可以占用单台服务器的所有资源,性能最好
-
超出扩容极限,动态修改 replica 数量,9个 shard(3primary,6 replica),扩容到 9台 机器,比 3台 机器时,拥有 3倍 的读吞吐量
-
3台 机器下,9个 shard(3 primary,6 replica),资源更少,但是容错性更好,最多容纳 2台机器宕机,6个 shard 只能容纳 1台 机器宕机
-
这里的这些知识点,你综合起来看,就是说,一方面告诉你扩容的原理,怎么扩容,怎么提升系统整体吞吐量;另一方面要考虑到系统的容错性,怎么保证提高容错性,让尽可能多的服务器宕机,保证数据不丢失

自己总结:
- 横向扩容简单,只需要增加 replica 的数量即可,es 会完成副本的同步
- rep 会可接受读请求,分担 master 的压力
- 当副本在每台机器上都存在的时候,容错性增加,但是空间增多,这就是以空间换取性能和容错性
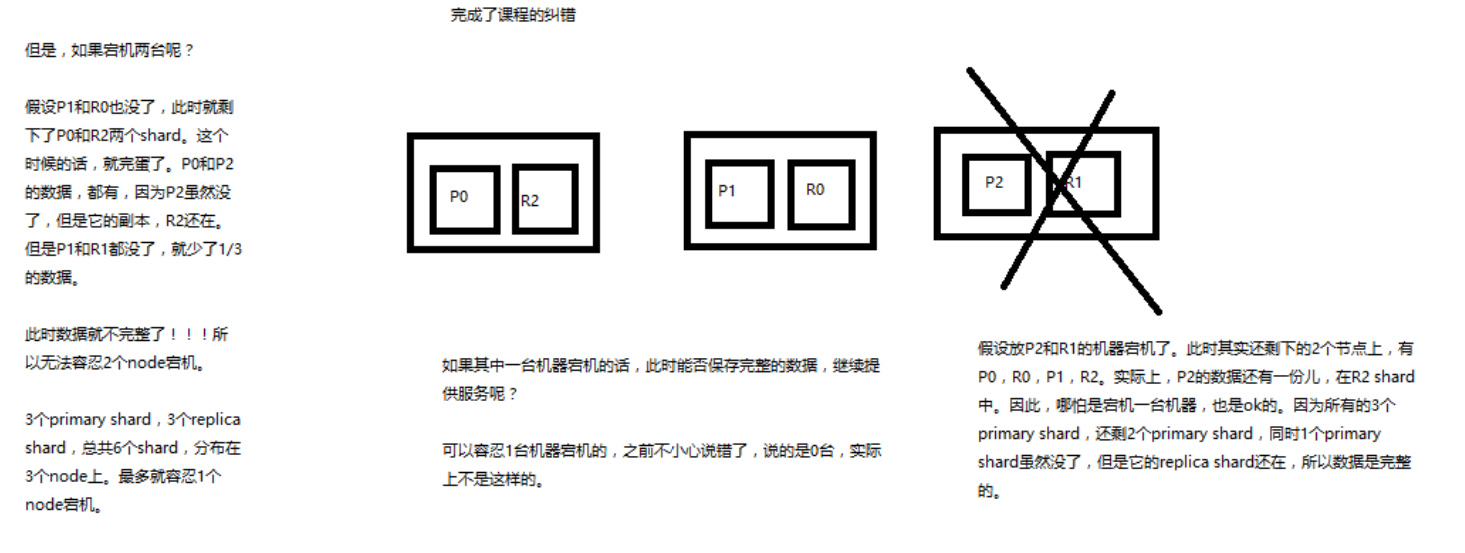
纠错
前面的讲解中,有一个地方说错了:3台 机器,6个 shard,不能有机器宕机;这个说错了。
看下图:就是一个排列的问题,3 台机器上怎么才能保证至少 2台机器上至少存在一份数据。这个是可以做到的
容错机制浅析
图解 Elasticsearch 容错机制:master 选举,replica 容错,数据恢复

还是使用上一章的例子,9 shard,3 node 来说明 es 的一个最基本的容错机制
- master node 宕机,自动 master 选举,red
- replica容错:新 master 将 replica 提升为 primary shard,yellow
- 重启宕机 node,master copy replica 到该 node,使用原有的 shard 并同步宕机后的修改,green
初步解析 document 的核心元数据
初步解析 document 的核心元数据以及图解剖析 index 创建反例
_index 元数据_type元数据_id元数据
插入一条数据查看返回来的元数据信息
PUT /test_index/test_type/1
{
  "test_content": "test test"
}

------------ 响应

{
  "_index": "test_index",
  "_type": "test_type",
  "_id": "1",
  "_version": 1,
  "result": "created",
  "_shards": {
    "total": 2,
    "successful": 2,
    "failed": 0
  },
  "created": true
}
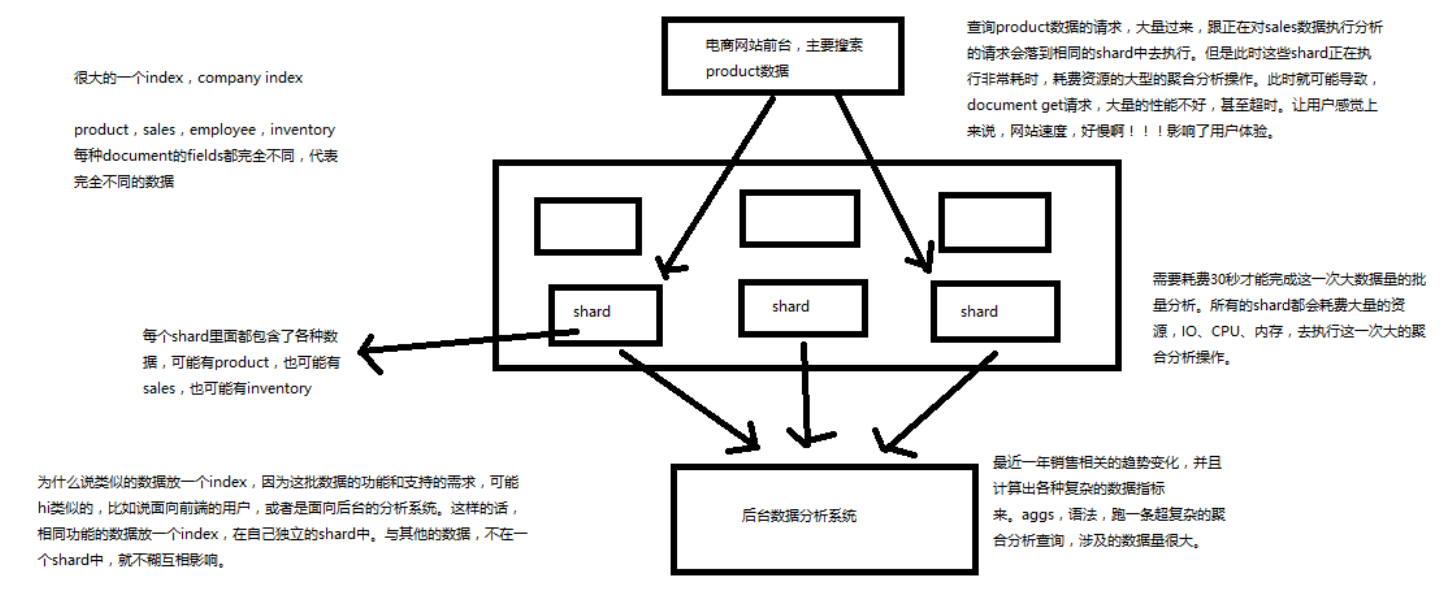
_index 元数据
简单说:可以看成是 mysql 中的一个库
- 代表一个 document 存放在哪个 index 中
-
类似的数据放在一个索引,非类似的数据放不同索引
product index(包含了所有的商品),
sales index(包含了所有的商品销售数据),
inventory index(包含了所有库存相关的数据)。
如果你把 product,sales,human resource(employee),全都放在一个大的 index 里面,比如说 company index,不合适的。
-
index 中包含了很多类似的 document
类似是什么意思?
其实指的就是说,这些 document 的 fields 很大一部分是相同的,你说你放了 3个 document,每个 document 的 fields 都完全不一样,这就不是类似了,就不太适合放到一个index里面去了。 大致上的意思就是:在查询不相关数据的时候,相同 index 下所占用的资源是共享的,不相关的资源访问的时候就会影响它的访问(当然是在数据量很大的情况下容易感受到这种性能情况)
- 索引名称必须是小写的,不能用下划线开头,不能包含逗号;如:product,website,blog 都可以
下面图解不类似的情况下出现的性能问题
_type元数据
简单说:可以看成是 mysql 一个库中的表
- 代表 document 属于 index 中的哪个类别(type)
-
一个索引通常会划分为多个 type,逻辑上对 index 中有些许不同的几类数据进行分类
因为一批相同的数据,可能有很多相同的 fields,但是还是可能会有一些轻微的不同,可能会有少数 fields 是不一样的,举个例子,就比如说,商品,可能划分为电子商品,生鲜商品,日化商品,等等。
- type 名称可以是大写或者小写,但是同时不能用下划线开头,不能包含逗号
_id元数据
- 代表 document 的唯一标识,与 index 和 type 一起,可以唯一标识和定位一个 document
- 我们可以手动指定 document 的 id(put /index/type/id),也可以不指定,由 es 自动为我们创建一个 id
分布式文档-document id
- 手动指定 document id
- 自动生成 document id
手动指定 document id
根据应用情况来说,是否满足手动指定document id的前提:
一般来说,是从某些其他的系统中,导入一些数据到es时,会采取这种方式, 就是使用系统中已有数据的唯一标识,作为 es 中 document 的 id。
举个例子,比如说,我们现在在开发一个电商网站,做搜索功能,或者是OA系统,做员工检索功能。 这个时候,数据首先会在网站系统或者 IT 系统内部的数据库中,会先有一份, 此时就肯定会有一个数据库的 primary key(自增长,UUID,或者是业务编号)。 如果将数据导入到 es 中,此时就比较适合采用数据在数据库中已有的 primary key。
如果说,我们是在做一个系统,这个系统主要的数据存储就是es一种,也就是说, 数据产生出来以后,可能就没有 id,直接就放 es 一个存储,那么这个时候, 可能就不太适合说手动指定 document id 的形式了,因为你也不知道id应该是什么, 此时可以采取下面要讲解的让 es 自动生成 id 的方式。
手动指定的语法就是前面用过的 put 方式
PUT /test_index/test_type/1
{
  "test_content": "test test"
}
自动生成 document id
语法很简单,把 put 改成 post,不指定 id
POST /test_index/test_type
{
  "test_content": "test test"
}

---------- 响应

{
  "_index": "test_index",
  "_type": "test_type",
  "_id": "AWgPGM7zE8HO-7Ks86bu",
  "_version": 1,
  "result": "created",
  "_shards": {
    "total": 2,
    "successful": 1,
    "failed": 0
  },
  "created": true
}
可以看到返回了一串很长的 id
自动生成的 ID 的特点:
- 长度为 20 个字符
- URL 安全:经过了 base64编码的 id,可以放在 url 中传递
- GUID 方式,分布式系统并行生成时不可能发生冲突
_souce元数据 _souce元数据- 定制返回结果字段
_souce 元数据
添加一条数据
PUT /test_index/test_type/1
{
  "test_content": "test test",
  "test_content2": "test test2"
}
获取这一条数据
GET /test_index/test_type/1

-------- 响应

{
  "_index": "test_index",
  "_type": "test_type",
  "_id": "1",
  "_version": 2,
  "found": true,
  "_source": {
    "test_content": "test test",
    "test_content2": "test test2"
  }
}
其中响应的 _source 中的就是我们在新增数据的时候提交的数据
定制返回结果字段
// 多个字段用逗号分隔,就能返回指定的字段了

GET /test_index/test_type/1?_source=test_content2,test_content
dsl 语法,只有一个字段的时候,可以直接写 "_source": "test_content"
GET /test_index/test_type/_search
{
  "query": {
    "match": {
      "_id": "1"
    }
  },
  "_source": ["test_content","test_content2"]
}
CRUD、强制操作
document 的全量替换、强制创建以及图解 lazy delete 机制
- document 的全量替换
- document 的强制创建
- document 的删除
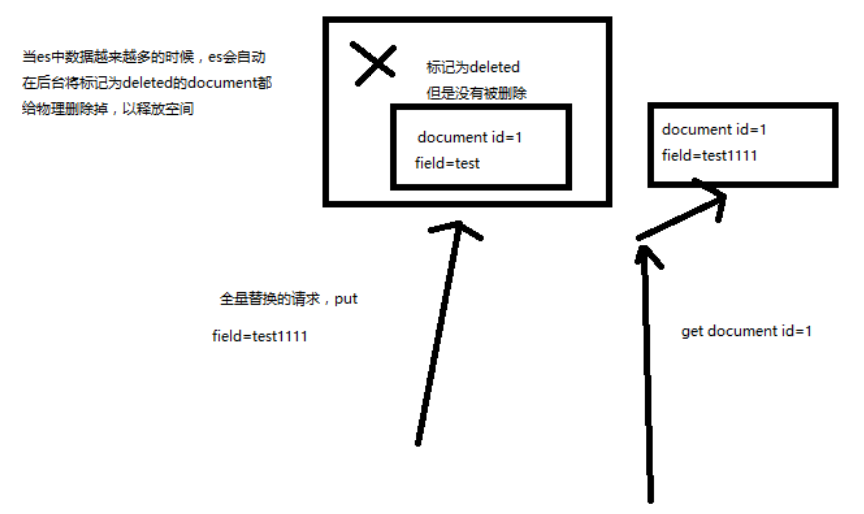
document 的全量替换
-
语法与创建文档是一样的
如果 document id 不存在,那么就是创建;如果 document id 已经存在,那么就是全量替换操作,替换 document 的 json 串内容
-
document 是不可变的
如果要修改 document 的内容,第一种方式就是全量替换,直接对 document 重新建立索引,替换里面所有的内容
-
es 会将老的 document 标记为 deleted
然后新增我们给定的一个 document,当我们创建越来越多的 document 的时候,es 会在适当的时机在后台自动删除标记为 deleted 的 document
document 的强制创建
老师讲解的是:
- 创建文档与全量替换的语法是一样的,有时我们只是想新建文档,不想替换文档,如果强制进行创建呢?
PUT /index/type/id?op_type=create,PUT /index/type/id/_create
PUT /test_index/test_type/1/_create
{
  "test_content": "test test",
  "test_content2": "test test23"
}

PUT /test_index/test_type/1?op_type=create
{
  "test_content": "test test",
  "test_content2": "test test23",
  "test_content3": "test test23"
}
document 的强制创建(正确的讲解)
我觉得上面讲解得有问题:
如果已经存在一个 document id 为 1 的时候,再使用以上语法创建,会报错;
会告诉你已经存在了;
那么这个的含义应该是:当你不想要覆盖操作的时候,可以使用 create 显示指定不要覆盖,而是报错
{
  "error": {
    "root_cause": [
      {
        "type": "version_conflict_engine_exception",
        "reason": "[test_type][1]: version conflict, document already exists (current version [3])",
        "index_uuid": "g4RJx2v8TXK95LdwlhRx5A",
        "shard": "2",
        "index": "test_index"
      }
    ],
    "type": "version_conflict_engine_exception",
    "reason": "[test_type][1]: version conflict, document already exists (current version [3])",
    "index_uuid": "g4RJx2v8TXK95LdwlhRx5A",
    "shard": "2",
    "index": "test_index"
  },
  "status": 409
}
document 的删除
DELETE /test_index/test_type/1
这里的删除和更新操作类似,也是一个 lazy delete 机制
并发更新冲突
本章记录 5 个小结的笔记;他们都是讲解如何解决更新冲突
- 18-深度图解剖析 Elasticsearch 并发冲突问题
- 19-深度图解剖析悲观锁与乐观锁两种并发控制方案
- 20-图解 Elasticsearch 内部基于
_version如何进行乐观锁并发控制 - 21-上机动手实战演练基于
_version进行乐观锁并发控制 - 22-上机动手实战演练基于 external version 进行乐观锁并发控制
深度图解剖析 Elasticsearch 并发冲突问题
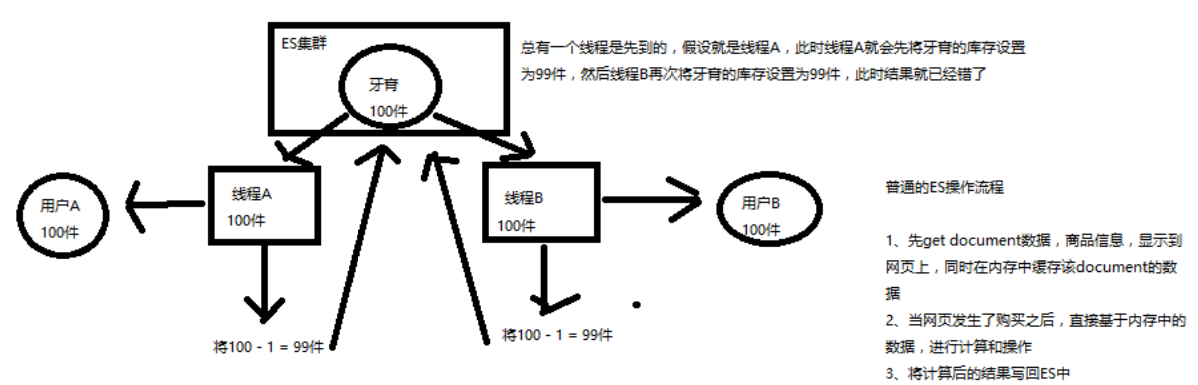
并发修改这个在很多数据库中都存在问题,一个场景:
一个商品库存是 2 个,一共 3 个人购买,3个人同时下单,如果没有并发控制,那么久会超卖。
为什么会超卖,这个就太基础了,不记录笔记了;
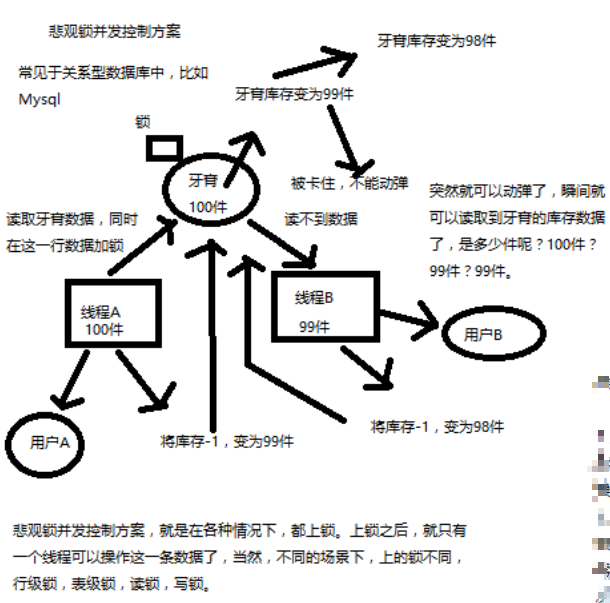
深度图解剖析悲观锁与乐观锁两种并发控制方案
悲观锁
悲观锁:通过锁定某一条数据(独占),进行解决并发控制
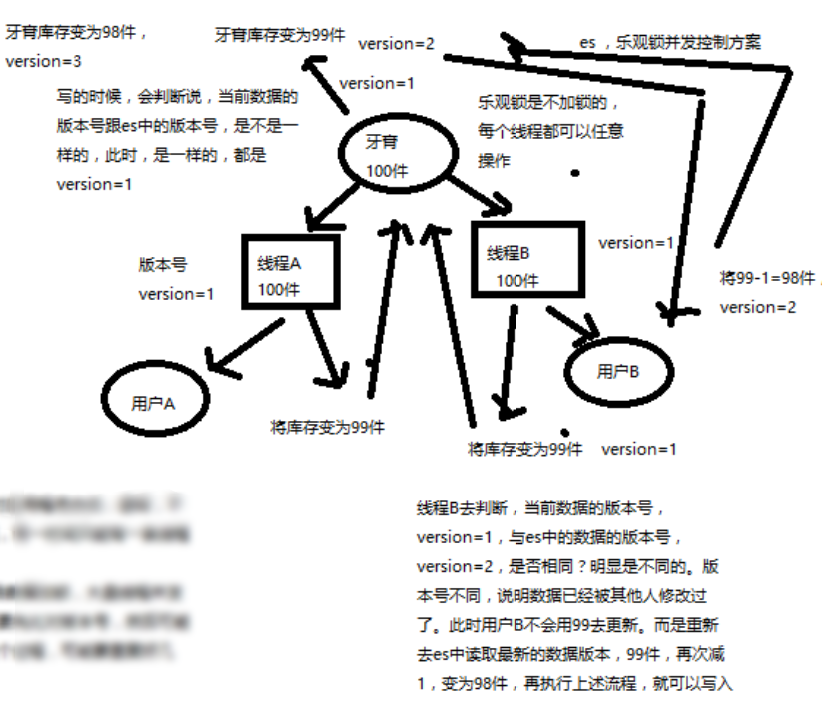
乐观锁
乐观锁:不加锁,通过条件(版本号)来更新数据;
大致流程:
- version = 1; 期望版本等于 1 的时候更新数据
- 如果此时数据库中的数据版本变为了 2,那么此时不更新
- 再次获取数据的版本号,再重复第 1、2步。
::: tip 关于条件更新:是需要依赖数据库的按指定条件更新的功能,而不是自行在程序中处理 :::
优缺点
悲观锁:
优点:
- 方便,直接加锁
- 对程序透明,不需要做额外操作
缺点:并发能力很低,同一时间只能有一条线程操作数据
乐观锁:
优点
- 并发能力很高,不给数据加锁
- 大量线程并发操作
缺点:
- 麻烦,每次更新都要对比版本号
- 可能多次加载数据,再次修改
图解 Elasticsearch 内部基于 _version 如何进行乐观锁并发控制
前面说的是概念,现在说说 es 内部对于并发修改是如何控制的;
_version 的产生:在创建的时候值为 0 ,在修改和删除的时候回自动增加 1
es 内部是基于 _version 版本号控制。
对于上图流程总结:
- 假设 a 操作修改条件是 version = 1;
- 假设 b 操作修改条件也是 version = 1;
- 那一条数据被先执行则生效,后到的则被丢弃
反正这一小节还是没有解决我心中的疑惑, es 到底是怎么实现并发版本的控制的,如果不加锁,怎么保证获取数据,再修改版本号的原子操作?
对于 cas 在同一台机器中是硬件保证的,那么对于 es 这种分布式的呢?我没有明白
实战 _version 进行乐观锁并发控制
实战的步骤也很简单,利用 es api 进行操作;
-
先添加一条数据,此时 version = 1
PUT /test_index/test_type/7 { "test_field": "test test" } -
带上 version = 1 更新数据,客户端1 更新成功
PUT /test_index/test_type/7?version=1 { "test_field": "test client 1" } -
带上 version = 1 更新数据
 PUT /test_index/test_type/7?version=1
 {
   "test_field": "test client 2"
 }
因为客户端1 已结更新成功,那么此时再用版本1 更新将会返回失败信息
 {
   "error": {
     "root_cause": [
       {
         "type": "version_conflict_engine_exception",
         "reason": "[test_type][7]: version conflict, current version [2] is different than the one provided [1]",
         "index_uuid": "g4RJx2v8TXK95LdwlhRx5A",
         "shard": "0",
         "index": "test_index"
       }
     ],
     "type": "version_conflict_engine_exception",
     "reason": "[test_type][7]: version conflict, current version [2] is different than the one provided [1]",
     "index_uuid": "g4RJx2v8TXK95LdwlhRx5A",
     "shard": "0",
     "index": "test_index"
   },
   "status": 409
 }
那么想要这条数据更新成功怎么办呢? 需要获取到这条数据的版本号,再带上新的版本号去更新即可
那么此次更新步骤就是 jdk 中的 cas,在并发频繁的时候,该步骤可能要尝试好多次才能更新进去
实战 external version 进行乐观锁并发控
external version 是什么?
- 这个值不是 es 中的
_version,是你自己维护的(比如 mysql 中数据的版本) - 但是提供的值是与 es 中的
_version比较的 - 提供的值必须比
_vesion的值大,才能更新成功
::: tip 内部版本号并发控制策略是提供的版本号必须一致才能更新成功 :::
语法
?version
?version=1&version_type=externalon=1

只是多了一个 type ,其他的都是一致的,除了上面说的值比较有区别外
partial update
本章共记录原教程的 3 个章节,他们都是关于 partial update 的知识
- 第23节:图解 partial update 实现原理以及动手实战演练
- 第24节:上机动手实战演练基于 groovy 脚本进行 partial update
- 第25节:图解 partial update 乐观锁并发控制原理以及相关操作讲解
图解实现原理与实战演练
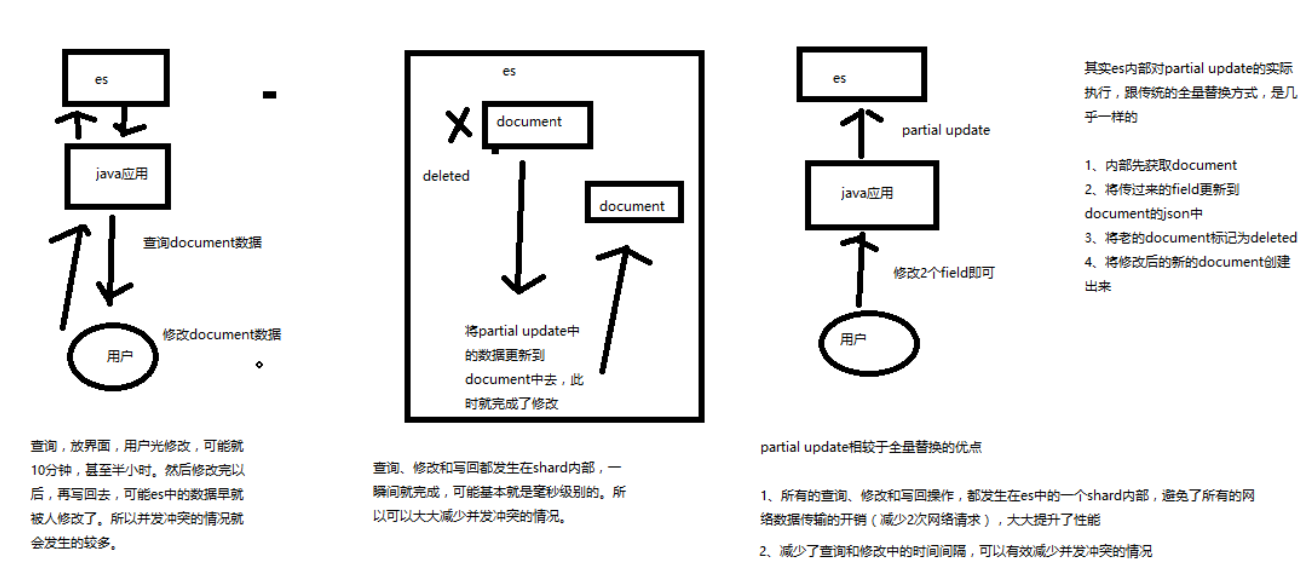
什么是 partial update?
PUT /index/type/id,创建文档&替换文档,就是一样的语法
一般对应到应用程序中,每次的执行流程基本是这样的:
- 应用程序先发起一个 get 请求,获取到 document,展示到前台界面,供用户查看和修改
- 用户在前台界面修改数据,发送到后台
- 后台代码,会将用户修改的数据在内存中进行执行,然后封装好修改后的全量数据
- 然后发送 PUT 请求,到 es 中,进行全量替换
- es 将老的 document 标记为 deleted,然后重新创建一个新的 document
partial update 语法
post /index/type/id/_update
{
   "doc": {
      "要修改的少数几个field即可,不需要全量的数据"
   }
}
看起来,好像就比较方便了,每次就传递少数几个发生修改的 field 即可,不需要将全量的 document 数据发送过去
图解 partial update 实现原理以及其优点
partial update,看起来很方便的操作,实际内部的原理是什么样子的,然后它的优点是什么
要明白在原理上与全量替换方法几乎一致:
- 内部先获取 document
- 将传递过来的 field 更新到 document 的 json 中
- 将老的 document 标记为 deleted
- 将修改后的新的 document 创建出来
partial update 相较于全量替换的优点:
-
所有的查询、修改和协会操作,都发生在 es 中的一个 shard 内部
避免网络数据传输的开销(减少两次网络请求,查询写回),大大提升性能
-
减少了查询和修改中的间隔,可有效减少并发冲突情况
先获取数据,再修改,这中间可能会存在号几分钟的人工填写时间, 如果存在并发,则需要多次获取版本号再写入的操作。 而这里在一个 shard 内部就完成了这些
演练
PUT /test_index/test_type/10
{
  "test_field1": "test1",
  "test_field2": "test2"
}

POST /test_index/test_type/10/_update
{
  "doc": {
    "test_field2": "updated test2"
  }
}
groovy 语法实现
es,其实是有个内置的脚本支持的,可以基于 groovy 脚本实现各种各样的复杂操作
本节基于 groovy 脚本,简单讲解如何执行 partial update
es scripting module,我们会在高手进阶篇去讲解,这里就只是初步讲解一下
内置脚本
什么是内置脚本? 语法内容通过 api 发送
新增一条数据,通过这条数据的来讲解怎么操作
PUT /test_index/test_type/11
{
  "num": 0,
  "tags": []
}
自增操作
POST /test_index/test_type/11/_update
{
  "script": "ctx._source.num+=1"
}

----- 响应

{
  "_index": "test_index",
  "_type": "test_type",
  "_id": "11",
  "_version": 2,
  "result": "updated",
  "_shards": {
    "total": 2,
    "successful": 1,
    "failed": 0
  }
}
数组操作
POST /test_index/test_type/11/_update
{
  "script": "ctx._source.tags.add('xx')"
}
对于这个脚本的语法这里没有说从哪里来的。
外置脚本
什么是外置脚本? 语法内容存储在 /config/scripts 目录中的文件中,通过 api 指定哪一个文件获取文件中的脚本内容
test-add-tags.groovy
ctx._source.tags+=new_tag
POST /test_index/test_type/11/_update
{
  "script": {
    "lang": "groovy",
    "file": "test-add-tags",
    "params": {
      "new_tag":"tag1"
    }
  }
}
::: tip 外置脚本里面的语法放在内置脚本中的话,结果是不一样的, 内置中会把数组的 json 串当成字符串操作,如下
"_source": {
    "num": 1,
    "tags": "[xx, tag1]tag2"
  }
:::
用脚本删除文档
脚本做的事情:当 num 等于指定值的时候,就删除,否则不做操作
test-delete-document.groovy
ctx.op = ctx._source.num == count ? 'delete' : 'none'
POST /test_index/test_type/11/_update
{
  "script": {
    "lang": "groovy",
    "file": "test-delete-document",
    "params": {
      "count": 1
    }
  }
}
::: tip 注意 count 的值类型,如果写成 “1” 的话,是不会被匹配的 :::
upsert 操作
什么是 upsert ? 可以理解为 document 存在就更新,不存在则插入
刚刚把 id=11 的 document 删除了,现在直接更新操作,会报错
POST /test_index/test_type/11/_update
{
  "doc": {
    "num": 1
  }
}

------ 响应

{
  "error": {
    "root_cause": [
      {
        "type": "document_missing_exception",
        "reason": "[test_type][11]: document missing",
        "index_uuid": "g4RJx2v8TXK95LdwlhRx5A",
        "shard": "0",
        "index": "test_index"
      }
    ],
    "type": "document_missing_exception",
    "reason": "[test_type][11]: document missing",
    "index_uuid": "g4RJx2v8TXK95LdwlhRx5A",
    "shard": "0",
    "index": "test_index"
  },
  "status": 404
}
使用脚本实现:如果指定的 document 不存在,就执行 upsert 中的初始化操作;如果指定的 document 存在,就执行 doc 或者 script 指定的 partial update 操作
POST /test_index/test_type/11/_update
{
   "script" : "ctx._source.num+=1",
   "upsert": {
       "num": 0,
       "tags": []
   }
}
可以执行两次该操作,查看内容。
图解乐观锁并发控制原理与操作
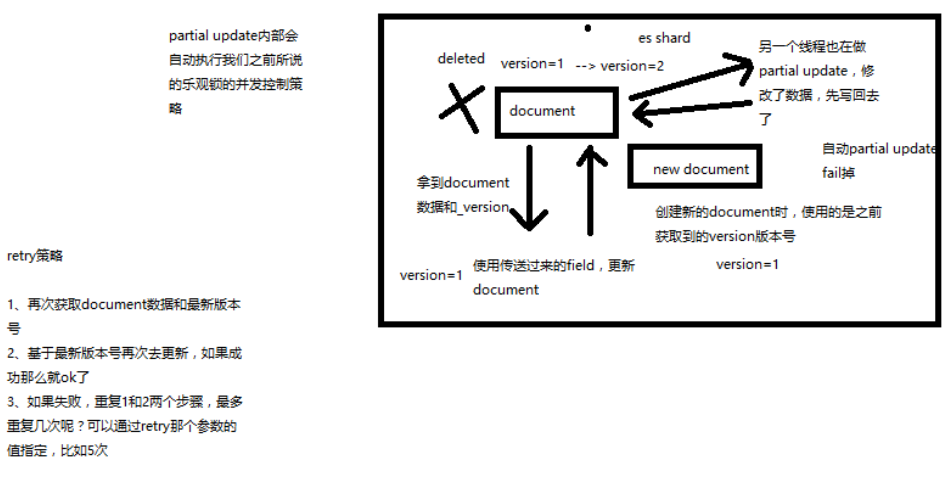
- partial update 内置乐观锁并发控制
-
retry_on_conflict
retry 策略大致如下:
- 再次获取 document 数据和最新版本
- 基于最新版本号再次去更新
重试的次数为指定的次数,次数用完,还更新不了就失败了
_version
POST /test_index/test_type/11/_update?retry_on_conflict=2
{
  "doc": {
    "num" : 2
  }
}
mget 批量查询 API
批量查询的好处
就是一条一条的查询,比如说要查询 100条 数据,那么就要发送 100次 网络请求,这个开销还是很大的
如果进行批量查询的话,查询 100条 数据,就只要发送 1次 网络请求,网络请求的性能开销缩减 100倍
不同 index 下
GET /_mget
{
   "docs" : [
      {
         "_index" : "test_index",
         "_type" :  "test_type",
         "_id" :    10
      },
      {
         "_index" : "test_index",
         "_type" :  "test_type",
         "_id" :    11
      }
   ]
}

------ 响应

{
  "docs": [
    {
      "_index": "test_index",
      "_type": "test_type",
      "_id": "10",
      "_version": 2,
      "found": true,
      "_source": {
        "test_field1": "test1",
        "test_field2": "updated test2"
      }
    },
    {
      "_index": "test_index",
      "_type": "test_type",
      "_id": "11",
      "_version": 3,
      "found": true,
      "_source": {
        "num": 2,
        "tags": []
      }
    }
  ]
}
是同一个 index 下
GET /test_index/_mget
{
   "docs" : [
      {
         "_type" :  "test_type",
         "_id" :    10
      },
      {
         "_type" :  "test_type",
         "_id" :    11
      }
   ]
}
这里可以看出来了,在 api url 中是公共的,那么相同 type 下就可以这样写
GET /test_index/test_type/_mget
{
   "docs" : [
      {
         "_id" :    10
      },
      {
         "_id" :    11
      }
   ]
}
但是这个可以简化成
GET /test_index/test_type/_mget
{
   "ids":[10,11]
}
mget 的重要性
可以说 mget 是很重要的,一般来说,在进行查询的时候,如果一次性要查询多条数据的话,那么一定要用 batch批量操作的 api
尽可能减少网络开销次数,可能可以将性能提升数倍,甚至数十倍,非常非常之重要
bulk 批量增删改
什么是 bulk?
简单说:就在提供了一个批量传递操作的入口,语法和各自的差不多
每一个操作要两个 json 串,语法如下:
{"action": {"metadata"}}
{"data"}
举例,比如你现在要创建一个文档,放 bulk 里面,看起来会是这样子的:
{"index": {"_index": "test_index", "_type", "test_type", "_id": "1"}} // 唯一定位信息
{"test_field1": "test1", "test_field2": "test2"} // doc 文档内容
有哪些类型的操作可以执行呢?
- delete:删除一个文档,只要 1个 json 串就可以了
- create:
PUT /index/type/id/_create,强制创建/存在则报错 - index:普通的put操作,可以是创建文档,也可以是全量替换文档
- update:执行的 partial update 操作
:::tip bulk api 对 json 的语法,有严格的要求,每个 json 串不能换行,只能放一行,同时一个 json 串和一个 json 串之间,必须有一个换行;如果换行的话就会报错
{
  "error": {
    "root_cause": [
      {
        "type": "json_parse_exception",
        "reason": "Unexpected end-of-input within/between Object entries\n at [Source: org.elasticsearch.transport.netty4.ByteBufStreamInput@2b0a4adc; line: 2, column: 40]"
      }
    ],
    "type": "json_parse_exception",
    "reason": "Unexpected end-of-input within/between Object entries\n at [Source: org.elasticsearch.transport.netty4.ByteBufStreamInput@2b0a4adc; line: 2, column: 40]"
  },
  "status": 500
}
:::
演练
POST /_bulk
{ "delete": { "_index": "test_index", "_type": "test_type", "_id": "3" }}
{ "create": { "_index": "test_index", "_type": "test_type", "_id": "12" }}
{ "test_field":    "test12" }
{ "index":  { "_index": "test_index", "_type": "test_type", "_id": "2" }}
{ "test_field":    "replaced test2" }
{ "update": { "_index": "test_index", "_type": "test_type", "_id": "1", "_retry_on_conflict" : 3} }
{ "doc" : {"test_field2" : "bulk test1"} }
响应
{
  "took": 471,
  "errors": true,
  "items": [
    {
      "delete": {
        "found": false,
        "_index": "test_index",
        "_type": "test_type",
        "_id": "3",
        "_version": 1,
        "result": "not_found",
        "_shards": {
          "total": 2,
          "successful": 1,
          "failed": 0
        },
        "status": 404
      }
    },
    {
      "create": {
        "_index": "test_index",
        "_type": "test_type",
        "_id": "12",
        "_version": 1,
        "result": "created",
        "_shards": {
          "total": 2,
          "successful": 1,
          "failed": 0
        },
        "created": true,
        "status": 201
      }
    },
    {
      "index": {
        "_index": "test_index",
        "_type": "test_type",
        "_id": "2",
        "_version": 1,
        "result": "created",
        "_shards": {
          "total": 2,
          "successful": 1,
          "failed": 0
        },
        "created": true,
        "status": 201
      }
    },
    {
      "update": {
        "_index": "test_index",
        "_type": "test_type",
        "_id": "1",
        "status": 404,
        "error": {
          "type": "document_missing_exception",
          "reason": "[test_type][1]: document missing",
          "index_uuid": "g4RJx2v8TXK95LdwlhRx5A",
          "shard": "2",
          "index": "test_index"
        }
      }
    }
  ]
}
简写与 mget 类似
POST /test_index/_bulk
{ "delete": { "_type": "test_type", "_id": "3" }}
{ "create": { "_type": "test_type", "_id": "12" }}
{ "test_field":    "test12" }
{ "index":  { "_type": "test_type" }}
{ "test_field":    "auto-generate id test" }
{ "index":  { "_type": "test_type", "_id": "2" }}
{ "test_field":    "replaced test2" }
{ "update": { "_type": "test_type", "_id": "1", "_retry_on_conflict" : 3} }
{ "doc" : {"test_field2" : "bulk test1"} }

POST /test_index/test_type/_bulk
{ "delete": { "_id": "3" }}
{ "create": { "_id": "12" }}
{ "test_field":    "test12" }
{ "index":  { }}
{ "test_field":    "auto-generate id test" }
{ "index":  { "_id": "2" }}
{ "test_field":    "replaced test2" }
{ "update": { "_id": "1", "_retry_on_conflict" : 3} }
{ "doc" : {"test_field2" : "bulk test1"} }
bulk size 最佳大小
bulk request 会加载到内存里,如果太大的话,性能反而会下降,因此需要反复尝试一个最佳的 bulk size。一般从 1000~5000 条数据开始,尝试逐渐增加。另外,如果看大小的话,最好是在 5~15MB 之间。
阶段总结 & 什么是 distributed document store
阶段性总结
- 01~08讲:快速入门了一下,最基本的原理,最基本的操作
- 09~13讲:在入门之后,对 ES 的分布式的基本原理,进行了相对深入一些的剖析
- 14~27讲:围绕着 document 这个东西,进行操作,进行讲解和分析
什么是 distributed document store
到目前为止,你觉得你在学什么东西,给大家一个直观的感觉,好像已经知道了 es 是分布式的,包括一些基本的原理,然后花了不少时间在学习 document 本身相关的操作,增删改查。一句话点出来,给大家归纳总结一下,其实我们应该思考一下,es 的一个最最核心的功能,已经被我们相对完整的讲完了。
Elasticsearch 在跑起来以后,其实起到的第一个最核心的功能,就是一个分布式的文档数据存储系统。ES 是分布式的。文档数据存储系统。文档数据,存储系统。
- 文档数据:es 可以存储和操作 json 文档类型的数据,而且这也是 es 的核心数据结构。
-
存储系统:es 可以对 json 文档类型的数据进行存储,查询,创建,更新,删除,等等操作。
其实已经起到了一个什么样的效果呢?其实 ES 满足了这些功能,就可以说已经是一个 NoSQL 的存储系统了。
围绕着 document 在操作,其实就是把 es 当成了一个 NoSQL 存储引擎,一个可以存储文档类型数据的存储系统,在操作里面的 document。
es 可以作为一个分布式的文档存储系统,所以说,我们的应用系统,是不是就可以基于这个概念,去进行相关的应用程序的开发了。
什么类型的应用程序呢?
- 数据量较大,es 的分布式本质,可以帮助你快速进行扩容,承载大量数据
- 数据结构灵活多变,随时可能会变化,而且数据结构之间的关系,非常复杂,如果我们用传统数据库,那是不是很坑,因为要面临大量的表
- 对数据的相关操作,较为简单,比如就是一些简单的增删改查,用我们之前讲解的那些 document 操作就可以搞定
- NoSQL 数据库,适用的也是类似于上面的这种场景
举个例子,比如说像一些网站系统,或者是普通的电商系统,博客系统,面向对象概念比较复杂,但是作为终端网站来说,没什么太复杂的功能,就是一些简单的 CRUD 操作,而且数据量可能还比较大。这个时候选用 ES 这种 NoSQL 型的数据存储,比传统的复杂的功能务必强大的支持 SQL 的关系型数据库,更加合适一些。无论是性能,还是吞吐量,可能都会更好。
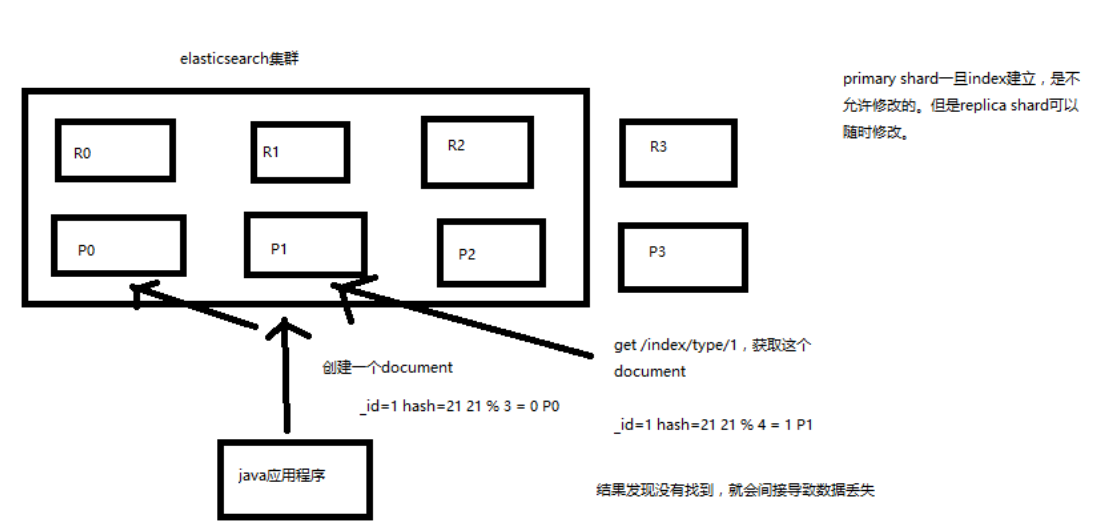
深度图解剖析 document 数据路由原理
什么是数据路由?
我们知道,一个 index 的数据会被分为多片,每片都在一个 shard 中, 所以一个 document ,只能存在于一个 shard 中
当客户端创建 document 的时候,es 此时就需要决定这个 document 存放在哪一个 shard 上。
这个过程,就称之为 docum routing (数据路由)
路由算法
- shard = hash(routing) % number_of_primary_shards
- routing =
_idor custom routing value
举个例子,一个 index 有3个 primary shard,P0,P1,P2
每次增删改查一个 document 的时候,都会带过来一个 routing number,
默认就是这个 document 的 _id(可能是手动指定,也可能是自动生成)
routing = _id,假设_id=1- hash(1) % 3 = 0; 假设 hash 值为 6
手动指定 routing
默认的 routing 就是 _id
也可以在发送请求的时候,手动指定一个 routing value,比如说 put /index/type/id?routing=user_id
手动指定 routing value 是很有用的,可以保证说,某一类 document 一定被路由到一个 shard 上去, 那么在后续进行应用级别的负载均衡,以及提升批量读取的性能的时候,是很有帮助的
primary shard 数量不可变的谜底
路由算法限制,更改之后,那么就有部分旧数据的路由错误
document 增删改内部原理图解揭秘
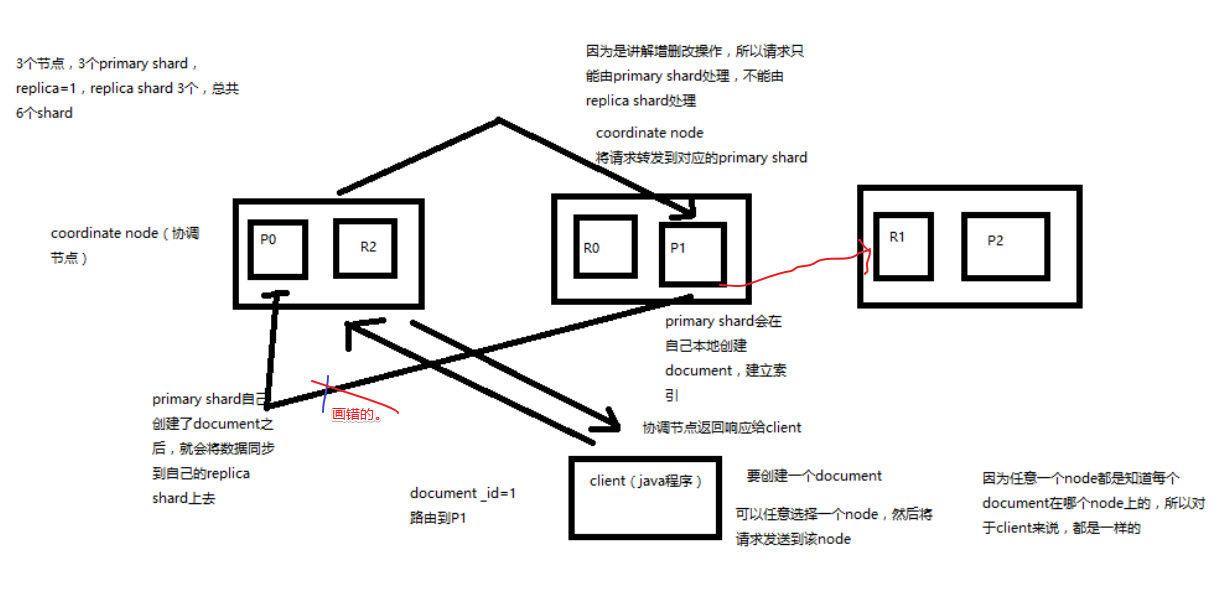
- 客户端选择一个 node 发送请求过去,这个 node 就是 coordinating node(协调节点)
- coordinating node,对 document 进行路由,将请求转发给对应的 node(有primary shard)
- 实际的 node 上的 primary shard 处理请求,然后将数据同步到 replica node
- coordinating node,如果发现 primary node 和所有 replica node 都搞定之后,就返回响应结果给客户端
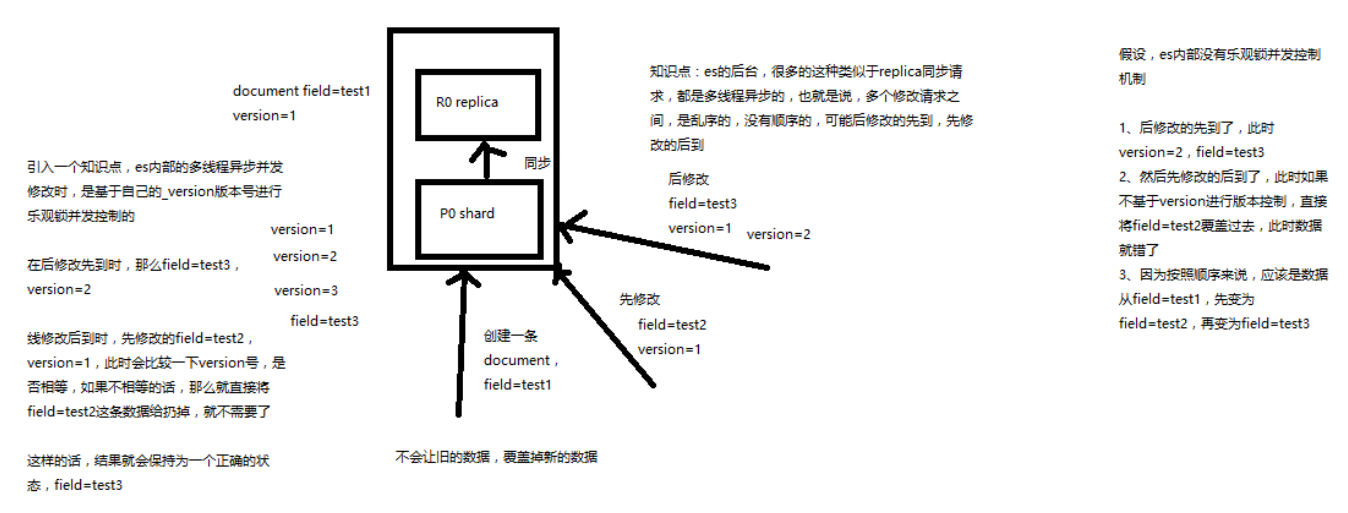
::: warning 疑问 有一个知识点可能没有说到,3个 primary shard,这 3个 shard 的数据是怎么协调的呢?
这里的解密感觉还是很初级的解密 :::
图解写一致性原理以及 quorum 机制深入剖析
consistency 写一致性
我们在发送任何一个增删改操作的时候,比如说 put /index/type/id,
都可以带上一个 consistency 参数,指明我们想要的写一致性是什么?
put /index/type/id?consistency=quorum
有三个可选
-
one(primary shard)
要求我们这个写操作,只要有一个 primary shard 是 active 活跃可用的,就可以执行
-
all(all shard)
要求我们这个写操作,必须所有的 primary shard 和 replica shard 都是活跃的,才可以执行这个写操作
-
quorum(default)
默认的值,要求所有的 shard中,必须是大部分的 shard 都是活跃的,可用的,才可以执行这个写操作
quorum 机制
写之前必须确保大多数 shard 都可用,当 number_of_replicas>1 时才生效
计算公式:quorum = int( (primary + number_of_replicas) / 2 ) + 1,
举个例子:3个 primary shard,number_of_replicas=1,总共有 3 + 3 * 1 = 6个 shard
quorum = int( (3 + 1) / 2 ) + 1 = 3
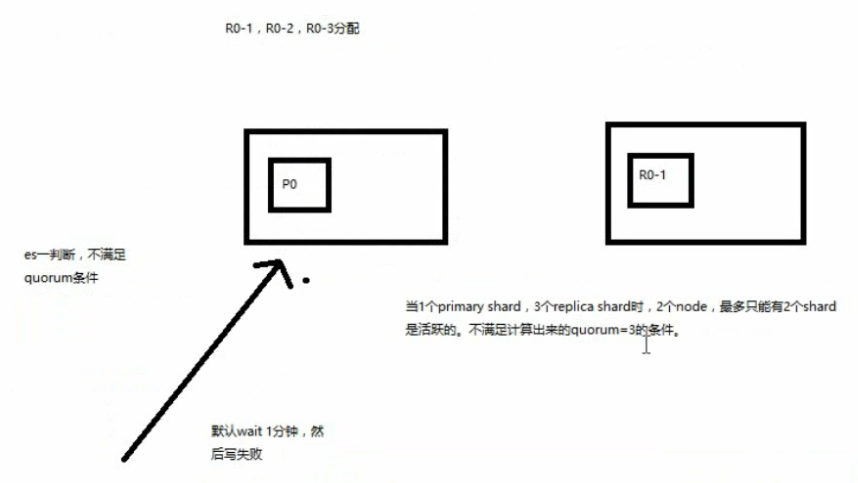
所以,要求 6个 shard中至少有 3个shard 是 active 状态的,才可以执行这个写操作
如果节点数少于quorum数量,可能导致quorum不齐全,进而导致无法执行任何写操作
3个 primary shard,replica=1,要求至少 3个 shard 是 active,3个 shard 按照之前学习的 shard&replica机制,必须在不同的节点上,如果说只有 2台 机器的话,是不是有可能出现说,3个 shard 都没法分配齐全,此时就可能会出现写操作无法执行的情况
es 提供了一种特殊的处理场景,就是说当 number_of_replicas>1 时才生效,因为假如说,你就一个 primary shard,replica=1,此时就 2个 shard
(1 + 1 / 2) + 1 = 2,要求必须有 2个 shard 是活跃的,但是可能就 1个 node,此时就 1个 shard是活跃的,如果你不特殊处理的话,导致我们的单节点集群就无法工作
::: warning 疑问 p 和 r 不能在相同机器上。但是 r 和 r 也不能吗? p 和 p 可以再同一台机器上,现在是单节点,可以查看到他的健康状态 有 9个 p 被分配了,但是只有 3 个索引,也就是说一台机器上可以存在相同的 p ?
经过测试:在同一台机器上启动两个 es 实例,9 个 pri 和 9 个 rep,都可以被完全分配,集群状态变为 green
GET _cat/health?v
epoch      timestamp cluster       status node.total node.data shards pri relo init unassign pending_tasks max_task_wait_time active_shards_percent
1546783226 22:00:26  elasticsearch green           2         2     18   9    0    0        0             0                  -                100.0%

GET _cat/indices?v
health status index      uuid                   pri rep docs.count docs.deleted store.size pri.store.size
green  open   ecommerce  ZpGp7bIBQBaZFk9SYmbJVQ   5   1          4            0     44.5kb         22.2kb
green  open   test_index g4RJx2v8TXK95LdwlhRx5A   3   1          8            0     56.5kb         28.2kb
green  open   .kibana    id1SV_oGSjyGosKxeJApww   1   1          1            0      6.3kb          3.1kb
:::
document 查询内部原理图解揭秘
- 客户端发送请求到任意一个 node,成为 coordinate node
-
coordinate node 对 document 进行路由,将请求转发到对应的 node
此时会使用 round-robin 随机轮询算法,在 primary shard 以及其所有 replica 中随机选择一个,让读请求负载均衡
- 接收请求的 node 返回 document 给 coordinate node
- coordinate node 返回 document 给客户端
特殊情况:
document 如果还在建立索引过程中,可能只有 primary shard 有,任何一个 replica shard 都没有, 此时可能会导致无法读取到 document,但是 document 完成索引建立之后,primary shard 和 replica shard 就都有了
::: warning 疑问 对于这种情况没有处理么?在 mysql 的一些读写分离应用中,就会出现这种情况,
master 写入后,slave 还没有来得及同步,这个时候流量被转发到 slave 的时候无法获取到数据
一般的做法是:强制走 master;那么对于 es 来说这种场景怎么办? :::

bulk 奇特 json 与性能揭秘
bulk api 奇特的 json 格式复习,详细请查阅 bulk 批量增删改
{"action": {"meta"}}\n
{"data"}\n
{"action": {"meta"}}\n
{"data"}\n
bulk 中的每个操作都可能要转发到不同的 node 的 shard 去执行
如果采用标准的 json 格式
[{
  "action": {

  },
  "data": {

  }
}]
如果采用以上可随意换行的语法,整个可读性非常棒,读起来很爽,es 拿到那种标准格式的 json 串以后,要按照下述流程去进行处理:
- 将 json 数组解析为 JSONArray 对象,这个时候,整个数据,就会在内存中出现一份一模一样的拷贝,一份数据是 json 文本,一份数据是 JSONArray 对象
- 解析 json 数组里的每个 json,对每个请求中的 document 进行路由
- 为路由到同一个 shard 上的多个请求,创建一个请求数组
- 将这个请求数组序列化
- 将序列化后的请求数组发送到对应的节点上去
因为无法方便的将 action 分离出来,所以需要耗费更多时间去解析成对象,再提取,那么就会耗费更多内存,更多的 jvm gc 开销
我们之前提到过 bulk size 最佳大小的那个问题,一般建议说在几千条那样,然后大小在 10MB 左右, 所以说,可怕的事情来了。假设说现在 100个 bulk 请求发送到了一个节点上去,然后每个请求是 10MB,100个 请求,就是 1000MB = 1GB, 然后每个请求的 json 都 copy 一份为 jsonarray 对象,此时内存中的占用就会翻倍,就会占用 2GB 的内存,甚至还不止。 因为弄成 jsonarray 之后,还可能会多搞一些其他的数据结构,2GB+ 的内存占用。
占用更多的内存可能就会积压其他请求的内存使用量,比如说最重要的搜索请求,分析请求,等等,此时就可能会导致其他请求的性能急速下降 另外的话,占用内存更多,就会导致 java 虚拟机的垃圾回收次数更多,跟频繁,每次要回收的垃圾对象更多, 耗费的时间更多,导致 es 的 java 虚拟机停止工作线程的时间更多
那么采用奇特的格式呢?
- 不用将其转换为 json 对象,不会出现内存中的相同数据的拷贝,直接按照换行符切割 json
- 对每两个一组的 json,读取 meta,进行 document 路由
- 直接将对应的 json 发送到 node 上去
这里最大的优势可能就在于,不需要解析 doc 承载数据更多的情况了, 按行读取的话,由于 bulk 的 meta 数据较为简单,或许都不用解析成 json 对象,就能通过正则提取到 meta 信息
最大的优势在于,不需要将 json 数组解析为一个 JSONArray 对象,形成一份大数据的拷贝,浪费内存空间,尽可能地保证性能
search 结果深入解析(timeout 机制揭秘)
- 我们如果发出一个搜索请求的话,会拿到一堆搜索结果,本节课,我们来讲解一下,这个搜索结果里的各种数据,都代表了什么含义
- 我们来讲解一下,搜索的 timeout 机制,底层的原理,画图讲解
搜索结果返回字段含义
GET /_search

-------------- 响应

{
  "took": 4,
  "timed_out": false,
  "_shards": {
    "total": 9,
    "successful": 9,
    "failed": 0
  },
  "hits": {
    "total": 13,
    "max_score": 1,
    "hits": [
      {
        "_index": ".kibana",
        "_type": "config",
        "_id": "5.2.0",
        "_score": 1,
        "_source": {
          "buildNum": 14695
        }
      }
    ]
  }
  ....
}
- took:整个搜索请求花费了多少毫秒
-
hits.total:本次搜索,返回了几条结果
::: tip 这里解说可能是有问题的,这里的 total 是搜索结果总条数(通过
GET /_cat/indices?v中的 docs.count 计算对比) ::: -
hits.max_score:本次搜索的所有结果中,最大的相关度分数是多少
每一条 document 对于 search 的相关度,越相关,
_score分数越大,排位越靠前 -
hits.hits:默认查询前 10条 数据,完整数据,
_score降序排序 -
shards:
shards fail 的条件(primary 和 replica 全部挂掉),不影响其他shard。
默认情况下来说,一个搜索请求,会打到一个 index 的所有 primary shard 上去,当然了, 每个 primary shard 都可能会有一个或多个 replic shard,所以请求也可以到 primary shard 的其中一个 replica shard 上去。
- timeout:默认无 timeout
timeout 机制
默认无 timeout ,可以手动指定 timeout, latency completeness (延迟平衡完整性),
latency completeness 是什么意思?
我们有些搜索应用,对时间是很敏感的。
比如说电商网站,你不能让用户等 10分钟,才能等到一次搜索请求的结果,人早走了
timeout 机制:指定每个 shard 就只能在 timeout 时间范围内,将搜索到的部分数据(也有可能是全部搜索到的数据) 直接返回给 client 程序,而不是等到所有的数据全都搜索出来后再返回
确保一次搜索请求可以再用户指定 timeout 时长内完成。为一些时间敏感的搜索应用提供良好的支持
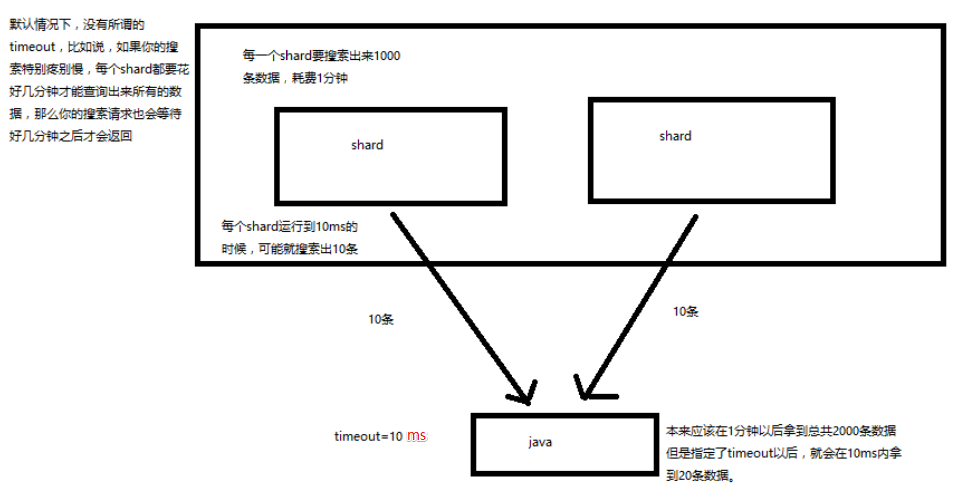
简单说:在指定超时时长内返回结果,这个结果可能不是所有结果;
timeout 语法
GET /_search?timeout=1ms

单位:timeout=10ms,timeout=1s,timeout=1m
multi-index/type 搜索模式
- multi-index 和 multi-type 搜索模式
- 初步图解一下简单的搜索原理
multi-index/type 搜索模式
告诉你如何一次性搜索多个index和多个type下的数据
/_search:所有索引,所有 type 下的所有数据都搜索出来/index1/_search:指定一个 index,搜索其下所有 type 的数据/index1,index2/_search:同时搜索两个index下的数据/*1,*2/_search:按照通配符去匹配多个索引index1/type1/_search:搜索一个 index 下指定的 type 的数据index1/type1,type2/_search:可以搜索一个 index 下多个 type的数据index1,index2/type1,type2/_search:搜索多个 index 下的多个 type的数据_all/type1,type2/_search:_all,可以代表搜索所有 index 下的指定 type 的数据
初步图解一下简单的搜索原理

分页搜索、deep paging
- 讲解如何使用es进行分页搜索的语法
- 什么是deep paging问题?为什么会产生这个问题,它的底层原理是什么?
分页语法
由以下两个参数控制:
- from:从那一条数据开始?
- size:获取多少条
GET /_search?size=10
GET /_search?size=10&from=0
GET /_search?size=10&from=20
GET /test_index/test_type/_search

---------- 响应

"hits": {
  "total": 8,
  "max_score": 1,
  "hits": [
  ]
}
::: tip 这里还是证明了前面某一章节解释 hits.total 解释错的。这里的数量就是这次你查询的总数量 :::
对于这 8 条数据进行每页 3 条数据的分页,大致是以下请求
GET /test_index/test_type/_search?from=0&size=3
GET /test_index/test_type/_search?from=3&size=3
GET /test_index/test_type/_search?from=6&size=3
deep paging
什么是 deep paging ?
看下图,记住一个知识点:分页搜索 10 条数据,在搜索深分页(比如 10000 条以后的数据), 每个节点会返回 10000+ 条数据进行排序后再选中其中的 10 条数据返回;
这资源耗费是很大的,就如同 mycat 中的分页是一个原理,需要协调节点来聚合并返回结果,但是这个 es 是怎么解决的呢?
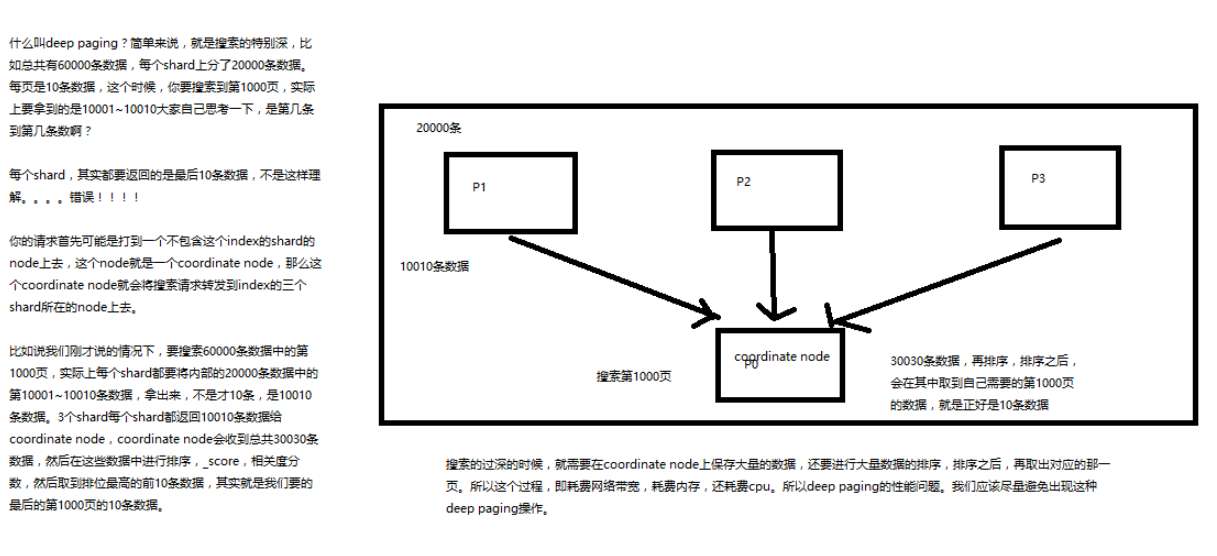
query string search 语法以及 _all metadata
- query string 基础语法
_allmetadata 的原理和作用
包含 test_field 字段中包含 test 内容
GET /test_index/test_type/_search?q=test_field:test

----------- 响应

"hits": {
  "total": 1,
  "max_score": 0.8835016,
  "hits": [
    {
      "_index": "test_index",
      "_type": "test_type",
      "_id": "7",
      "_score": 0.8835016,
      "_source": {
        "test_field": "test test"
      }
    }
  ]
}
}
必须包含,与包含类似
GET /test_index/test_type/_search?q=+test_field:test

不包含 test 内容
GET /test_index/test_type/_search?q=-test_field:test
一个是掌握 q=field:search content 的语法,还有一个是掌握 + 和 - 的含义
::: tip 这个知道就行了,一般很少使用 :::
_all metadata 的原理和作用
什么是 _all metadata ?
下面的搜索,没有指定具体的字段,也能返回数据,那么他返回的是什么呢?
GET /test_index/test_type/_search?q=test
返回的数据是所有字段中包含 test 内容的数据。
我们在进行中搜索的时候,难道是对 document 中的每一个 field 都进行一次搜索吗?不是的
es中的 _all 元数据,在建立索引的时候,我们插入一条 document,它里面包含了多个 field,
此时,es 会自动将多个 field 的值,全部用字符串的方式串联起来,变成一个长的字符串,作为 _all field 的值,同时建立索引
后面如果在搜索的时候,没有对某个field指定搜索,就默认搜索 _all field,其中是包含了所有 field 的值的
举个例子
{
  "name": "jack",
  "age": 26,
  "email": "jack@sina.com",
  "address": "guamgzhou"
}
“jack 26 jack@sina.com guangzhou”,作为这一条 document 的 _all field 的值,同时进行分词后建立对应的倒排索引
生产环境不使用
什么是 mapping ?
插入几条数据,让 es 自动为我们建立一个索引
PUT /website/article/1
{
  "post_date": "2017-01-01",
  "title": "my first article",
  "content": "this is my first article in this website",
  "author_id": 11400
}

PUT /website/article/2
{
  "post_date": "2017-01-02",
  "title": "my second article",
  "content": "this is my second article in this website",
  "author_id": 11400
}

PUT /website/article/3
{
  "post_date": "2017-01-03",
  "title": "my third article",
  "content": "this is my third article in this website",
  "author_id": 11400
}
尝试各种搜索
3条结果
GET /website/article/_search?q=2017

3条结果
GET /website/article/_search?q=2017-01-01

1条结果
GET /website/article/_search?q=post_date:2017-01-01

1条结果
GET /website/article/_search?q=post_date:2017
这里就很奇怪了,仔细看要搜索的东西,前面两个未指定字段的都能搜索出来 3条数据,后面指定字段的,只能搜索出一条数据了。
就这很让人费解了。出现这样的结果,这就是 es 的 mapping 的效果
查看 es 自动建立的 mapping,带出什么是 mapping 的知识点
自动或手动为 index 中的 type 建立的一种数据结构和相关配置,简称为 mapping
dynamic mapping,自动为我们建立 index,创建 type,以及 type 对应的 mapping,mapping 中包含了每个 field 对应的数据类型,以及如何分词等设置
我们当然,后面会讲解,也可以手动在创建数据之前,先创建 index 和 type,以及 type 对应的 mapping
查看 mapping
GET /website/_mapping/article
{
  "website": {
    "mappings": {
      "article": {
        "properties": {
          "author_id": {
            "type": "long"
          },
          "content": {
            "type": "text",
            "fields": {
              "keyword": {
                "type": "keyword",
                "ignore_above": 256
              }
            }
          },
          "post_date": {
            "type": "date"
          },
          "title": {
            "type": "text",
            "fields": {
              "keyword": {
                "type": "keyword",
                "ignore_above": 256
              }
            }
          }
        }
      }
    }
  }
}
可以看到 es 自动为每个字段都设置了不同的 data type。不同的 data type 的分词、搜索等行为是不一样的。所以出现了_all field 和 post_date field 的搜索表现完全不一样
至于里面的具体含义,本章节不会讲解
精确匹配与全文搜索的对比分析
本节只是一个小知识点,理解这些对后面的 mapping 相关知识是很有必要的。
exact value 精确匹配
2017-01-01,exact value,搜索的时候,必须输入 2017-01-01,才能搜索出来;如果你输入一个01,是搜索不出来的
full text 全文检索
- 缩写 vs. 全程:cn vs. china
- 格式转化:like liked likes
- 大小写:Tom vs tom
- 同义词:like vs love
- 2017-01-01,2017 01 01,搜索2017,或者01,都可以搜索出来
- china,搜索cn,也可以将china搜索出来
- likes,搜索like,也可以将likes搜索出来
- Tom,搜索tom,也可以将Tom搜索出来
- like,搜索love,同义词,也可以将like搜索出来
就不是说单纯的只是匹配完整的一个值,而是可以对值进行拆分词语后(分词)进行匹配,也可以通过缩写、时态、大小写、同义词等进行匹配
倒排索引核心原理快速揭秘
本节快速告诉你倒排索引的的基本原理
假设说有以下两条数据
- doc1:I really liked my small dogs, and I think my mom also liked them.
- doc2:He never liked any dogs, so I hope that my mom will not expect me to liked him.
插入被分词,初步的倒排索引的建立
| word | doc1 | doc2 |
|---|---|---|
| I | * | * |
| really | * | |
| liked | * | * |
| my | * | * |
| small | * | |
| dogs | * | |
| and | * | |
| think | * | |
| mom | * | * |
| also | * | |
| them | * | |
| He | * | |
| never | * | |
| any | * | |
| so | * | |
| hope | * | |
| that | * | |
| will | * | |
| not | * | |
| expect | * | |
| me | * | |
| to | * | |
| him | * |
演示了一下倒排索引最简单的建立的一个过程
::: tip 真实的倒排索引比这个复杂多了,这里只是这么一个基本原理 :::
搜索 mother like little dog,不可能有任何结果
因为会被拆分为以下几个词语,而这些词语并没有在上面第一步中初步索引中存在
- mother
- like
- little
- dog
这个是不是我们想要的搜索结果???绝对不是,因为在我们看来:
- mother 和 mom 有区别吗?同义词,都是妈妈的意思。
- like 和 liked 有区别吗?没有,都是喜欢的意思,只不过一个是现在时,一个是过去时。
- little 和 small 有区别吗?同义词,都是小小的。
- dog 和 dogs 有区别吗?狗,只不过一个是单数,一个是复数。
normalization
什么是 normalization?
简单说,建立倒排索引的时候,会执行一个操作,也就是说对拆分出的各个单词进行相应的处理, 以提升后面搜索的时候能够搜索到相关联的文档的概率
比如:括时态的转换,单复数的转换,同义词的转换,大小写的转换
- mom —> mother
- liked —> like
- small —> little
- dogs —> dog
重新建立倒排索引,加入 normalization ,再次用 mother liked little dog 搜索,就可以搜索到了
| word | doc1 | doc2 | |
|---|---|---|---|
| I | * | * | |
| really | * | ||
| like | * | * | liked –> like |
| my | * | * | |
| little | * | small –> little | |
| dog | * | dogs –> dog | |
| and | * | ||
| think | * | ||
| mom | * | * | |
| also | * | ||
| them | * | ||
| He | * | ||
| never | * | ||
| any | * | ||
| so | * | ||
| hope | * | ||
| that | * | ||
| will | * | ||
| not | * | ||
| expect | * | ||
| me | * | ||
| to | * | ||
| him | * |
mother like little dog,分词、normalization
- mother –> mom
- like –> like
- little –> little
- dog –> dog
doc1 和 doc2 都会搜索出来
内置分词器和分词器是什么?
什么是分词器
切分词语,normalization(提升 recall 召回率)
给你一段句子,然后将这段句子拆分成一个一个的单个的单词,同时对每个单词进行 normalization(时态转换,单复数转换)分词器
recall,召回率:搜索的时候,增加能够搜索到的结果的数量
分词器主要由三个部分组成:
-
character filter
在一段文本进行分词之前,先进行预处理,比如说最常见的就是,
- 过滤 html 标签(
<span>hello<span>–> hello) - & –> and(I&you –> I and you)
- 过滤 html 标签(
-
tokenizer:分词
比如:hello you and me –> hello, you, and, me
-
token filter:
比如 lowercase,stop word,synonymom,
- dogs –> dog
- liked –> like
- Tom –> tom
- a/the/an –> 干掉
- mother –> mom
- small –> little
一个分词器,很重要,将一段文本进行各种处理,最后处理好的结果才会拿去建立倒排索引
内置分词器的介绍
比如一句话:Set the shape to semi-transparent by calling set_trans(5)
被以下 4 种分词器(内置常用)处理之后,会得到不同的结果:
-
standard analyzer (默认)
set, the, shape, to, semi, transparent, by, calling, set_trans, 5(默认的是standard)
-
simple analyzer
set, the, shape, to, semi, transparent, by, calling, set, trans
-
whitespace analyzer
Set, the, shape, to, semi-transparent, by, calling, set_trans(5)
-
language analyzer(特定的语言的分词器,比如说,english,英语分词器)
set, shape, semi, transpar, call, set_tran, 5
做的处理前面都说过了,大小写、单复数、按照空格或者下划线横线等切分词语;
query string & mapping 遗留问题
什么是 query string
简单说:要搜索的文本内容就是 query string
比如我们有一个 document,其中有一个 field,包含的 value 是:hello you and me,建立倒排索引
我们要搜索这个 document 对应的 index,搜索文本是 hell me,这个搜索文本就是 query string
query string 分词
对于 query string 的分词,默认情况下,es 会使用它对应的 field 建立倒排索引时相同的分词器去进行分词,分词和 normalization,只有这样,才能实现正确的搜索
我们建立倒排索引的时候,将 dogs –> dog,结果你搜索的时候,还是一个 dogs,那不就搜索不到了吗?所以搜索的时候,那个 dogs 也必须变成 dog 才行。才能搜索到。
知识点:不同类型的 field,可能有的就是 full text,有的就是 exact value
- query string 必须以和 index 建立时相同的 analyzer 进行分词(默认情况下)
-
query string 对 exact value 和 full text 的区别对待
- date:exact value
_all:full text
mapping 遗留问题
什么是 mapping ? 中查询出来的结果让人很分解,这里进行回答解析
q=2017
GET /_search?q=2017
搜索的是 _all field,document 所有的 field 都会拼接成一个大串,进行分词
"_source": {
    "post_date": "2017-01-02",
    "title": "my second article",
    "content": "this is my second article in this website",
    "author_id": 11400
}
拿上面这一条数据举例:被拼接成 2017-01-02 my second article this is my second article in this website 11400
回到 query string(查询的内容上来),3 条数据对于时间的分词数据数据分布如下:
| - | doc1 | doc2 | doc3 |
|---|---|---|---|
| 2017 | * | * | * |
| 01 | * | ||
| 02 | * | ||
| 03 | * |
在 _all 中搜索 2017,自然会搜索到 3个 docuemnt
q=2017-01-01
GET /_search?q=2017-01-01
也搜索到了 3个 document,是因为该 query string 被分词成 2017、01、01 ,所以就搜索到了 3个;
对于这个结果还可以通过分数验证到部分问题:完全匹配的那一条数据得分是 1.05 ,其他的则是 0.8
"hits": [
  {
    "_index": "website",
    "_type": "article",
    "_id": "1",
    "_score": 1.0566096,
    "_source": {
      "post_date": "2017-01-01",
      "title": "my first article",
      "content": "this is my first article in this website",
      "author_id": 11400
    }
  },
  {
    "_index": "website",
    "_type": "article",
    "_id": "2",
    "_score": 0.84013355,
    "_source": {
      "post_date": "2017-01-02",
      "title": "my second article",
      "content": "this is my second article in this website",
      "author_id": 11400
    }
  },
  {
    "_index": "website",
    "_type": "article",
    "_id": "3",
    "_score": 0.84013355,
    "_source": {
      "post_date": "2017-01-03",
      "title": "my third article",
      "content": "this is my third article in this website",
      "author_id": 11400
    }
  }
]
}
q=post_date:2017-01-01
GET /_search?q=post_date:2017-01-01
该字段是 date类型, 会作为 exact value 去建立索引
| - | doc1 | doc2 | doc3 |
|---|---|---|---|
| 2017-01-01 | * | ||
| 2017-01-02 | * | ||
| 2017-01-03 | * |
所以只能查询到一条数据
q=post_date:2017
这个在这里不讲解,因为是 es 5.2 以后做的一个优化
可以查询几个条件看看结果
// 下面都能查询到 2017-01-01 的数据
GET /website/article/_search?q=post_date:2017
GET /website/article/_search?q=post_date:2017-01

// 这个就查询不到数据了
GET /website/article/_search?q=post_date:01
测试分词器
通过以下语法可以看到给定文本的具体分词情况
GET /_analyze
{
  "analyzer": "standard",
  "text": "2017-01-01"
}
响应
{
  "tokens": [
    {
      "token": "2017",
      "start_offset": 0,
      "end_offset": 4,
      "type": "<NUM>",
      "position": 0
    },
    {
      "token": "01",
      "start_offset": 5,
      "end_offset": 7,
      "type": "<NUM>",
      "position": 1
    },
    {
      "token": "01",
      "start_offset": 8,
      "end_offset": 10,
      "type": "<NUM>",
      "position": 2
    }
  ]
}
什么是 mapping 再次回炉透彻理解
对之前讲解的知识串联起来
- 往 es 里面直接插入数据,es 会自动建立索引,同时建立 type 以及对应的 mapping
- mapping 中就自动定义了每个 field 的数据类型
- 不同的数据类型(比如说 text 和 date),可能有的是 exact value,有的是 full text
- exact value,在建立倒排索引的时候,分词的时候,是将整个值一起作为一个关键词建立到倒排索引中的;
- full text,会经历各种各样的处理,分词,normaliztion(时态转换,同义词转换,大小写转换),才会建立到倒排索引中
- exact value 和 full text 类型的 field 就决定了一个搜索过来的时候,对 exact value field 或者是 full text field 进行搜索的行为也是不一样的,会跟建立倒排索引的行为保持一致;比如说 exact value 搜索的时候,就是直接按照整个值进行匹配;full text query string,也会进行分词和 normalization 再去倒排索引中去搜索
- 可以用 es 的 dynamic mapping,让其自动建立 mapping,包括自动设置数据类型;也可以提前手动创建 index 和 type 的 mapping,自己对各个 field 进行设置,包括数据类型,包括索引行为,包括分词器,等等
mapping:就是 index 的 type 的元数据,每个 type 都有一个自己的 mapping,决定了数据类型,建立倒排索引的行为,还有进行搜索的行为
mapping 的创建以及复杂 mapping 详解
本章会记录 3个 章节的笔记
-
- 初识搜索引擎_ mapping 的核心数据类型以及 dynamic mapping
-
- 初识搜索引擎_手动建立和修改 mapping 以及定制 string 类型数据是否分词
-
- 初识搜索引擎_ mapping 复杂数据类型以及 object 类型数据底层结构大揭秘
核心的数据类型
- string
- byte,short,integer,long
- float,double
- boolean
- date
dynamic mapping 规则
就是自动识别类型
- true or false –> boolean
- 123 –> long
- 123.45 –> double
- 2017-01-01 –> date
- “hello world” –> string/text
查看 mapping
语法
GET /index/_mapping/type
如何建立索引时指定 mapping
语法如下
PUT /index
{
  "index": {
    "type":{
      "properties": {
        "field":{
          "type": "text", // 数据类型
          "index":"",    // 索引类型
          "analyzer": "english" // 分词类型
        }
      }
    }
  }
}
索引类型有如下值:
- analyzed : 全文 full text
- not_analyzed : 精准匹配 exact value
- no :不索引
::: tip 只能创建 index 时手动建立 mapping,或者新增 field mapping,但是不能 update field mapping :::
PUT /website
{
  "mappings": {
    "article": {
      "properties": {
        "author_id": {
          "type": "long"
        },
        "title": {
          "type": "text",
          "analyzer": "english"
        },
        "content": {
          "type": "text"
        },
        "post_date": {
          "type": "date"
        },
        "publisher_id": {
          "type": "text",
          "index": "not_analyzed"
        }
      }
    }
  }
}
如果你尝试再次执行上面的语句就会看到报错了,不能修改
{
  "error": {
    "root_cause": [
      {
        "type": "index_already_exists_exception",
        "reason": "index [website/icXrvvkcRj6z4uNaNhf6uA] already exists",
        "index_uuid": "icXrvvkcRj6z4uNaNhf6uA",
        "index": "website"
      }
    ],
    "type": "index_already_exists_exception",
    "reason": "index [website/icXrvvkcRj6z4uNaNhf6uA] already exists",
    "index_uuid": "icXrvvkcRj6z4uNaNhf6uA",
    "index": "website"
  },
  "status": 400
}
新增字段 mapping
对于已经存在的字段不能修改 mapping,新增字段则可以指定
PUT /website/_mapping/article
{
  "properties" : {
    "new_field" : {
      "type" :    "string",
      "index":    "not_analyzed"
    }
  }
}
测试 mapping
可以使用如下语法进行查看 mapping 的分词效果,如
title 的 analyzer 是 english,可以看到把 a 干掉了
GET /website/_analyze
{
  "field": "title",
  "text": "a dogs"
}

--------------- 响应

{
  "tokens": [
    {
      "token": "dog",
      "start_offset": 2,
      "end_offset": 6,
      "type": "<ALPHANUM>",
      "position": 1
    }
  ]
}
GET /website/_analyze
{
  "field": "content",
  "text": "my-dogs"
}
如果 index = not_analyzed 的话。使用该 api 就会报错;如 new_field 字段
GET website/_analyze
{
  "field": "new_field",
  "text": "my dogs"
}

--------------------------------- 响应

{
  "error": {
    "root_cause": [
      {
        "type": "remote_transport_exception",
        "reason": "[sEvAlYx][127.0.0.1:9300][indices:admin/analyze[s]]"
      }
    ],
    "type": "illegal_argument_exception",
    "reason": "Can't process field [new_field], Analysis requests are only supported on tokenized fields"
  },
  "status": 400
}
mapping 复杂数据类型以及 object 类型数据底层结构大揭秘
multivalue field
建立索引时与 string 是一样的,数据类型不能混
{ "tags": [ "tag1", "tag2" ]}
empty field
主要是空值:null,[],[null]
object field
对象类型的就比较复杂了,先来创建一个文档,再查看 es 自动为我们创建的 mapping 是什么样的
PUT /company/employee/1
{
  "address": {
    "country": "china",
    "province": "guangdong",
    "city": "guangzhou"
  },
  "name": "jack",
  "age": 27,
  "join_date": "2017-01-01"
}
GET /company/_mapping/employee 可以看到返回的数据嵌套很复杂了。
address 下面还有一个 properties ,那么 address 就是一个 object field
{
  "company": {
    "mappings": {
      "employee": {
        "properties": {
          "address": {
            "properties": {
              "city": {
                "type": "text",
                "fields": {
                  "keyword": {
                    "type": "keyword",
                    "ignore_above": 256
                  }
                }
              },
              "country": {
                "type": "text",
                "fields": {
                  "keyword": {
                    "type": "keyword",
                    "ignore_above": 256
                  }
                }
              },
              "province": {
                "type": "text",
                "fields": {
                  "keyword": {
                    "type": "keyword",
                    "ignore_above": 256
                  }
                }
              }
            }
          },
          "age": {
            "type": "long"
          },
          "join_date": {
            "type": "date"
          },
          "name": {
            "type": "text",
            "fields": {
              "keyword": {
                "type": "keyword",
                "ignore_above": 256
              }
            }
          }
        }
      }
    }
  }
}
比如这一条数据,它在 es 里面被分词之后,可能是这样的
{
  "address": {
    "country": "china",
    "province": "guangdong",
    "city": "guangzhou"
  },
  "name": "jack",
  "age": 27,
  "join_date": "2017-01-01"
}

-----------------------------------

{
    "name":            [jack],
    "age":          [27],
    "join_date":      [2017-01-01],
    "address.country":         [china],
    "address.province":   [guangdong],
    "address.city":  [guangzhou]
}
上面的都是比较简单的内容,如果是稍微复杂一点的,就可能是下面这样了
{
    "authors": [
        { "age": 26, "name": "Jack White"},
        { "age": 55, "name": "Tom Jones"},
        { "age": 39, "name": "Kitty Smith"}
    ]
}

-------------------------------

{
    "authors.age":    [26, 55, 39],
    "authors.name":   [jack, white, tom, jones, kitty, smith]
}
search api 的基础语法介绍
search api的基本语法
GET /search
{}
多 index/type 查询
GET /index1,index2/type1,type2/search
{}
分页查询
GET /_search
{
  "from": 0,
  "size": 10
}
```json

## http 协议中 get 是否可以带上 request body

HTTP协议,一般不允许 get 请求带上 request body,但是因为 get 更加适合描述查询数据的操作,因此还是这么用了

```json
GET /_search?from=0&size=10

POST /_search
{
  "from":0,
  "size":10
}
碰巧,很多浏览器,或者是服务器,也都支持 GET+request body 模式
如果遇到不支持的场景,也可以用 POST /_search
::: tip HTTP 协议是规定不允许 get 携带 body 的,对于 es 来说他自己接收请求解析了 body。 :::
快速上机动手实战 Query DSL 搜索语法
一个例子让你明白什么是 Query DSL
之前说的 query string search(在 url 中拼接参数),这里在 body 中使用语法来查询
GET /_search
{
    "query": {
        "match_all": {}
    }
}
Query DSL 的基本语法
{
    QUERY_NAME: {
        ARGUMENT: VALUE,
        ARGUMENT: VALUE,...
    }
}

{
    QUERY_NAME: {
        FIELD_NAME: {
            ARGUMENT: VALUE,
            ARGUMENT: VALUE,...
        }
    }
}
示例:查询 test_field 字段中包含 test 的数据
GET /test_index/test_type/_search
{
  "query": {
    "match": {
      "test_field": "test"
    }
  }
}
如何组合多个搜索条件
搜索需求:title 必须包含 elasticsearch、content 可以包含 elasticsearch 也可以不包含,author_id 必须不为 111
先插入三条数据
PUT /website/article/1
{
  "title": "my hadoop article",
  "content": "hadoop is very bad",
  "author_id": 111
}

PUT /website/article/2
{
  "title": "my elasticsearch article",
  "content": "es is very bad",
   "author_id": 110
}


PUT /website/article/3
{
  "title": "my elasticsearch article",
  "content": "es is very goods",
  "author_id": 111
}
- title 必须包含 elasticsearch : 只有 2 和 3
- content 可以包含 elasticsearch 也可以不包含:那么 1,2,3 都满足
- author_id 必须不为 111 :只有 2 满足
所以搜索结果就是 id 为 2 的文档
GET /website/article/_search
{
  "query": {
    "bool": {
      "must": [
        {"match": {
          "title": "elasticsearch"
          }
        }
      ],
      "should": [
        {"match": {
          "content": "elasticsearch"
          }
        }
      ],
      "must_not": [
        {"match": {
          "author_id": 111
          }
        }
      ]
    }
  }
}
- bool: 多可以条件
- must:必须
- match:匹配
- should:可能匹配,可以不匹配
- must_not:必须不
还有下面的例子,查询的是:
- name 必须包含 tom
- hired 可能为 true/false 并且 personality 为 good 且 rude 不为 true
- minimum_should_match : 只要匹配到一条,但是这个应该是与 should 条件匹配的个数有关,具体是什么规则,没有尝试出来
总结起来: name 必须包含 tom 则就可以
GET /test_index/_search
{
    "query": {
            "bool": {
                "must": { "match":   { "name": "tom" }},
                "should": [
                    { "match":       { "hired": true }},
                    { "bool": {
                        "must":      { "match": { "personality": "good" }},
                        "must_not":  { "match": { "rude": true }}
                    }}
                ],
                "minimum_should_match": 1
            }
    }
}
filter 与 query 深入对比解密:相关度、性能
filter 与 query 示例
先来插入几条数据
PUT /company/employee/2
{
  "address": {
    "country": "china",
    "province": "jiangsu",
    "city": "nanjing"
  },
  "name": "tom",
  "age": 30,
  "join_date": "2016-01-01"
}

PUT /company/employee/3
{
  "address": {
    "country": "china",
    "province": "shanxi",
    "city": "xian"
  },
  "name": "marry",
  "age": 35,
  "join_date": "2015-01-01"
}
搜索请求:年龄必须大于等于 30,同时 join_date 必须是 2016-01-01
GET /company/employee/_search
{
  "query": {
    "bool": {
      "must": [
        {
          "match": {
            "join_date": "2016-01-01"
          }
        }
      ],
      "filter": {
        "range": {
          "age": {
            "gte": 30
          }
        }
      }
    }
  }
}
上面这一个查询中 ,query 中有 filter,那么他们有什么不一样的呢?
filter 与 query 对比大解密
- filter:仅仅只是按照搜索条件过滤出需要的数据而已,不计算任何相关度分数,对相关度没有任何影响
- query: 会去计算每个 document 相对于搜索条件的相关度,并按照相关度进行排序
::: tip query 中除了 filter 的条件应该都会进行分数计算,而 filter 只是把数据过滤 :::
一般来说,如果你是在进行搜索,需要将最匹配搜索条件的数据先返回,那么用 query;
如果你只是要根据一些条件筛选出一部分数据,不关注其排序,那么用 filter;
除非是你的这些搜索条件,你希望越符合这些搜索条件的 document 越排在前面返回,那么这些搜索条件要放在 query 中;
如果你不希望一些搜索条件来影响你的 document 排序,那么就放在 filter 中即可
filter 与 query 性能
- filter:不需要计算相关度分数,不需要按照相关度分数进行排序,同时还有内置的自动 cache 最常使用 filter 的数据
- query:相反,要计算相关度分数,按照分数进行排序,而且无法 cache 结果
常用的各种 query 搜索语法
本章节会记录以下章节的内容:
-
- 初识搜索引擎_上机动手实战常用的各种 query 搜索语法
-
- 初识搜索引擎_上机动手实战多搜索条件组合查询
-
- 初识搜索引擎_上机动手实战如何定位不合法的搜索以及其原因
-
- 初识搜素引擎_上机动手实战如何定制搜索结果的排序规则
match all
GET /_search
{
    "query": {
        "match_all": {}
    }
}
match
搜索所有 index 中 title 包含 my elasticsearch article 内容。
GET /_search
{
    "query": { "match": { "title": "my elasticsearch article" }}
}
::: tip 记住:搜索的内容会默认会安装该字段的 mapping 进行分词匹配 :::
multi match
一个查询文本在多个字段中匹配,其中一个字段中有则返回
GET /test_index/test_type/_search
{
  "query": {
    "multi_match": {
      "query": "test",
      "fields": ["test_field", "test_field1"]
    }
  }
}
range query
范围
GET /company/employee/_search
{
  "query": {
    "range": {
      "age": {
        "gte": 30
      }
    }
  }
}
term query
将搜索文本不分词查询。(记忆当中有一个操作选项可以让文本不分词,具体记不起来了)
GET /test_index/test_type/_search
{
  "query": {
    "term": {
      "test_field": "test hello"
    }
  }
}
terms query
多个词查询
GET /_search
{
    "query": { "terms": { "tag": [ "search", "full_text", "nosql" ] }}
}
exist query
::: tip 2.x中的查询,现在已经不提供了 :::
bool 中可以放那些语法
bool 中可以放:must,must_not,should,filter
{
    "bool": {
        "must":     { "match": { "title": "how to make millions" }},
        "must_not": { "match": { "tag":   "spam" }},
        "should": [
            { "match": { "tag": "starred" }}
        ],
        "filter": {
          "range": { "date": { "gte": "2014-01-01" }}
        }
    }
}
每个子查询都会计算一个 document 针对它的相关度分数,然后 bool 综合所有分数,合并为一个分数,当然 filter 是不会计算分数的
{
    "bool": {
        "must":     { "match": { "title": "how to make millions" }},
        "must_not": { "match": { "tag":   "spam" }},
        "should": [
            { "match": { "tag": "starred" }}
        ],
        "filter": {
          "bool": {
              "must": [
                  { "range": { "date": { "gte": "2014-01-01" }}},
                  { "range": { "price": { "lte": 29.99 }}}
              ],
              "must_not": [
                  { "term": { "category": "ebooks" }}
              ]
          }
        }
    }
}
只想用 filter
上面说到 bool 中可以放:must,must_not,should,filter,但是不支持直接放 filter, 但是可以通过 constant_score(恒定分数,所有分数都是 1)来实现
GET /company/employee/_search
{
  "query": {
    "constant_score": {
      "filter": {
        "range": {
          "age": {
            "gte": 30
          }
        }
      }
    }
  }
}
_validate & explain
验证语法是否正确,和查看计划/错误信息
比如以下查询:match 写成了 math
GET /test_index/test_type/_validate/query?explain
{
  "query": {
    "math": {
      "test_field": "test"
    }
  }
}

------------------- 响应

{
  "valid": false,
  "error": "org.elasticsearch.common.ParsingException: no [query] registered for [math]"
}

------------------- 改正之后

{
  "valid": true,
  "_shards": {
    "total": 1,
    "successful": 1,
    "failed": 0
  },
  "explanations": [
    {
      "index": "test_index",
      "valid": true,
      "explanation": "+test_field:test #(#_type:test_type)"
    }
  ]
}
::: tip explain 参数在验证失败的情况下,会返回错误消息;验证通过的情况下,会返回计划,如在哪个 index 上查询等信息
一般用在那种特别复杂庞大的搜索下,比如你一下子写了上百行的搜索,这个时候可以先用 validate api 去验证一下,搜索是否合法 :::
默认排序规则
默认情况下,是按照 _score 降序排序的
然而,某些情况下,可能没有有用的 _score,比如说 filter
GET /_search
{
    "query" : {
        "bool" : {
            "filter" : {
                "term" : {
                    "author_id" : 1
                }
            }
        }
    }
}
当然,也可以是 constant_score
GET /_search
{
    "query" : {
        "constant_score" : {
            "filter" : {
                "term" : {
                    "author_id" : 1
                }
            }
        }
    }
}
定制排序规则
按员工入职时间升序排列:
GET /company/employee/_search
{
  "query": {
    "constant_score": {
      "filter": {
        "range": {
          "age": {
            "gte": 30
          }
        }
      }
    }
  },
  "sort": [
    {
      "join_date": {
        "order": "asc"
      }
    }
  ]
}
::: tip
使用自定义排序后,_score 会变成 null
:::
一个 field 索引两次解决字符串排序
如果对一个 string field 进行排序,结果往往不准确,因为分词后是多个单词,再排序就不是我们想要的结果了
通常解决方案是,将一个 string field 建立两次索引,一个分词,用来进行搜索;一个不分词,用来进行排序
先来建立 mapping,将 title 索引两次,注意语法
PUT /website
{
  "mappings": {
    "article": {
      "properties": {
        "title": {
          "type": "text",
          "fields": {
            "raw": {
              "type": "string",
              "index": "not_analyzed"
            }
          },
          "fielddata": true
        },
        "content": {
          "type": "text"
        },
        "post_date": {
          "type": "date"
        },
        "author_id": {
          "type": "long"
        }
      }
    }
  }
}
::: tip 对一个 text、string 字段进行排序,需要正排索引,使用 fielddata 属性来开启 :::
记得查询看下 mapping 数据
GET /website/_mapping

-------------------------- 响应

{
  "website": {
    "mappings": {
      "article": {
        "properties": {
          "author_id": {
            "type": "long"
          },
          "content": {
            "type": "text"
          },
          "post_date": {
            "type": "date"
          },
          "title": {
            "type": "text",
            "fields": {
              "raw": {
                "type": "keyword"
              }
            },
            "fielddata": true
          }
        }
      }
    }
  }
}
插入两条数据,注意第 2条 数据的 title 的首字母,g 排序的话,就会在后面
PUT /website/article/1
{
  "title": "first article",
  "content": "this is my second article",
  "post_date": "2017-01-01",
  "author_id": 110
}

PUT /website/article/2
{
  "title": "girst article",
  "content": "this is my second article",
  "post_date": "2017-01-01",
  "author_id": 110
}
直接查询, 后插入的在前面
GET /website/article/_search

{
  "took": 5,
  "timed_out": false,
  "_shards": {
    "total": 5,
    "successful": 5,
    "failed": 0
  },
  "hits": {
    "total": 2,
    "max_score": 1,
    "hits": [
      {
        "_index": "website",
        "_type": "article",
        "_id": "2",
        "_score": 1,
        "_source": {
          "title": "girst article",
          "content": "this is my second article",
          "post_date": "2017-01-01",
          "author_id": 110
        }
      },
      {
        "_index": "website",
        "_type": "article",
        "_id": "1",
        "_score": 1,
        "_source": {
          "title": "first article",
          "content": "this is my second article",
          "post_date": "2017-01-01",
          "author_id": 110
        }
      }
    ]
  }
}
使用 title 升序排列,可以看到 sort 中使用的是分词后的一个单词来排序
GET /website/article/_search
{
  "query": {},
  "sort": [
    {
      "title": {
        "order": "asc"
      }
    }
  ]
}

----------------- 响应

{
  "took": 3,
  "timed_out": false,
  "_shards": {
    "total": 5,
    "successful": 5,
    "failed": 0
  },
  "hits": {
    "total": 2,
    "max_score": null,
    "hits": [
      {
        "_index": "website",
        "_type": "article",
        "_id": "2",
        "_score": null,
        "_source": {
          "title": "girst article",
          "content": "this is my second article",
          "post_date": "2017-01-01",
          "author_id": 110
        },
        "sort": [
          "article"
        ]
      },
      {
        "_index": "website",
        "_type": "article",
        "_id": "1",
        "_score": null,
        "_source": {
          "title": "first article",
          "content": "this is my second article",
          "post_date": "2017-01-01",
          "author_id": 110
        },
        "sort": [
          "article"
        ]
      }
    ]
  }
}
使用 title.raw 来排序
GET /website/article/_search
{
  "query": {},
  "sort": [
    {
      "title.raw": {
        "order": "asc"
      }
    }
  ]
}

--------------------- 响应

{
  "took": 1,
  "timed_out": false,
  "_shards": {
    "total": 5,
    "successful": 5,
    "failed": 0
  },
  "hits": {
    "total": 2,
    "max_score": null,
    "hits": [
      {
        "_index": "website",
        "_type": "article",
        "_id": "1",
        "_score": null,
        "_source": {
          "title": "first article",
          "content": "this is my second article",
          "post_date": "2017-01-01",
          "author_id": 110
        },
        "sort": [
          "first article"
        ]
      },
      {
        "_index": "website",
        "_type": "article",
        "_id": "2",
        "_score": null,
        "_source": {
          "title": "girst article",
          "content": "this is my second article",
          "post_date": "2017-01-01",
          "author_id": 110
        },
        "sort": [
          "girst article"
        ]
      }
    ]
  }
}
相关度评分 TF&IDF 算法独家解密
算法介绍
relevance score(相关度得分)算法:简单来说,就是计算出,一个索引中的文本,与搜索文本,他们之间的关联匹配程度
Elasticsearch 使用的是 term frequency/inverse document frequency 算法,简称为 TF/IDF 算法
TF/IDF 有以下三个组成
-
Term frequency(词的频率)
搜索文本中的各个词条在 field 文本中出现了多少次,出现次数越多,就越相关
比如:搜索请求:hello world,肯定是 doc1 中得分高
doc1:hello you, and world is very good doc2:hello, how are you
-
Inverse document frequency
搜索文本中的各个词条在整个索引的所有文档中出现了多少次,出现的次数越多,就越不相关
比如:搜索请求:hello world ,hello 在 doc 2 中出现了两次,得分就会低
doc1:hello world today is very good doc2:hello hello world is very good
-
Field-length norm:
field 长度,field 越长,相关度越弱
比如:搜索请求:hello world
doc1:{ “title”: “hello article”, “content”: “babaaba 1万个单词” } doc2:{ “title”: “my article hi world”, “content”: “blablabala 1万个单词” }
hello world 在整个 index 中出现的次数是一样多的
doc1更相关,title field更短
简单验证理论
先插入两条数据
PUT /website/article/3
{
  "title": "first article aaa aaa bbb",
  "content": "this is my second article",
  "post_date": "2017-01-01",
  "author_id": 110
}

PUT /website/article/4
{
  "title": "girst article aaa bbb",
  "content": "this is my second article",
  "post_date": "2017-01-01",
  "author_id": 110
}
搜索 aaa bbb
GET /website/article/_search
{
  "query": {
    "match": {
      "title": "aaa bbb"
    }
  }
}
可以看到如下的响应数据
{
  "took": 7,
  "timed_out": false,
  "_shards": {
    "total": 5,
    "successful": 5,
    "failed": 0
  },
  "hits": {
    "total": 2,
    "max_score": 1.219939,
    "hits": [
      {
        "_index": "website",
        "_type": "article",
        "_id": "4",
        "_score": 1.219939,
        "_source": {
          "title": "girst article aaa bbb",
          "content": "this is my second article",
          "post_date": "2017-01-01",
          "author_id": 110
        }
      },
      {
        "_index": "website",
        "_type": "article",
        "_id": "3",
        "_score": 0.67312354,
        "_source": {
          "title": "first article aaa aaa bbb",
          "content": "this is my second article",
          "post_date": "2017-01-01",
          "author_id": 110
        }
      }
    ]
  }
}
explain 查看
通过 explain 关键字查看该数据是怎么得到的
GET /website/article/_search?explain
{
  "query": {
    "match": {
      "title": "aaa bbb"
    }
  }
}
只有两条数据,但是响应的内容很多, 能从高亮的几行中看到:idf 和 tfNorm 的计算法方式等
{
"took": 4,
"timed_out": false,
"_shards": {
"total": 5,
"successful": 5,
"failed": 0
},
"hits": {
"total": 2,
"max_score": 1.219939,
"hits": [
{
"_shard": "[website][2]",
"_node": "sEvAlYxFRJe598mrSDwUjQ",
"_index": "website",
"_type": "article",
"_id": "4",
"_score": 1.219939,
"_source": {
"title": "girst article aaa bbb",
"content": "this is my second article",
"post_date": "2017-01-01",
"author_id": 110
},
"_explanation": {
"value": 1.219939,
"description": "sum of:",
"details": [
{
"value": 1.219939,
"description": "sum of:",
"details": [
{
"value": 0.6099695,
"description": "weight(title:aaa in 0) [PerFieldSimilarity], result of:",
"details": [
{
"value": 0.6099695,
"description": "score(doc=0,freq=1.0 = termFreq=1.0\n), product of:",
"details": [
{
"value": 0.6931472,
"description": "idf, computed as log(1 + (docCount - docFreq + 0.5) / (docFreq + 0.5)) from:",
"details": [
{
"value": 1,
"description": "docFreq",
"details": []
},
{
"value": 2,
"description": "docCount",
"details": []
}
]
},
{
"value": 0.88,
"description": "tfNorm, computed as (freq * (k1 + 1)) / (freq + k1 * (1 - b + b * fieldLength / avgFieldLength)) from:",
"details": [
{
"value": 1,
"description": "termFreq=1.0",
"details": []
},
{
"value": 1.2,
"description": "parameter k1",
"details": []
},
{
"value": 0.75,
"description": "parameter b",
"details": []
},
{
"value": 3,
"description": "avgFieldLength",
"details": []
},
{
"value": 4,
"description": "fieldLength",
"details": []
}
]
}
]
}
]
},
{
"value": 0.6099695,
"description": "weight(title:bbb in 0) [PerFieldSimilarity], result of:",
"details": [
{
"value": 0.6099695,
"description": "score(doc=0,freq=1.0 = termFreq=1.0\n), product of:",
"details": [
{
"value": 0.6931472,
"description": "idf, computed as log(1 + (docCount - docFreq + 0.5) / (docFreq + 0.5)) from:",
"details": [
{
"value": 1,
"description": "docFreq",
"details": []
},
{
"value": 2,
"description": "docCount",
"details": []
}
]
},
{
"value": 0.88,
"description": "tfNorm, computed as (freq * (k1 + 1)) / (freq + k1 * (1 - b + b * fieldLength / avgFieldLength)) from:",
"details": [
{
"value": 1,
"description": "termFreq=1.0",
"details": []
},
{
"value": 1.2,
"description": "parameter k1",
"details": []
},
{
"value": 0.75,
"description": "parameter b",
"details": []
},
{
"value": 3,
"description": "avgFieldLength",
"details": []
},
{
"value": 4,
"description": "fieldLength",
"details": []
}
]
}
]
}
]
}
]
},
{
"value": 0,
"description": "match on required clause, product of:",
"details": [
{
"value": 0,
"description": "# clause",
"details": []
},
{
"value": 1,
"description": "*:*, product of:",
"details": [
{
"value": 1,
"description": "boost",
"details": []
},
{
"value": 1,
"description": "queryNorm",
"details": []
}
]
}
]
}
]
}
},
{
"_shard": "[website][4]",
"_node": "sEvAlYxFRJe598mrSDwUjQ",
"_index": "website",
"_type": "article",
"_id": "3",
"_score": 0.67312354,
"_source": {
"title": "first article aaa aaa bbb",
"content": "this is my second article",
"post_date": "2017-01-01",
"author_id": 110
},
"_explanation": {
"value": 0.67312354,
"description": "sum of:",
"details": [
{
"value": 0.67312354,
"description": "sum of:",
"details": [
{
"value": 0.39063013,
"description": "weight(title:aaa in 0) [PerFieldSimilarity], result of:",
"details": [
{
"value": 0.39063013,
"description": "score(doc=0,freq=2.0 = termFreq=2.0\n), product of:",
"details": [
{
"value": 0.2876821,
"description": "idf, computed as log(1 + (docCount - docFreq + 0.5) / (docFreq + 0.5)) from:",
"details": [
{
"value": 1,
"description": "docFreq",
"details": []
},
{
"value": 1,
"description": "docCount",
"details": []
}
]
},
{
"value": 1.3578535,
"description": "tfNorm, computed as (freq * (k1 + 1)) / (freq + k1 * (1 - b + b * fieldLength / avgFieldLength)) from:",
"details": [
{
"value": 2,
"description": "termFreq=2.0",
"details": []
},
{
"value": 1.2,
"description": "parameter k1",
"details": []
},
{
"value": 0.75,
"description": "parameter b",
"details": []
},
{
"value": 5,
"description": "avgFieldLength",
"details": []
},
{
"value": 5.2244897,
"description": "fieldLength",
"details": []
}
]
}
]
}
]
},
{
"value": 0.2824934,
"description": "weight(title:bbb in 0) [PerFieldSimilarity], result of:",
"details": [
{
"value": 0.2824934,
"description": "score(doc=0,freq=1.0 = termFreq=1.0\n), product of:",
"details": [
{
"value": 0.2876821,
"description": "idf, computed as log(1 + (docCount - docFreq + 0.5) / (docFreq + 0.5)) from:",
"details": [
{
"value": 1,
"description": "docFreq",
"details": []
},
{
"value": 1,
"description": "docCount",
"details": []
}
]
},
{
"value": 0.9819638,
"description": "tfNorm, computed as (freq * (k1 + 1)) / (freq + k1 * (1 - b + b * fieldLength / avgFieldLength)) from:",
"details": [
{
"value": 1,
"description": "termFreq=1.0",
"details": []
},
{
"value": 1.2,
"description": "parameter k1",
"details": []
},
{
"value": 0.75,
"description": "parameter b",
"details": []
},
{
"value": 5,
"description": "avgFieldLength",
"details": []
},
{
"value": 5.2244897,
"description": "fieldLength",
"details": []
}
]
}
]
}
]
}
]
},
{
"value": 0,
"description": "match on required clause, product of:",
"details": [
{
"value": 0,
"description": "# clause",
"details": []
},
{
"value": 1,
"description": "*:*, product of:",
"details": [
{
"value": 1,
"description": "boost",
"details": []
},
{
"value": 1,
"description": "queryNorm",
"details": []
}
]
}
]
}
]
}
}
]
}
}
::: tip 太复杂,只要知道大概是这么个东西就行了 :::
分析一个 document 是如何被匹配上的
可以使用 _explain 关键字,下面的语法只是在前面的搜索基础上取出某一个结果的分析,这里是 id=4 的 document
GET /website/article/4/_explain
{
  "query": {
    "match": {
      "title": "aaa bbb"
    }
  }
}
内核级知识点之 doc value 初步探秘
- 倒排索引: 搜索的时候使用
- 正排索引:排序的时候使用,看到每个 document 的每个 field,然后进行排序,所谓的正排索引,其实就是doc values
在建立索引的时候,一方面会建立倒排索引,以供搜索用;一方面会建立正排索引,也就是 doc values,以供排序,聚合,过滤等操作使用
doc values 是被保存在磁盘上的,此时如果内存足够,os 会自动将其缓存在内存中,性能还是会很高;如果内存不足够,os 会将其写入磁盘上
倒排索引回顾
比如:
doc1: hello world you and me doc2: hi, world, how are you
倒排索引可能如下:
| word | doc1 | doc2 |
|---|---|---|
| hello | * | |
| world | * | * |
| you | * | * |
| and | * | |
| me | * | |
| hi | * | |
| how | * | |
| are | * |
query string:hello you –> hello, you
hello –> doc1 you –> doc1,doc2
在倒排索引中就匹配到了。
正排索引
doc1: hello world you and me
doc2: hi, world, how are you
sort by age
doc1: { "name": "jack", "age": 27 }
doc2: { "name": "tom", "age": 30 }
| document | name | age |
|---|---|---|
| doc1 | jack | 27 |
| doc2 | tom | 30 |
::: tip 疑问 还是没有明白,怎么用来排序的,对于正排索引来说,搜索到所有的文档之后,再按照文档中的字段排序不行么?
那么正排索引和平时 mysql 中的类似,直接获取 document 然后按照字段排序。
这两个貌似是一样的? :::
分布式搜索引擎内核解密之 query phase
query phase
- 搜索请求发送到某一个 coordinate node,构构建一个 priority queue,长度以 paging 操作 from 和 size 为准,默认为 10
- coordinate node 将请求转发到所有 shard,每个 shard 本地搜索,并构建一个本地的 priority queue
- 各个 shard 将自己的 priority queue 返回给 coordinate node,并构建一个全局的 priority queue
这个流程就叫 query phase (查询阶段)
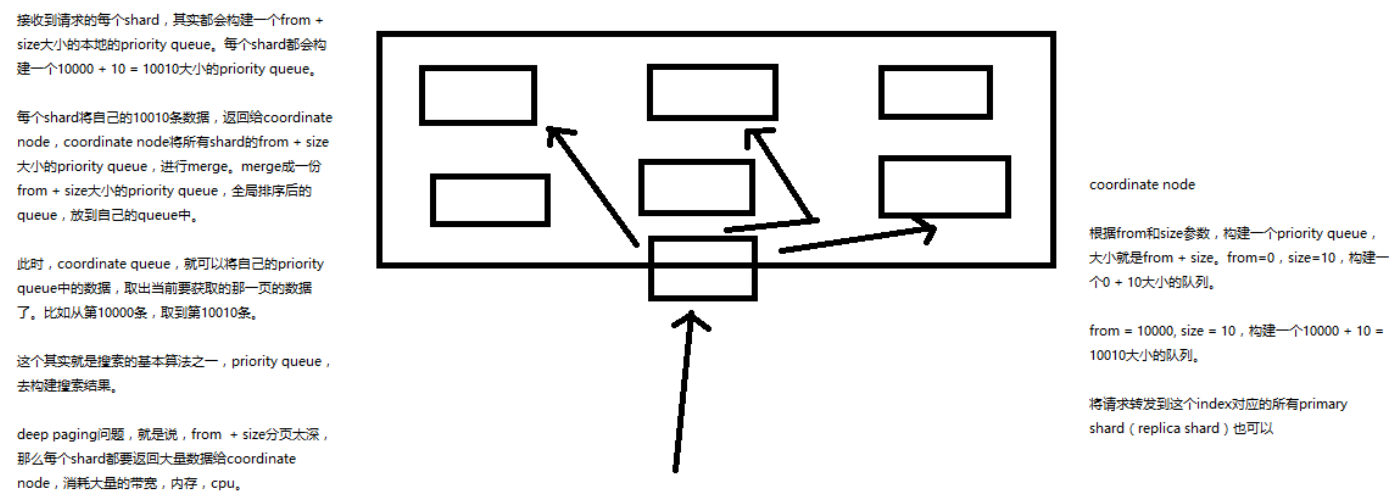
::: tip 这个过程还是经典的做法,有一个节点来做聚合,所以就会有单节点聚合占用资源过多的情况发生 :::
replica shard 如何提升搜索吞吐量
一次请求要打到所有 shard 的一个 replica/primary 上去,如果每个 shard 都有多个 replica,那么同时并发过来的搜索请求可以同时打到其他的 replica 上去
::: tip 疑问 还是同步问题,这个还是不知道 es 是怎么保证在快速同步的,并且查询还没有问题的?不明白 :::
分布式搜索引擎内核解密之 fetch phase
什么是 fetch phase?
就是获取数据阶段,query phase 获取到的只是 id,fetch phase 会批量到各个 shard 上去获取数据
::: tip 疑问 这里就明白了之前为什么需要正排索引了? 貌似在这一步获取数据之后再排序不行么? 搞不明白,好像都很麻烦的原理 :::
fetch phbase 工作流程
- coordinate node 构建完 priority queue 之后,就发送 mget 请求去所有 shard 上获取对应的 document
- 各个 shard 将 document 返回给 coordinate node
- coordinate node 将合并后的 document 结果返回给 client 客户端
一般搜索,如果不加 from 和 size,就默认搜索前 10条,按照 _score 排序
搜索相关参数梳理以及 bouncing results 问题解决方案
本章重点:怎么解决 bouncing results 和 timeout、routing 回顾,其他的不详细解说
什么是 bouncing results?
看一个场景:两个 document 排序,field 值相同;不同的 shard 上,可能排序不同; 每次请求轮询打到不同的 replica shard 上;每次页面上看到的搜索结果的排序都不一样。这就是 bouncing result,也就是跳跃的结果。
解决方案:使用 preference
什么是 preference ? 决定了哪些 shard 会被用来执行搜索操作,可选值有如下
_primary_primary_first_local_only_node:xyz_prefer_node:xyz_shards:2,3
这里的每个值不解说,在高级课程中才会解说。
解决 preference 的思路:将 preference 设置为一个字符串,比如说 user_id,让每个 user 每次搜索的时候,都使用同一个 replica shard 去执行,就不会看到 bouncing results 了
这里的 user_id 是指,假如 id=123 的用户查询,那么久将 preference=123。id=234 的用户查询就设置为 234 。
GET /_search?preference=123
timeout
已经讲解过原理了,主要就是限定在一定时间内,将部分获取到的数据直接返回,避免查询耗时过长
routing
document 文档路由默认是 _id 路由;routing=user_id,这样的话可以让同一个 user 对应的数据到一个 shard 上去
search_type
default:query_then_fetch
dfs_query_then_fetch:可以提升 revelance sort(相关性排序) 精准度
scoll 技术滚动搜索大量数据
如果一次性要查出来比如 10万条 数据,那么性能会很差,此时一般会采取用 scoll 滚动查询,一批一批的查,直到所有数据都查询完处理完
使用 scoll 滚动搜索,可以先搜索一批数据,然后下次再搜索一批数据,以此类推,直到搜索出全部的数据来
scoll 搜索会在第一次搜索的时候,保存一个当时的视图快照,之后只会基于该旧的视图快照提供数据搜索,如果这个期间数据变更,是不会让用户看到的
采用基于 _doc(这个是什么?) 进行排序的方式,性能较高
每次发送 scroll 请求,我们还需要指定一个 scoll 参数,指定一个时间窗口,每次搜索请求只要在这个时间窗口内能完成就可以了
GET /test_index/test_type/_search?scroll=1m
{
  "query": {
    "match_all": {}
  },
  "sort": [ "_doc" ],
  "size": 3
}
注意看第一次搜索返回的数据,一共有 8 条数据,第一次返回了 3 条
{
  "_scroll_id": "DnF1ZXJ5VGhlbkZldGNoAwAAAAAAACqyFnNFdkFsWXhGUkplNTk4bXJTRHdValEAAAAAAAAqsxZzRXZBbFl4RlJKZTU5OG1yU0R3VWpRAAAAAAAAKrQWc0V2QWxZeEZSSmU1OThtclNEd1VqUQ==",
  "took": 11,
  "timed_out": false,
  "_shards": {
    "total": 3,
    "successful": 3,
    "failed": 0
  },
  "hits": {
    "total": 8,
    "max_score": null,
    "hits": [
      {
        "_index": "test_index",
        "_type": "test_type",
        "_id": "AWgPOqUAE8HO-7Ks86b7",
        "_score": null,
        "_source": {
          "test_content": "test test",
          "test_content2": "test test2"
        },
        "sort": [
          0
        ]
      },
      {
        "_index": "test_index",
        "_type": "test_type",
        "_id": "AWgPGM7zE8HO-7Ks86bu",
        "_score": null,
        "_source": {
          "test_content": "test test"
        },
        "sort": [
          0
        ]
      },
      {
        "_index": "test_index",
        "_type": "test_type",
        "_id": "10",
        "_score": null,
        "_source": {
          "test_field1": "test1",
          "test_field2": "updated test2"
        },
        "sort": [
          0
        ]
      }
    ]
  }
}
获得的结果会有一个 scoll_id,下一次再发送 scoll 请求的时候,必须带上这个 scoll_id
GET /_search/scroll
{
    "scroll": "1m",
    "scroll_id" : "DnF1ZXJ5VGhlbkZldGNoAwAAAAAAACqyFnNFdkFsWXhGUkplNTk4bXJTRHdValEAAAAAAAAqsxZzRXZBbFl4RlJKZTU5OG1yU0R3VWpRAAAAAAAAKrQWc0V2QWxZeEZSSmU1OThtclNEd1VqUQ=="
}
::: tip scroll 时间窗口不用每次都携带,貌似是每次都延长时间
scoll 看起来挺像分页的,但是其实使用场景不一样。
分页主要是用来一页一页搜索,给用户看的
scoll 主要是用来一批一批检索数据,让系统进行处理的 :::
快速上手手动创建、修改、删除索引
为什么我们要手动创建索引?
在自动索引配置和 mapping 配置不符合我们要求的时候就需要手动管理了
创建索引
创建索引的语法
PUT /my_index
{
    "settings": { ... any settings ... },
    "mappings": {
        "type_one": { ... any mappings ... },
        "type_two": { ... any mappings ... },
        ...
    }
}
创建索引的示例
PUT /my_index
{
  "settings": {
    "number_of_shards": 1,
    "number_of_replicas": 0
  },
  "mappings": {
    "my_type": {
      "properties": {
        "my_field": {
          "type": "text"
        }
      }
    }
  }
}
修改索引
前面其实已经说到过,修改的时候好多都没法修改的。
PUT /my_index/_settings
{
    "number_of_replicas": 1
}
删除索引
// 删除的单个
DELETE /my_index
// 删除多个
DELETE /index_one,index_two
// 通配符删除
DELETE /index_*
// 删除所有
DELETE /_all
elasticsearch.yml 中有一个配置 ,设置为 true 后,就不允许删除所有索引了(为了安全)
action.destructive_requires_name: true
修改和定制分词器
默认的分词器
下面只是描述,但是具体的 type 值是什么呢?
- standard tokenizer:以单词边界进行切分
- standard token filter:什么都不做
- lowercase token filter:将所有字母转换为小写
- stop token filer(默认被禁用):移除停用词,比如a the it等等
修改分词器的设置
启用 english 停用词 token filter
PUT /my_index
{
  "settings": {
    "analysis": {
      "analyzer": {
        "es_std": {
          "type": "standard",
          "stopwords": "_english_"
        }
      }
    }
  }
}
测试标准分词效果
GET /my_index/_analyze
{
  "analyzer": "standard",
  "text": "a dog is in the house"
}
响应
{
  "tokens": [
    {
      "token": "a",
      "start_offset": 0,
      "end_offset": 1,
      "type": "<ALPHANUM>",
      "position": 0
    },
    {
      "token": "dog",
      "start_offset": 2,
      "end_offset": 5,
      "type": "<ALPHANUM>",
      "position": 1
    },
    {
      "token": "is",
      "start_offset": 6,
      "end_offset": 8,
      "type": "<ALPHANUM>",
      "position": 2
    },
    {
      "token": "in",
      "start_offset": 9,
      "end_offset": 11,
      "type": "<ALPHANUM>",
      "position": 3
    },
    {
      "token": "the",
      "start_offset": 12,
      "end_offset": 15,
      "type": "<ALPHANUM>",
      "position": 4
    },
    {
      "token": "house",
      "start_offset": 16,
      "end_offset": 21,
      "type": "<ALPHANUM>",
      "position": 5
    }
  ]
}
测试刚才启用的分词器
GET /my_index/_analyze
{
  "analyzer": "es_std",
  "text":"a dog is in the house"
}
响应
{
  "tokens": [
    {
      "token": "dog",
      "start_offset": 2,
      "end_offset": 5,
      "type": "<ALPHANUM>",
      "position": 1
    },
    {
      "token": "house",
      "start_offset": 16,
      "end_offset": 21,
      "type": "<ALPHANUM>",
      "position": 5
    }
  ]
}
定制自己的分词器
::: tip 如果索引已经存在了,再次执行则会报错 :::
PUT /my_index
{
  "settings": {
    "analysis": {
      "char_filter": {
        "&_to_and": {
          "type": "mapping",
          "mappings": ["&=> and"]
        }
      },
      "filter": {
        "my_stopwords": {
          "type": "stop",
          "stopwords": ["the", "a"]
        }
      },
      "analyzer": {
        "my_analyzer": {
          "type": "custom",
          "char_filter": ["html_strip", "&_to_and"],
          "tokenizer": "standard",
          "filter": ["lowercase", "my_stopwords"]
        }
      }
    }
  }
}
&_to_and: 将 & 转换为 and- my_stopwords:把 the 和 a 定义为停用词
- my_analyzer.type:自定义
- my_analyzer.char_filter: 过滤 html 标签和使用我们刚才定义的 char filter
- my_analyzer.tokenizer:分词器使用标准分词器
- my_analyzer.filter 全部转换为小写、使用刚才自定义的停用词
测试自定义分词器
GET /my_index/_analyze
{
  "text": "tom&jerry are a friend in the house, <a>, HAHA!!",
  "analyzer": "my_analyzer"
}
可以看到响应把刚才定义的都用上了
{
  "tokens": [
    {
      "token": "tomandjerry",
      "start_offset": 0,
      "end_offset": 9,
      "type": "<ALPHANUM>",
      "position": 0
    },
    {
      "token": "are",
      "start_offset": 10,
      "end_offset": 13,
      "type": "<ALPHANUM>",
      "position": 1
    },
    {
      "token": "friend",
      "start_offset": 16,
      "end_offset": 22,
      "type": "<ALPHANUM>",
      "position": 3
    },
    {
      "token": "in",
      "start_offset": 23,
      "end_offset": 25,
      "type": "<ALPHANUM>",
      "position": 4
    },
    {
      "token": "house",
      "start_offset": 30,
      "end_offset": 35,
      "type": "<ALPHANUM>",
      "position": 6
    },
    {
      "token": "haha",
      "start_offset": 42,
      "end_offset": 46,
      "type": "<ALPHANUM>",
      "position": 7
    }
  ]
}
为字段指定自定义分词器
要注意,这个在前面已经说过了,只能新增字段设置,不能修改
PUT /my_index/_mapping/my_type
{
  "properties": {
    "content": {
      "type": "text",
      "analyzer": "my_analyzer"
    }
  }
}
内核级知识点:深入探秘 type 底层数据结构
type
是一个 index 中用来区分类似的数据的,类似的数据,但是可能有不同的 fields,而且有不同的属性来控制索引建立、分词器
field 的 value,在底层的 lucene 中建立索引的时候,全部是 opaque bytes (二进制)类型,不区分类型的
lucene 是没有 type 的概念的,在 document 中,实际上将 type 作为一个 document 的 field 来存储,即 _type,es 通过 _type来进行 type 的过滤和筛选
一个 index 中的多个 type,实际上是放在一起存储的,因此一个 index 下,不能有多个 type 重名,而类型或者其他设置不同的,因为那样是无法处理的
比如下面这个示例
在 ecommerce(电子商务) index 下有电子商品和生鲜产品两个 type,只有一个保质期字段是不同名的
{
   "ecommerce": {
      "mappings": {
         "elactronic_goods": {
            "properties": {
               "name": {
                  "type": "string",
               },
               "price": {
                  "type": "double"
               },
      	       "service_period": {
      		        "type": "string"
      	       }
            }
         },
         "fresh_goods": {
            "properties": {
               "name": {
                  "type": "string",
               },
               "price": {
                  "type": "double"
               },
      	       "eat_period": {
      		        "type": "string"
      	       }
            }
         }
      }
   }
}
两条示例数据可能是这样
{
  "name": "geli kongtiao",
  "price": 1999.0,
  "service_period": "one year"
}

{
  "name": "aozhou dalongxia",
  "price": 199.0,
  "eat_period": "one week"
}
但是在底层存在却是多了一个 _type 属性
{
  "_type": "elactronic_goods",
  "name": "geli kongtiao",
  "price": 1999.0,
  "service_period": "one year"
}

{
  "_type": "fresh_goods",
  "name": "aozhou dalongxia",
  "price": 199.0,
  "eat_period": "one week"
}
在 lucene 存储是一个 document
在底层的存储是这样子的
{
   "ecommerce": {
      "mappings": {
        "_type": {
          "type": "string",
          "index": "not_analyzed"
        },
        "name": {
          "type": "string"
        },
        "price": {
          "type": "double"
        },
        "service_period": {
          "type": "string"
        },
        "eat_period": {
          "type": "string"
        }
      }
   }
}
所以将类似结构的 type 放在一个 index 下,这些 type 应该有多个 field 是相同的
假如说,你将两个 type 的 field 完全不同,放在一个 index 下,那么就每条数据都至少有一半的 field 在底层的 lucene 中是空值,会有严重的性能问题
::: tip 不要将大多数字段不一致的 type 放到同一个 index 中;
也看到好多地方说官网在高版本将限制为一个 index 只能有一个 type 了 :::
mapping root object 深入剖析
本章主要讲解 root object 下的东西 和 一些底层数据字段
什么是 root object?
就是某个 type 对应的 mapping json,包括了 properties,metadata(_id,_source,_type),settings(analyzer),其他settings(比如include_in_all)
如下高亮部分,“my_type” 这个一个大 json 就叫做 root object
PUT /my_index
{
  "mappings": {
    "my_type": {
      "properties": {}
    }
  }
}
properties
- type:数据类型
- index:是否需要分词类型
- analyzer:分词器
PUT /my_index/_mapping/my_type
{
  "properties": {
    "title": {
      "type": "text",
      "index": "analyzed",
      "analyzer": "standard"
    }
  }
}
_source
{
    "_index": "website",
    "_type": "article",
    "_id": "2",
    "_score": 1,
    "_source": {
      "title": "girst article",
      "content": "this is my second article",
      "post_date": "2017-01-01",
      "author_id": 110
    }
  },
查询出一个文档的时候,响应的数据中的 _source
好处
- 查询的时候,直接可以拿到完整的 document,不需要先拿 document id,再发送一次请求拿 document
- partial update 基于
_source实现 - reindex(零停机重建索引) 时,直接基于
_source实现,不需要从数据库(或者其他外部存储)查询数据再修改 - 可以基于
_source定制返回 field - debug query 更容易,因为可以直接看到
_source
如果不需要以上好处可以禁用
_source
PUT /my_index/_mapping/my_type2
{
  "_source": {"enabled": false}
}
插入一条数据
PUT /my_index/my_type2/1
{
  "title": "girst article",
  "content": "this is my second article",
  "post_date": "2017-01-01",
  "author_id": 110
}
获取后查看响应的数据
GET /my_index/my_type2/_search

---------------------------- 响应

{
  "took": 2,
  "timed_out": false,
  "_shards": {
    "total": 5,
    "successful": 5,
    "failed": 0
  },
  "hits": {
    "total": 1,
    "max_score": 1,
    "hits": [
      {
        "_index": "my_index",
        "_type": "my_type2",
        "_id": "1",
        "_score": 1
      }
    ]
  }
}
可以看到返回的 _score 是一个 id
_all
将所有 field 打包在一起,作为一个 _all field,建立索引。没指定任何 field 进行搜索时,就是使用 _all field在搜索。
默认开启,可以手动关闭
PUT /my_index/_mapping/my_type3
{
  "_all": {"enabled": false}
}
也可以在 field 级别设置 include_in_all field,设置是否要将 field 的值包含在 _all field 中
PUT /my_index/_mapping/my_type4
{
  "properties": {
    "my_field": {
      "type": "text",
      "include_in_all": false
    }
  }
}
标识性 metadata
_index_type_id定制化自己的 dynamic mapping 策略
定制 dynamic 策略
有如下三种可选
- true:遇到陌生字段,就进行 dynamic mapping
- false:遇到陌生字段,就忽略
- strict:遇到陌生字段,就报错
示例,创建一个策略
- 对于 my_type 全局设置策略为 遇到陌生字段就报错
- 对于 my_type.address 字段 策略设置为自动 mapping
PUT /my_index { “mappings”: { “my_type”: { “dynamic”: “strict”, “properties”: { “title”: { “type”: “text” }, “address”: { “type”: “object”, “dynamic”: “true” } } } } }
测试全局策略是否生效
PUT /my_index/my_type/1
{
  "title": "my article",
  "content": "this is my article",
  "address": {
    "province": "guangdong",
    "city": "guangzhou"
  }
}
响应错误,content 字段校验未通过
{
  "error": {
    "root_cause": [
      {
        "type": "strict_dynamic_mapping_exception",
        "reason": "mapping set to strict, dynamic introduction of [content] within [my_type] is not allowed"
      }
    ],
    "type": "strict_dynamic_mapping_exception",
    "reason": "mapping set to strict, dynamic introduction of [content] within [my_type] is not allowed"
  },
  "status": 400
}
测试 address 测自动 mapping 策略
PUT /my_index/my_type/1
{
  "title": "my article",
  "address": {
    "province": "guangdong",
    "city": "guangzhou"
  }
}
响应成功
{
  "_index": "my_index",
  "_type": "my_type",
  "_id": "1",
  "_version": 1,
  "result": "created",
  "_shards": {
    "total": 2,
    "successful": 1,
    "failed": 0
  },
  "created": true
}
查看 mapping 信息
GET /my_index/_mapping/my_type

------------------------------- 响应

{
  "my_index": {
    "mappings": {
      "my_type": {
        "dynamic": "strict",
        "properties": {
          "address": {
            "dynamic": "true",
            "properties": {
              "city": {
                "type": "text",
                "fields": {
                  "keyword": {
                    "type": "keyword",
                    "ignore_above": 256
                  }
                }
              },
              "province": {
                "type": "text",
                "fields": {
                  "keyword": {
                    "type": "keyword",
                    "ignore_above": 256
                  }
                }
              }
            }
          },
          "title": {
            "type": "text"
          }
        }
      }
    }
  }
}
可以看到 address 下被自动 mapping 了两个字段的配置
定制 dynamic mapping 策略
自动 mapping 的相关信息
date_detection
默认会按照一定格式识别 date,比如 yyyy-MM-dd 。
但是如果某个 field 先过来一个 2017-01-01 的值,就会被自动 dynamic mapping 成 date, 后面如果再来一个 “hello world” 之类的值,就会报错。
可以手动关闭某个 type 的 date_detection,如果有需要,自己手动指定某个 field 为 date 类型。
PUT /my_index/_mapping/my_type
{
"date_detection": false
}
定制自己的 dynamic mapping template(type level)
::: tip type level:就是在哪一个级别/层面。比如在 index 层面配置,那么就对所有的 type 生效 :::
动态 mapping 模板:就是当某一个字段匹配到模板中的通配符配置时就应用该配置的 mapping 配置
配置一个动态模板
- 为 my_type 配置动态模板
- en:为该配置取一个名称
- match:通配符匹配字段;
- match_mapping_type:字段 type 也要匹配上
- mapping:mapping 的信息配置
下面的配置意思是:当一个 string 字段名称后缀为 _en 结尾时就使用此 mapping
PUT /my_index
{
"mappings": {
"my_type": {
"dynamic_templates": [
{ "en": {
"match": "*_en",
"match_mapping_type": "string",
"mapping": {
"type": "string",
"analyzer": "english"
}
}}
]
}}}
测试一个不匹配的数据
先查询当前的 mapping
GET /my_index/_mapping/my_type/
-------------------- 响应
{
"my_index": {
"mappings": {
"my_type": {
"dynamic_templates": [
{
"en": {
"match": "*_en",
"match_mapping_type": "string",
"mapping": {
"analyzer": "english",
"type": "string"
}
}
}
]
}
}
}
}
再插入数据
PUT /my_index/my_type/1
{
"title": "this is my first article"
}
再次查询当前的 mapping,title 字段没有匹配到动态模板配置
GET /my_index/_mapping/my_type/
-------------------- 响应
{
"my_index": {
"mappings": {
"my_type": {
"dynamic_templates": [
{
"en": {
"match": "*_en",
"match_mapping_type": "string",
"mapping": {
"analyzer": "english",
"type": "string"
}
}
}
],
"properties": {
"title": {
"type": "text",
"fields": {
"keyword": {
"type": "keyword",
"ignore_above": 256
}
}
}
}
}
}
}
}
插入一条匹配的数据
PUT /my_index/my_type/2
{
"title_en": "this is my first article"
}
查看 mapping ,可以看到被匹配上了
GET /my_index/_mapping/my_type/
-------------------- 响应
{
"my_index": {
"mappings": {
"my_type": {
"dynamic_templates": [
{
"en": {
"match": "*_en",
"match_mapping_type": "string",
"mapping": {
"analyzer": "english",
"type": "string"
}
}
}
],
"properties": {
"title": {
"type": "text",
"fields": {
"keyword": {
"type": "keyword",
"ignore_above": 256
}
}
},
"title_en": {
"type": "text",
"analyzer": "english"
}
}
}
}
}
}
搜索再次测试是否能搜索到结果
GET /my_index/my_type/_search?q=title:is
------------------- 响应
{
"took": 3,
"timed_out": false,
"_shards": {
"total": 5,
"successful": 5,
"failed": 0
},
"hits": {
"total": 1,
"max_score": 0.2824934,
"hits": [
{
"_index": "my_index",
"_type": "my_type",
"_id": "1",
"_score": 0.2824934,
"_source": {
"title": "this is my first article"
}
}
]
}
}
GET /my_index/my_type/_search?q=title_en:is
----------------------- 响应
{
"took": 1,
"timed_out": false,
"_shards": {
"total": 5,
"successful": 5,
"failed": 0
},
"hits": {
"total": 0,
"max_score": null,
"hits": []
}
}
-
title 没有匹配到任何的 dynamic 模板,默认就是 standard 分词器,不会过滤停用词,is 会进入倒排索引,用 is 来搜索是可以搜索到的
-
title_en 匹配到了 dynamic 模板,就是 english 分词器,会过滤停用词,is 这种停用词就会被过滤掉,用 is 来搜索就搜索不到了
定制自己的 default mapping template(index level)
- 在 index 这个层面全局关闭
_all功能 - 在 blog 这个 type 下打开
_all功能
PUT /my_index
{
"mappings": {
"_default_": {
"_all": { "enabled": false }
},
"blog": {
"_all": { "enabled": true }
}
}
}
scoll+bulk+ 索引别名实现零停机重建索引
零停机重建索引问题
在程序使用中使用了一个 my_index 的索引,但是该索引中的 text 字段类型为 date,现在想要改成 string,让客户端不停机的情况下完成这个需求
零停机重建索引思路
- 前提客户端使用的索引是一个别名
- 新建一个索引,把 text 字段建立成 string 类型
- 使用 scoll api 批量查询出来
- 使用 bulk api 批量插入到新索引中去
- 移除别名中的旧索引,把新索引与别名相关联
::: tip 该思路,在视频中没有深入的解决这一需求的完整解决方案;
如:在后台重建数据这一个时间段内:
- 万一文档中的数据有变化呢?
- 旧索引中的文档信息怎么与新索引中的数据进行追平呢? :::
所以基于上面不完善的解决方案,该笔记记录只记录关键步骤;
自动建立 mapping 是 date
PUT /my_index/my_type/1
{
"title": "2017-01-03"
}
{
"my_index": {
"mappings": {
"my_type": {
"properties": {
"title": {
"type": "date"
}
}
}
}
}
}
当后期向索引中加入 string 类型的 title 值的时候,就会报错
PUT /my_index/my_type/2
{
"title": "my first article"
}
{
"error": {
"root_cause": [
{
"type": "mapper_parsing_exception",
"reason": "failed to parse [title]"
}
],
"type": "mapper_parsing_exception",
"reason": "failed to parse [title]",
"caused_by": {
"type": "illegal_argument_exception",
"reason": "Invalid format: \"my first article\""
}
},
"status": 400
}
如果此时想修改 title 的类型,是不可能的
PUT /my_index/_mapping/my_type
{
"properties": {
"title": {
"type": "text"
}
}
}
{
"error": {
"root_cause": [
{
"type": "illegal_argument_exception",
"reason": "mapper [title] of different type, current_type [date], merged_type [text]"
}
],
"type": "illegal_argument_exception",
"reason": "mapper [title] of different type, current_type [date], merged_type [text]"
},
"status": 400
}
此时,唯一的办法,就是进行 reindex,也就是说,重新建立一个索引,将旧索引的数据查询出来,再导入新索引
新建一个 index,调整其 title 的类型为 string
PUT /my_index_new
{
"mappings": {
"my_type": {
"properties": {
"title": {
"type": "text"
}
}
}
}
}
使用 scroll api 将数据批量查询出来
GET /my_index/_search?scroll=1m
{
"query": {
"match_all": {}
},
"sort": ["_doc"],
"size": 1
}
{
"_scroll_id": "DnF1ZXJ5VGhlbkZldGNoBQAAAAAAADpAFjRvbnNUWVZaVGpHdklqOV9zcFd6MncAAAAAAAA6QRY0b25zVFlWWlRqR3ZJajlfc3BXejJ3AAAAAAAAOkIWNG9uc1RZVlpUakd2SWo5X3NwV3oydwAAAAAAADpDFjRvbnNUWVZaVGpHdklqOV9zcFd6MncAAAAAAAA6RBY0b25zVFlWWlRqR3ZJajlfc3BXejJ3",
"took": 1,
"timed_out": false,
"_shards": {
"total": 5,
"successful": 5,
"failed": 0
},
"hits": {
"total": 3,
"max_score": null,
"hits": [
{
"_index": "my_index",
"_type": "my_type",
"_id": "2",
"_score": null,
"_source": {
"title": "2017-01-02"
},
"sort": [
0
]
}
]
}
}
采用 bulk api 将 scoll 查出来的一批数据,批量写入新索引
重复该步骤逻辑,将所有数据插入到新索引中
POST /_bulk
{ "index": { "_index": "my_index_new", "_type": "my_type", "_id": "2" }}
{ "title": "2017-01-02" }
索引名切换
客户端使用索引的时候就需要一直使用 goods_index 索引了
POST /_aliases
{
"actions": [
{ "remove": { "index": "my_index", "alias": "goods_index" }},
{ "add": { "index": "my_index_new", "alias": "goods_index" }}
]
}
直接通过 goods_index 别名来查询,是否 ok
GET /goods_index/my_type/_search
这样思路可以再一开始就对索引添加别名使用,真实索引使用版本号来区分
POST /_aliases
{
"actions": [
{ "remove": { "index": "my_index_v1", "alias": "my_index" }},
{ "add": { "index": "my_index_v2", "alias": "my_index" }}
]
}
内核原理解密
本章会记录原始以下章节内容
-
- 内核原理探秘_倒排索引组成结构以及其索引可变原因揭秘
-
- 内核原理探秘_深度图解剖析 document 写入原理(buffer,segment,commit)
-
- 内核原理探秘_优化写入流程实现 NRT 近实时(filesystem cache,refresh)
-
- 内核原理探秘_继续优化写入流程实现 durability 可靠存储(translog,flush)
-
- 内核原理探秘_最后优化写入流程实现海量磁盘文件合并(segment merge,optimize)
倒排索引,是适合用于进行搜索的
倒排索引的结构
倒排索引其实并不是像之前说的那样很简单的,结构,但是核心却就是这样。
word doc1 doc2
dog * *
hello *
you *
还包括其他的一些数据,可以看出来如下数据基本上都是用来算相关度评分的
- 包含这个关键词的 document list
- 包含这个关键词的所有 document 的数量:IDF(inverse document frequency)
- 这个关键词在每个 document 中出现的次数:TF(term frequency)
- 这个关键词在这个 document 中的次序
- 每个 document 的长度:length norm
- 包含这个关键词的所有 document 的平均长度
倒排索引不可变的好处
- 不需要锁,提升并发能力,避免锁的问题
- 数据不变,一直保存在 os cache 中,只要 cache 内存足够
- filter cache 一直驻留在内存,因为数据不变
- 可以压缩,节省 cpu 和 io 开销(因为不可变,所以可以压缩不存在修改)
倒排索引不可变的坏处
每次都要重新构建整个索引。
在之前的讲解中,一个重要概念,对于 document 的变更,内部都是先标记延迟删除,再新增一个文档
document 写入原理
会涉及到三个概念:
- buffer:内存
- segment:lucene 底层的 index 是分为多个 segment 的,每个 segment 都会存放部分数据
- commit:将 buffer 的数据写入到 segment 中
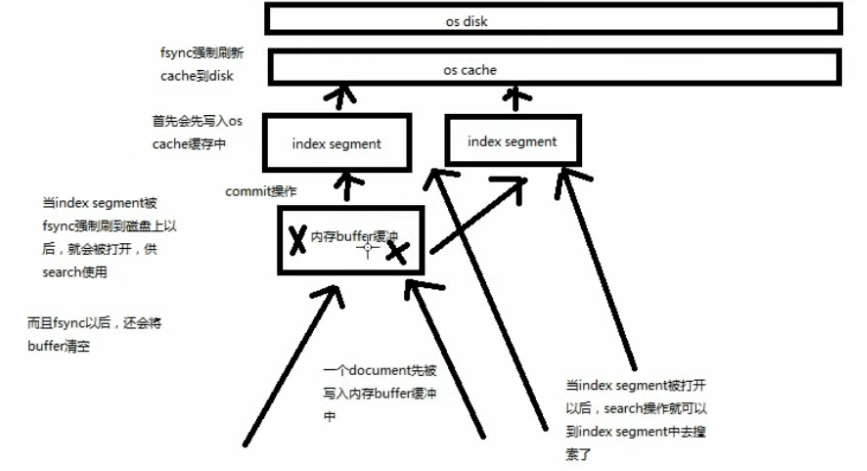
一个 document 的写入如上图流程:
- 数据写入 buffer
- commit point
- buffer 中的数据写入新的 index segment
- 等待在 os cache 中的 index segment 被 fsync 强制刷到磁盘上
- 新的 index sgement 被打开,供 search 使用
- buffer 被清空
document 删除原理
每次 commit point 时,会有一个 .del 文件,标记了哪些 segment 中的哪些 document 被标记为 deleted 了
搜索的时候,会依次查询所有的 segment,从旧的到新的, 比如被修改过的 document,在旧的 segment 中,会标记为 deleted,在新的 segment 中会有其新的数据
::: tip 对于这个原理概念思路的东西,听一听就好了,至于怎么实现的,貌似所有书籍教程基本上都不会解说 :::

NRT 实现
前面流程的问题,每次都必须等待 fsync 将 segment 刷入磁盘, 才能将 segment 打开供 search 使用,这样的话,从一个 document 写入,到它可以被搜索,可能会超过1分钟!!!
这就不是近实时的搜索了!!!主要瓶颈在于 fsync 实际发生磁盘IO写数据进磁盘,是很耗时的。
写入流程别改进如下:
- 数据写入 buffer
- 每隔一定时间,buffer 中的数据被写入 segment 文件,但是先写入 os cache
- 只要 segment 写入 os cache,那就直接打开供 search 使用,不立即执行 commit
数据写入 os cache,并被打开供搜索的过程,叫做 refresh,默认是每隔 1秒 refresh 一次。 也就是说,每隔一秒就会将 buffer 中的数据写入一个新的 index segment file,先写入 os cache 中。所以,es 是近实时的,数据写入到可以被搜索,默认是 1秒。
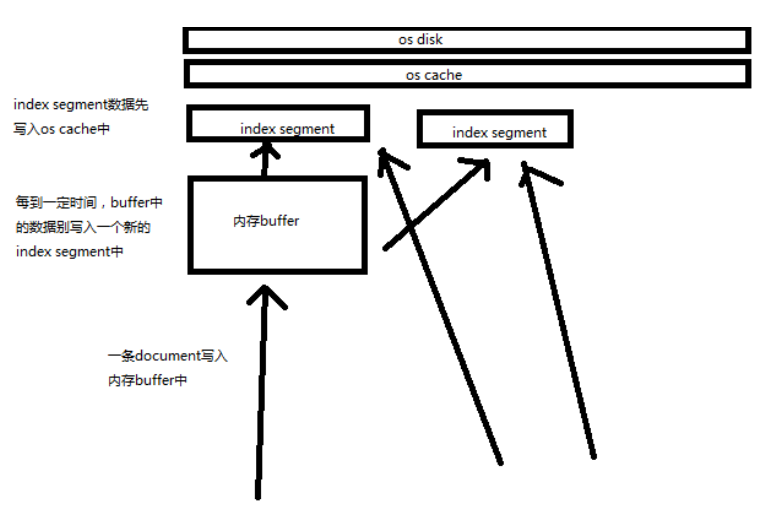
refresh 间隔修改
POST /my_index/_refresh,可以手动 refresh,一般不需要手动执行,没必要,让 es 自己搞就可以了
比如说,我们现在的时效性要求,比较低,只要求一条数据写入 es,一分钟以后才让我们搜索到就可以了,那么就可以调整 refresh interval
PUT /my_index
{
"settings": {
"refresh_interval": "30s"
}
}
这里支持刷新到 os cache 中,commit (将 os cache 中的内容刷新到硬盘上)操作是什么时候调用的呢?稍后就会讲。。。
durability 可靠存储
再次优化的写入流程(增加了 translog 文件)
- 数据写入 buffer 缓冲和 translog 日志文件
- 每隔一秒钟,buffer 中的数据被写入新的 segment file,并进入 os cache,此时 segment 被打开并供 search 使用
- buffer 被清空
- 重复 1~3,新的 segment 不断添加,buffer 不断被清空,而 translog 中的数据不断累加
-
当 translog 长度达到一定程度的时候,commit 操作发生
- buffer 中的所有数据写入一个新的 segment,并写入 os cache,打开供使用
- buffer 被清空
- 一个 commit ponit 被写入磁盘,标明了所有的 index segment
- filesystem cache 中的所有 index segment file 缓存数据,被 fsync 强行刷到磁盘上

宕机后数据恢复流程
基于 translog 和 commit point,如何进行数据恢复
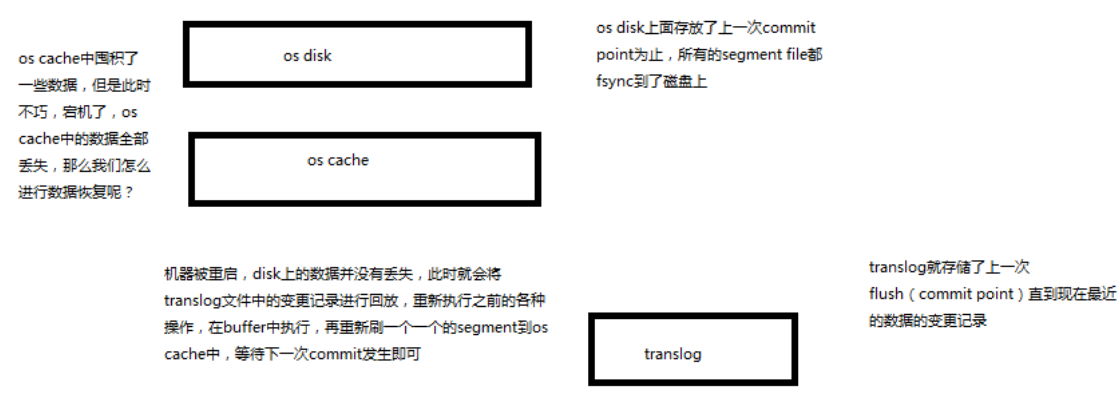
flush 操作
fsync + 清空 translog,就是 flush,默认每隔 30分钟 flush 一次,或者当 translog 过大的时候,也会 flush
POST /my_index/_flush,一般来说别手动 flush,让它自动执行就可以了
translog
每隔 5秒 被 fsync 一次到磁盘上。在一次增删改操作之后,当 fsync 在 primary shard 和 replica shard 都成功之后,那次增删改操作才会成功
但是这种在一次增删改时强行 fsync translog 可能会导致部分操作比较耗时,也可以允许部分数据丢失,设置异步 fsync translog
PUT /my_index/_settings
{
"index.translog.durability": "async",
"index.translog.sync_interval": "5s"
}
海量磁盘文件合并
每秒一个 segment file,文件过多,而且每次 search 都要搜索所有的 segment,很耗时
默认会在后台执行 segment merge 操作,在 merge 的时候,被标记为 deleted 的 document 也会被彻底物理删除
每次 merge 操作的执行流程
- 选择一些有相似大小的 segment,merge 成一个大的 segment
- 将新的 segment flush 到磁盘上去
- 写一个新的 commit point,包括了新的 segment,并且排除旧的那些 segment
- 将新的 segment 打开供搜索
- 将旧的 segment 删除
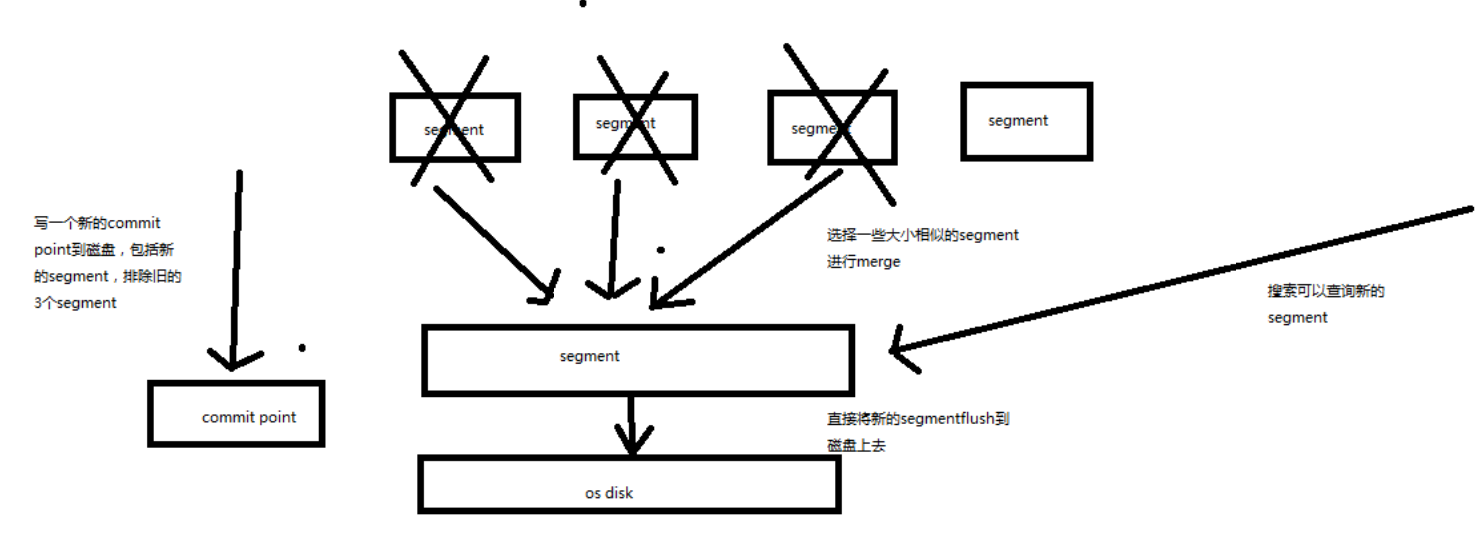
_optimize
也就是上述讲解的 segment merge 操作
OST /my_index/_optimize?max_num_segments=1,尽量不要手动执行,让它自动默认执行就可以了
可以在 elasticsearch-5.2.0\data\nodes\0\indices\7jrPOaovTP6-Z0X9bUIowA\0 看到一些文件
index/segments_1
translog/translog-1.tlog
练习例子-员工管理
本章节会记录原始以下章节
-
- Java API初步使用_员工管理案例:基于 Java 实现员工信息的增删改查
-
- Java API初步使用_员工管理案例:基于 Java 对员工信息进行复杂的搜索操作
-
- Java API初步使用_员工管理案例:基于 Java 对员工信息进行聚合分析
强调一下,我们的es讲课的风格
-
es 这门技术有点特殊,跟比如其他的像纯 java 的课程,比如分布式课程,或者大数据类的课程,比如 hadoop,spark,storm 等。不太一样
-
es 非常重要的一个 api,是它的 restful api,你自己思考一下,掌握这个 es 的 restful api,可以让你执行一些核心的运维管理的操作,比如说创建索引,维护索引,执行各种 refresh、flush、optimize 操作,查看集群的健康状况,比如还有其他的一些操作,就不在这里枚举了。或者说探查一些数据,可能用 java api 并不方便。
-
es 的学习,首先,你必须学好 restful api,然后才是你自己的熟悉语言的 api,java api。
这个《核心知识篇(上半季)》,其实主要还是打基础,包括核心的原理,还有核心的操作,还有部分高级的技术和操作,大量的实验,大量的画图,最后初步讲解怎么使用 java api
《核心知识篇(下半季)》,包括深度讲解搜索这块技术,还有聚合分析这块技术,包括数据建模,包括 java api 的复杂使用,有一个项目实战
示例简介
含有如下信息的属性:
员工信息
- 姓名
- 年龄
- 职位
- 国家
- 入职日期
- 薪水
项目搭建,我使用 gradle 构建项目,依赖如下
dependencies {
testCompile group: 'junit', name: 'junit', version: '4.12'
compile 'org.elasticsearch.client:transport:5.2.2'
compile 'org.apache.logging.log4j:log4j-api:2.7'
compile 'org.apache.logging.log4j:log4j-core:2.7'
}
log4j2.properties
appender.console.type = Console
appender.console.name = console
appender.console.layout.type = PatternLayout
rootLogger.level = info
rootLogger.appenderRef.console.ref = console
transportClient CRUD
使用 transport 进行一个简单的测试用例,来测试是否能正常与 es 交互
package cn.mrcode.newstudy.elasticsearch;
import org.elasticsearch.action.delete.DeleteResponse;
import org.elasticsearch.action.get.GetResponse;
import org.elasticsearch.action.index.IndexResponse;
import org.elasticsearch.action.update.UpdateResponse;
import org.elasticsearch.client.transport.TransportClient;
import org.elasticsearch.common.settings.Settings;
import org.elasticsearch.common.transport.InetSocketTransportAddress;
import org.elasticsearch.common.xcontent.XContentFactory;
import org.elasticsearch.transport.client.PreBuiltTransportClient;
import org.junit.Before;
import org.junit.Test;
import java.io.IOException;
import java.net.InetAddress;
import java.net.UnknownHostException;
/**
* @author : zhuqiang
* @date : 2019/1/22 21:59
*/
public class DemoTest {
private TransportClient client = null;
@Before
public void createClient() throws UnknownHostException {
// 集群连接
client = new PreBuiltTransportClient(Settings.EMPTY)
.addTransportAddress(new InetSocketTransportAddress(InetAddress.getByName("localhost"), 9300))
// // 在同一台机器上面启动多个实例,端口会变化,多个地址在这里添加
// .addTransportAddress(new InetSocketTransportAddress(InetAddress.getByName("localhost"), 9301))
;
}
@Test
public void createEmployee() throws IOException {
IndexResponse response = client.prepareIndex("company", "employee", "1")
.setSource(XContentFactory.jsonBuilder()
.startObject()
.field("name", "jack")
.field("age", 27)
.field("position", "technique")
.field("country", "china")
.field("join_date", "2017-01-01")
.field("salary", 10000)
.endObject())
.get();
System.out.println(response.getResult());
}
// 按 id 查询文档
@Test
public void getById() {
// 很奇葩的一个现象,执行后该对象 toString 方法是一个错误栈,实际上是可以获取到数据的
// Error building toString out of XContent: com.fasterxml.jackson.core.JsonGenerationException: Can not start an object, expecting field name (context: Object)
GetResponse response = client.prepareGet("company", "employee", "1").get();
System.out.println(response.getSource());
}
@Test
public void update() throws IOException {
UpdateResponse updateResponse = client.prepareUpdate("company", "employee", "1")
.setDoc(XContentFactory.jsonBuilder()
.startObject()
.field("age", "26")
.endObject())
.get();
System.out.println(updateResponse);
}
@Test
public void delete() {
DeleteResponse response = client.prepareDelete("company", "employee", "1").get();
System.out.println(response);
}
}
复杂搜索
我都忍不住吐槽了,这个搜索也太简单了。全是一个条件字段查询啊。难道 es 就只能这样吗?
public class EmployeeSearchTest {
private TransportClient client = null;
@Before
public void createClient() throws UnknownHostException {
client = new PreBuiltTransportClient(Settings.EMPTY)
.addTransportAddress(new InetSocketTransportAddress(InetAddress.getByName("localhost"), 9300))
;
}
/**
* 准备数据
*/
@Test
public void prepareData() throws Exception {
client.prepareIndex("company", "employee", "1")
.setSource(XContentFactory.jsonBuilder()
.startObject()
.field("name", "jack")
.field("age", 27)
.field("position", "technique software")
.field("country", "china")
.field("join_date", "2017-01-01")
.field("salary", 10000)
.endObject())
.get();
client.prepareIndex("company", "employee", "2")
.setSource(XContentFactory.jsonBuilder()
.startObject()
.field("name", "marry")
.field("age", 35)
.field("position", "technique manager")
.field("country", "china")
.field("join_date", "2017-01-01")
.field("salary", 12000)
.endObject())
.get();
client.prepareIndex("company", "employee", "3")
.setSource(XContentFactory.jsonBuilder()
.startObject()
.field("name", "tom")
.field("age", 32)
.field("position", "senior technique software")
.field("country", "china")
.field("join_date", "2016-01-01")
.field("salary", 11000)
.endObject())
.get();
client.prepareIndex("company", "employee", "4")
.setSource(XContentFactory.jsonBuilder()
.startObject()
.field("name", "jen")
.field("age", 25)
.field("position", "junior finance")
.field("country", "usa")
.field("join_date", "2016-01-01")
.field("salary", 7000)
.endObject())
.get();
client.prepareIndex("company", "employee", "5")
.setSource(XContentFactory.jsonBuilder()
.startObject()
.field("name", "mike")
.field("age", 37)
.field("position", "finance manager")
.field("country", "usa")
.field("join_date", "2015-01-01")
.field("salary", 15000)
.endObject())
.get();
}
/**
* <pre>
* 搜索:需求如下
* (1)搜索职位中包含 technique 的员工
* (2)同时要求 age 在 30 到 40 岁之间
* (3)分页查询,查找第一页
* </pre>
*/
@Test
public void search() {
SearchResponse searchResponse = client.prepareSearch("company")
.setTypes("employee")
.setQuery(QueryBuilders.matchQuery("position", "technique"))
.setPostFilter(QueryBuilders.rangeQuery("age").from(30).to(40))
.setFrom(0)
.setSize(1)
.get();
SearchHit[] hits = searchResponse.getHits().getHits();
for (SearchHit hit : hits) {
System.out.println(hit.getSourceAsString());
}
}
}
查询结果
{"name":"marry","age":35,"position":"technique manager","country":"china","join_date":"2017-01-01","salary":12000}
上述 java 查询对于的 resultful api 代码如下
GET /company/employee/_search
{
"query": {
"bool": {
"must": [
{
"match": {
"position": "technique"
}
}
],
"filter": {
"range": {
"age": {
"gte": 30,
"lte": 40
}
}
}
}
},
"from": 0,
"size": 1
}
聚合分析
package cn.mrcode.newstudy.elasticsearch;
import org.elasticsearch.action.search.SearchResponse;
import org.elasticsearch.client.transport.TransportClient;
import org.elasticsearch.common.settings.Settings;
import org.elasticsearch.common.transport.InetSocketTransportAddress;
import org.elasticsearch.search.aggregations.AggregationBuilders;
import org.elasticsearch.search.aggregations.bucket.histogram.DateHistogramInterval;
import org.elasticsearch.transport.client.PreBuiltTransportClient;
import org.junit.Before;
import org.junit.Test;
import java.net.InetAddress;
import java.net.UnknownHostException;
import java.util.concurrent.ExecutionException;
/**
* 聚合分析
*
* @author : zhuqiang
* @date : 2019/1/22 23:18
*/
public class EmployeeAggrTest {
private TransportClient client = null;
@Before
public void createClient() throws UnknownHostException {
client = new PreBuiltTransportClient(Settings.EMPTY)
.addTransportAddress(new InetSocketTransportAddress(InetAddress.getByName("localhost"), 9300))
;
}
/**
* <pre>
* 需求:
* (1)首先按照 country 国家来进行分组
* (2)然后在每个 country 分组内,再按照入职年限进行分组
* (3)最后计算每个分组内的平均薪资
* </pre>
*/
@Test
public void aggr() throws ExecutionException, InterruptedException {
SearchResponse searchResponse = client.prepareSearch("company")
.setTypes("employee")
.addAggregation(
AggregationBuilders
// 前面的是对该操作取名,后面的是真实的字段
.terms("group_by_country")
.field("country")
.subAggregation(
AggregationBuilders
.dateHistogram("group_by_join_date")
.field("join_date")
.dateHistogramInterval(DateHistogramInterval.YEAR) // 按照年来分
.subAggregation(
AggregationBuilders
.avg("ave_salary")
.field("salary")
)
)
)
.execute()
.get();
System.out.println(searchResponse);
}
}
可以看到上面的操作,添加一个聚合操作,然后在该聚合操作里面不断下钻
如果运行报错
java.util.concurrent.ExecutionException: RemoteTransportException[[sEvAlYx][127.0.0.1:9300][indices:data/read/search]]; nested: SearchPhaseExecutionException[all shards failed]; nested: RemoteTransportException[[sEvAlYx][127.0.0.1:9300][indices:data/read/search[phase/query]]]; nested: IllegalArgumentException[Fielddata is disabled on text fields by default. Set fielddata=true on [country] in order to load fielddata in memory by uninverting the inverted index. Note that this can however use significant memory.];
前面的课程遇到过的,进行聚合分析/排序的时候,需要把 text 类型的 Fielddata 属性打开
删除索引,手动重建后,再运行上一个例子中的数据准备插入数据
PUT /company
{
"mappings": {
"employee": {
"properties": {
"age": {
"type": "long"
},
"country": {
"type": "text",
"fields": {
"keyword": {
"type": "keyword",
"ignore_above": 256
}
},
"fielddata": true
},
"join_date": {
"type": "date"
},
"name": {
"type": "text",
"fields": {
"keyword": {
"type": "keyword",
"ignore_above": 256
}
}
},
"position": {
"type": "text",
"fields": {
"keyword": {
"type": "keyword",
"ignore_above": 256
}
}
},
"salary": {
"type": "long"
}
}
}
}
}
程序运行结果
{
"took": 244,
"timed_out": false,
"_shards": {
"total": 5,
"successful": 5,
"failed": 0
},
"hits": {
"total": 5,
"max_score": 1,
"hits": [
{
"_index": "company",
"_type": "employee",
"_id": "5",
"_score": 1,
"_source": {
"name": "mike",
"age": 37,
"position": "finance manager",
"country": "usa",
"join_date": "2015-01-01",
"salary": 15000
}
},
{
"_index": "company",
"_type": "employee",
"_id": "2",
"_score": 1,
"_source": {
"name": "marry",
"age": 35,
"position": "technique manager",
"country": "china",
"join_date": "2017-01-01",
"salary": 12000
}
},
{
"_index": "company",
"_type": "employee",
"_id": "4",
"_score": 1,
"_source": {
"name": "jen",
"age": 25,
"position": "junior finance",
"country": "usa",
"join_date": "2016-01-01",
"salary": 7000
}
},
{
"_index": "company",
"_type": "employee",
"_id": "1",
"_score": 1,
"_source": {
"name": "jack",
"age": 27,
"position": "technique software",
"country": "china",
"join_date": "2017-01-01",
"salary": 10000
}
},
{
"_index": "company",
"_type": "employee",
"_id": "3",
"_score": 1,
"_source": {
"name": "tom",
"age": 32,
"position": "senior technique software",
"country": "china",
"join_date": "2016-01-01",
"salary": 11000
}
}
]
},
"aggregations": {
"group_by_country": {
"doc_count_error_upper_bound": 0,
"sum_other_doc_count": 0,
"buckets": [
{
"key": "china",
"doc_count": 3,
"group_by_join_date": {
"buckets": [
{
"key_as_string": "2016-01-01T00:00:00.000Z",
"key": 1451606400000,
"doc_count": 1,
"ave_salary": {
"value": 11000
}
},
{
"key_as_string": "2017-01-01T00:00:00.000Z",
"key": 1483228800000,
"doc_count": 2,
"ave_salary": {
"value": 11000
}
}
]
}
},
{
"key": "usa",
"doc_count": 2,
"group_by_join_date": {
"buckets": [
{
"key_as_string": "2015-01-01T00:00:00.000Z",
"key": 1420070400000,
"doc_count": 1,
"ave_salary": {
"value": 15000
}
},
{
"key_as_string": "2016-01-01T00:00:00.000Z",
"key": 1451606400000,
"doc_count": 1,
"ave_salary": {
"value": 7000
}
}
]
}
}
]
}
}
}
对于的 restfull api
可以看到 restfull api 与 java 代码中的讨论几乎上是一致的
GET /company/employee/_search
{
"aggs": {
"group_by_country": {
"terms": {
"field": "country"
},
"aggs": {
"group_by_join_date": {
"date_histogram": {
"field": "join_date",
"interval": "year"
},
"aggs": {
"ave_salary": {
"avg": {
"field": "salary"
}
}
}
}
}
}
}
}
怎么使用 api 来获取到结果数据呢?
// 怎么用 api 来获取里面的分组结果数据呢?
// 这个只能看着结果,debug 来获取到层级对象
// 它的类型和之前查询的类型对应
StringTerms groupByCountry = (StringTerms) searchResponse.getAggregations().asMap().get("group_by_country");
List<Terms.Bucket> buckets = groupByCountry.getBuckets();
for (Terms.Bucket bucket : buckets) {
String keyAsString = bucket.getKeyAsString();
System.out.println("==== " + keyAsString);
InternalDateHistogram groupByJoinDate = (InternalDateHistogram) bucket.getAggregations().asMap().get("group_by_join_date");
List<Histogram.Bucket> groupByJoinDateBuckets = groupByJoinDate.getBuckets();
for (Histogram.Bucket groupByJoinDateBucket : groupByJoinDateBuckets) {
System.out.println("===== " + groupByJoinDateBucket.getKeyAsString());
InternalAvg aveSalary = (InternalAvg) groupByJoinDateBucket.getAggregations().asMap().get("ave_salary");
System.out.println("======" + aveSalary.getValueAsString());
}
}
System.out.println();
}
java api 获取的结果
可以看到 java api 来获取结果确实很麻烦
==== china
===== 2016-01-01T00:00:00.000Z
======11000.0
===== 2017-01-01T00:00:00.000Z
======11000.0
==== usa
===== 2015-01-01T00:00:00.000Z
======15000.0
===== 2016-01-01T00:00:00.000Z
======7000.0